This section describes the Dashboard’s view options, and also details the user interface (UI) icon tools shown across all OTIS windows.
You automatically access the Dashboard immediately upon logging into the system; otherwise, click DASHBOARD in the navigation pane located in the left-most section of all OTIS windows.
Topics in this section include:
Using the Dashboard’s HOME View
Using the Dashboard’s TRAINING View
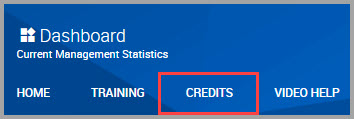
Using the Dashboard’s CREDIT View
Understanding OTIS System User Interface Tools
Using the Navigation Pane
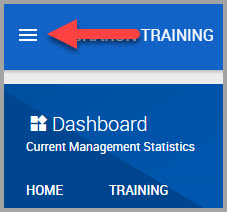
The navigation pane is where you can access the various OTIS feature modules.
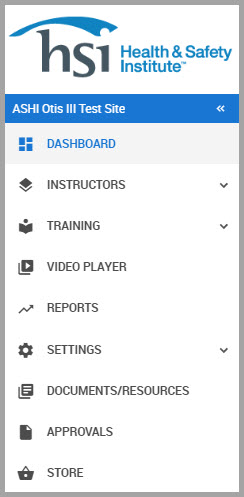
The navigation pane also:
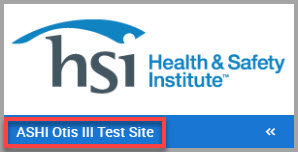
•Identifies the site name that you logged into.
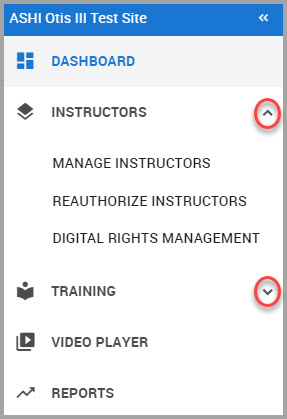
•Displays carets (circled in the following image) beside a feature module name when the module includes additional sub-modules. Click the module name to reveal its sub-modules.
•You can hide and display the navigation pane from any location in the application by clicking the following icon.
Using the Dashboard’s Views
The OTIS dashboard provides at-a-glance details for its views:
HOME VIEW—Displays basic details about your Training Center. See Using the Dashboard’s HOME View for more information.
TRAINING—Provides training statistics, a calendar where you can find and create new classes, and where you can check your credit balance. See Using the Dashboard’s TRAINING View for more information.
CREDITS—Where you can view your credit balance and purchase credits. See Purchasing Credits for more information.
VIDEO HELP—This section is publishing soon.
Using the Dashboard’s HOME View
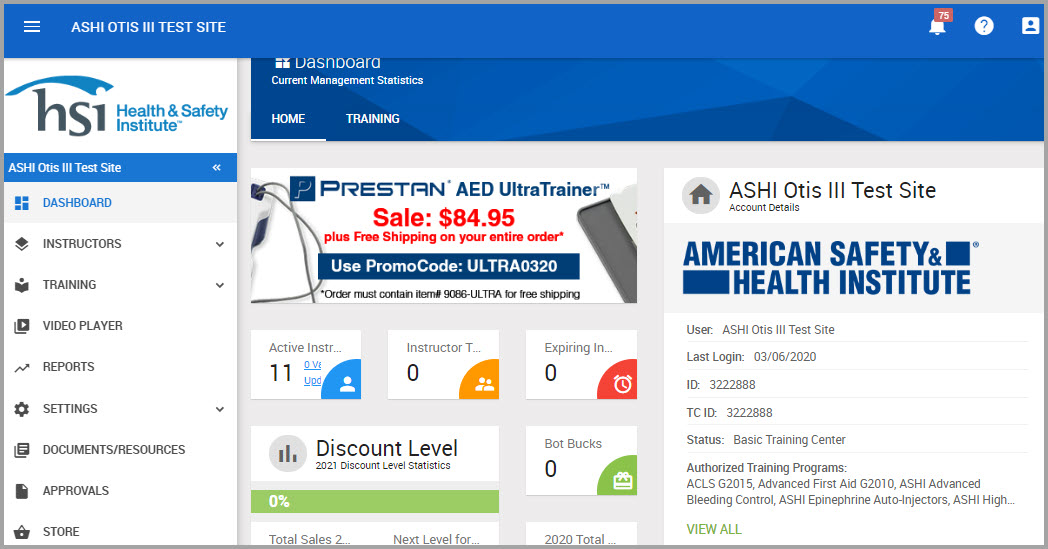
When you launch OTIS, the system displays the Dashboard’s HOME view by default. The top portion of this window is shown in the image below. A table describing the number keys immediately follows the image.
|
Number Key |
Description |
|---|---|
|
1 |
Tabs to access the HOME or TRAINING Dashboard. |
|
2 |
Click the arrows to toggle the banner’s display. |
|
3 |
Identifies your Training Center. |
|
4 |
Displays a snapshot of your Training Center’s statistics. |
|
5 |
Provides basic account details. |
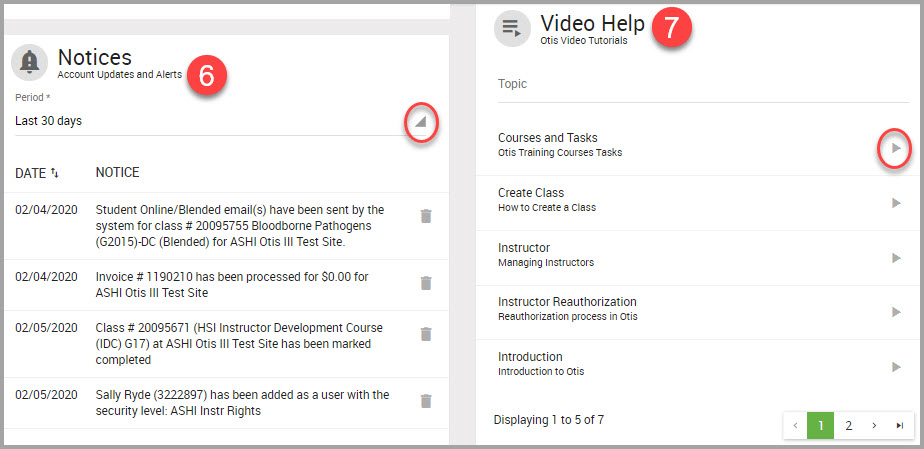
The lower-portion of the HOME dashboard is shown below, with a table describing the number keys following the image.
|
Number Key |
Description |
|---|---|
|
6 |
Where system notifications display. Click the Period* drop-down menu (shown circled) to filter messages per a specific time frame. Click VIEW HISTORY, located at the bottom of the Notices section, (not shown in the image) to open the Notice History window to locate recent or archived notices. In the Notice History window, you can also choose to ARCHIVE ALL NOTICES, or individually archive a notice by clicking its Archive icon |
|
7 |
Access Video Help by clicking Topic and entering a feature name. Once you find the feature you are looking for, click the topic’s arrow (shown circled) to play. Locate additional videos by clicking the page numbers in the lower portion of this section. |
Using the Dashboard’s TRAINING View
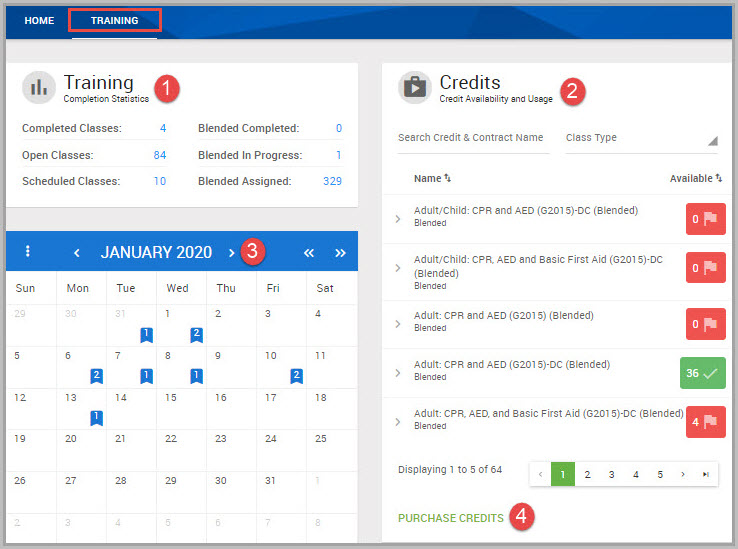
Click the TRAINING tab to access this window.
The number keys shown in the previous image are described below:
|
Number Key |
Descriptions |
|---|---|
|
1 |
Displays a snapshot of training statistics. |
|
2 |
Displays your available credits. |
|
3 |
Displays your training schedule, and is also where you can click on a date and either display that day’s training schedule, view that day’s course roster, or create a course for that day. |
|
4 |
Click to purchase credits. |
Using the Dashboard’s CREDIT View
Click the CREDITS tab to access this window.
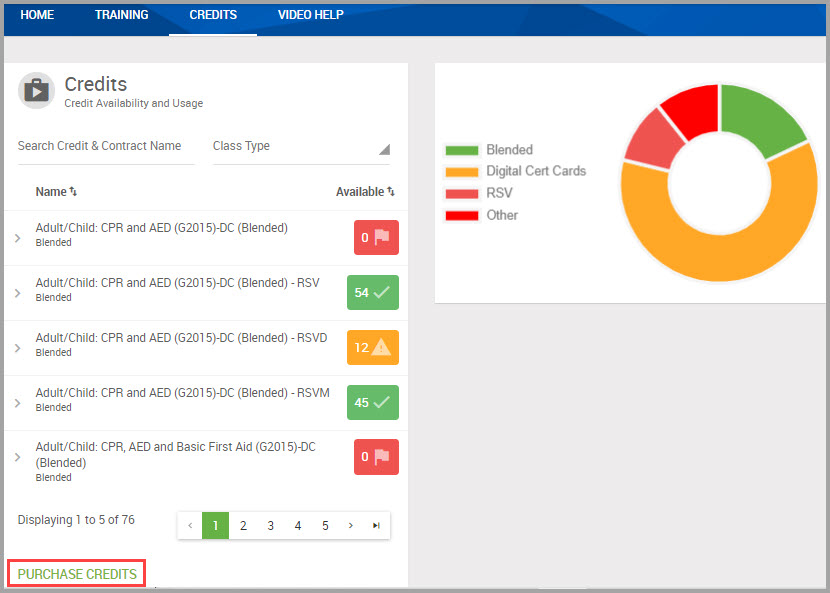
In this window you can:
•Check your credit balances by Class Type (Blended/Digital Cert Cards/Online/Other).
•Perform a Search to display the Credit, Contract Name or Class Type.
•Buy credits by clicking PURCHASE CREDITS.
Reviewing your Credit Balance
Step 1Click DASHBOARD in the navigation pane.
Step 2Click the CREDITS tab.
Step 3Perform a Search by Credit, Contract Type, or Class Type for the course that you want to purchase.
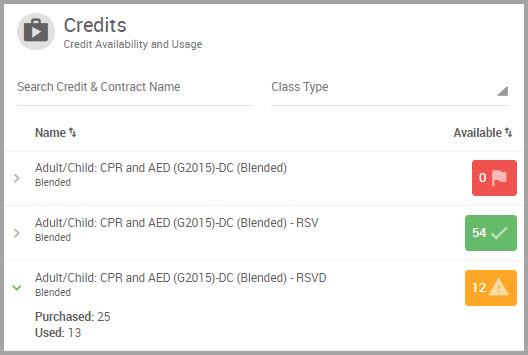
Step 4Review your Available credit balances by:
•Noting the credit number shown below the Available column.
•To see which credits you purchased and used, click the icon to reveal this additional information.
Purchasing Credits
Step 1Click DASHBOARD in the navigation pane.
Step 2Click the CREDITS tab.
Step 3Click the PURCHASE CREDITS hyperlink. You may need to scroll down the page to see this link.
Step 4In the Credits dialog, search for the credits you need by:
•Making a selection from the Category field. Results immediately display.
•Choosing a Group. Selections are based on the Category you selected.
•Entering key words in the Search Categories & Products field. Results display as you type.
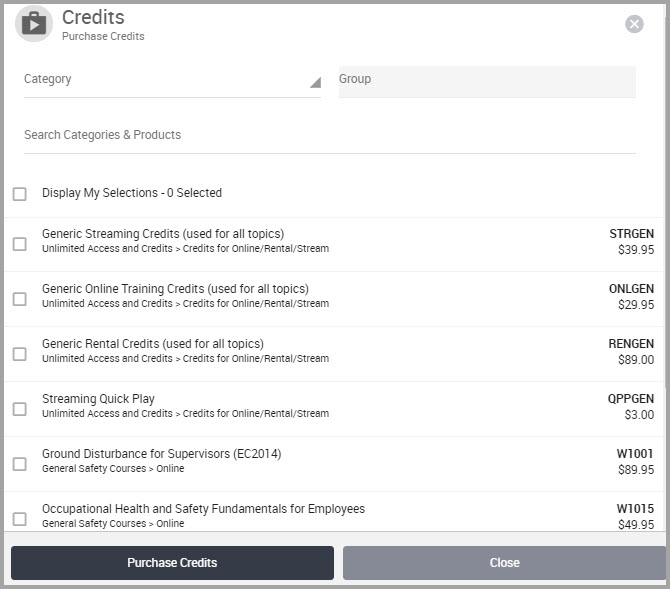
Step 5Make your selection by clicking the box next to the product name.
Step 6(Optional) Repeat for each product you need.
Step 7When you finish, click Purchase Credits.
Step 8In the HSI Store: Checkout/Cart Details page, review the cart’s contents and if you are satisfied, click Continue Checkout.
Step 9Read the Purchase Agreement by scrolling down its page.
Step 10 Click Accept.
Step 11 In the Shopping Cart Details page:
•(Optional) Enter any Promotional Code you may have, and click Apply Promo.
Step 12 You can purchase by using a new or saved credit card, or with a PO:
•To Pay with a New Credit Card:
(a)Click the Credit Card radio button.
(b)Scroll down the page and click Pay.
(c)In the Card Information dialog box, enter your Card Number.
(d)Enter the Exp. Date.
(e)Enter the three-digit Card Code shown on the back of your card.
(f)Enter your First Name.
(g)Enter your Last Name.
(h)Enter the Zip code associated with the card’s billing address.
(i)Click Submit.
•To Pay Using a Saved Credit Card:
(a)Click the radio button for the saved card you want to use.
(b)Click Pay with Saved Card.
•To Pay Using a Purchase Order:
(a)Enter the purchase order number in the Invoice field.
(b)(Required) Provide any additional information in the PO (Optional) field.
(c)Click Process Order. A message confirms your order.
Understanding OTIS System User Interface Tools
The following icons described in this chapter provides additional system tools. Topics include:
Using Show/Hide Navigation View
Viewing Supported Web Browsers/Versions
Using Show/Hide Navigation View
Located at the top-left section of all system’s windows is the Show/Hide Navigation View icon. Click this icon to display or hide the system’s navigation pane.
Viewing System Notifications
Located at the top-right section of all system’s windows is the Notification icon, which displays the number of system notifications pending your review.
Click this icon to view your notifications.
Accessing Support
The Support icon is located at the top-right section of all system windows. Click this icon to reveal the following support resources that we offer.
•Access step-by-step instructions for the system features by clicking Browse Help Topics. In the Help system portal, you can search for and print out the topics that you need assistance with.
•Request assistance from our Client Support team by clicking Create Support Ticket to fill out a support form.
Note Fields accompanied by an asterisk (*) requires a response.

Be sure to provide as much information as possible about the problem that you are experiencing. This information may include the browser you are using, screen shots of an issue, and so on.
•Contact Client Support 1-877-440-6049 to reach a Technical Support team member.
•Click Minimum System Requirements to review:
—Viewing Supported Web Browsers/Versions
•Click to learn about our Privacy Policy
Minimum System Requirements
To ensure you work efficiently with our system, review the following minimum system requirements:
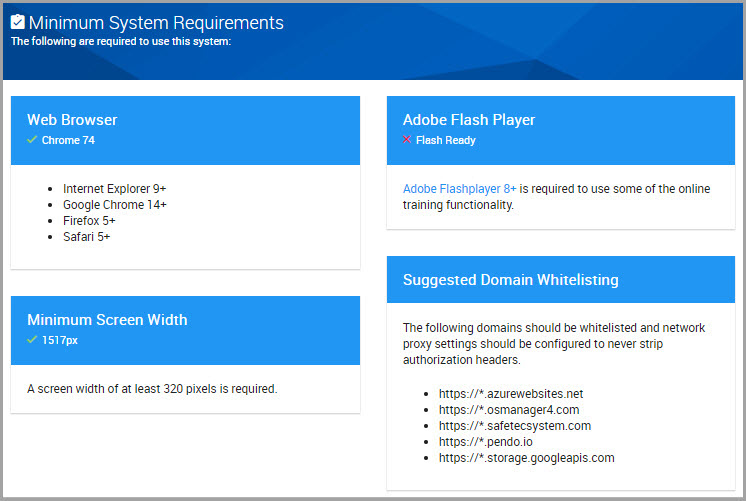
Viewing Supported Web Browsers/Versions
Ensure you are logging into the system using any of the browsers, and their version numbers, listed in this section of the window.
Minimum Screen Width
Confirm that your device’s display is set to at least 320 pixels for optimal viewing experience.
Adobe Flash Player
Adobe Flash is required for various online training functions.
Domains to Whitelist
A whitelist contains items such as email addresses, networks, websites, and domains that are authorized by your network administrator to access and communicate with your network.
Provide your network administrator with the domains listed in this section of the dashboard to ensure your access to our system.
Using the Profile Menu
The Profile icon is located in the top-right corner of system windows.
Click this icon to
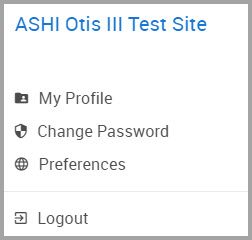
launch the following menu.
Menu selections include:
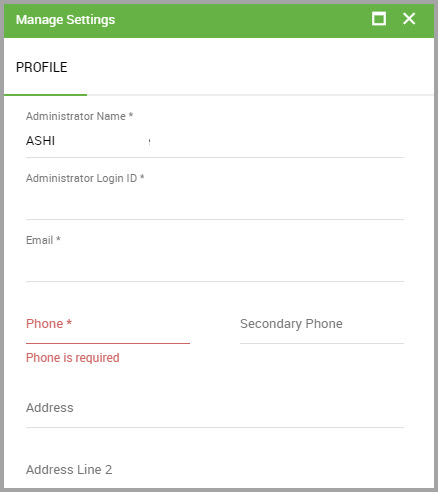
•My Profile—Click to launch the Manage Settings page where you can modify your profile details. When you finish updating, scroll down the window and click UPDATE ADMINISTRATOR.
Note Fields accompanied by an asterisk (*) requires input.
•Change Password—Click to change your password using at least eight alpha-numeric characters.
•Preferences—Click to specify various system preferences.
Note Fields accompanied by an asterisk (*) requires input.
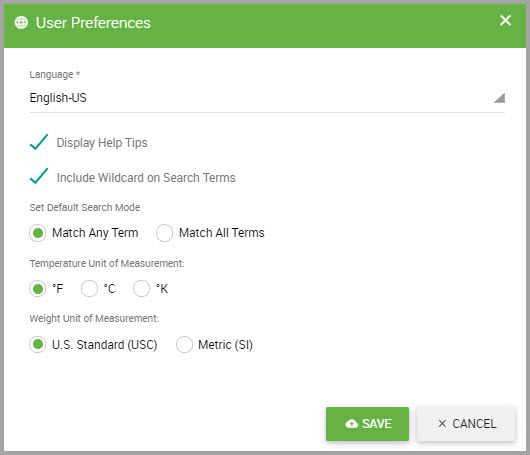
—Choose your system’s Language from the drop-down menu.
—Display Help Tips is enabled by default to display UI tool tips as you use the system. De-select if you do not want these tips to display.
Note If you want to set help tips globally, contact our Client Support team. See Accessing Support to learn how to create a Support Ticket.
—Include Wildcard on Search Terms automatically appends wildcards to maximize search results. For example, when this feature is enabled and if you enter the search term “Advanced,” search results include:
Advanced
Advanced First Aid
Note You must also select Match Any Term for this feature to perform.
—Set Default Search Mode
Match Any Term returns information based on all the terms you enter in Search fields.
Match All Terms returns data based on terms you enter in the order you entered them.
—Temperature Unit of Measurement
Set the Temperament Unit of Measurement (TUoM) you want automatically selected in system windows.
—Weight Unit of Measurement
Set the Weight Unit of Measurement (WUoM) you want automatically selected in system windows.