Learn to create and manage blended, classroom, and digital-cert card trainings, how to add the courses and tasks, and setting up a remote skills verification session. You can also learn how to navigate the two calendar views that are provided with the system.
Viewing Several Course Schedules Simultaneously in the Calendar View
Navigating the Calendar’s List View
Creating a Digital Cert Card Course
Certification using Remote Skills VerificationPUT RSV HERE
Viewing a Student’s Training History
Printing a Student’s Digital Certificate
Using the Classes Window
Access the Classes window by:
•Selecting TRAINING > CLASSES/BLENDED/ONLINE from the navigation pane.
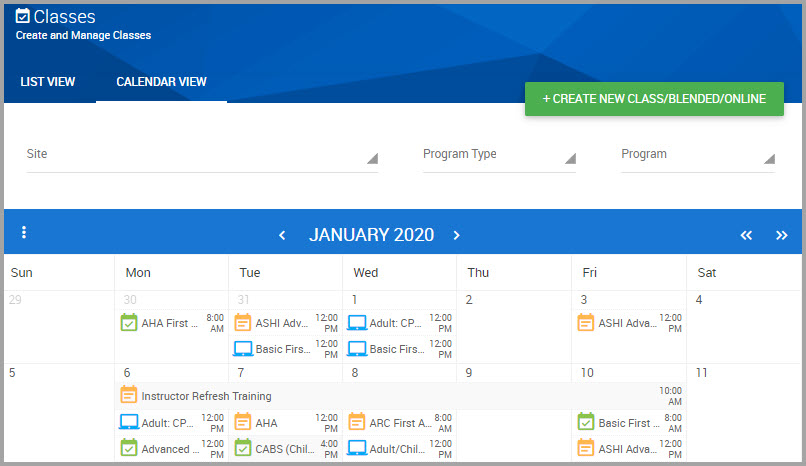
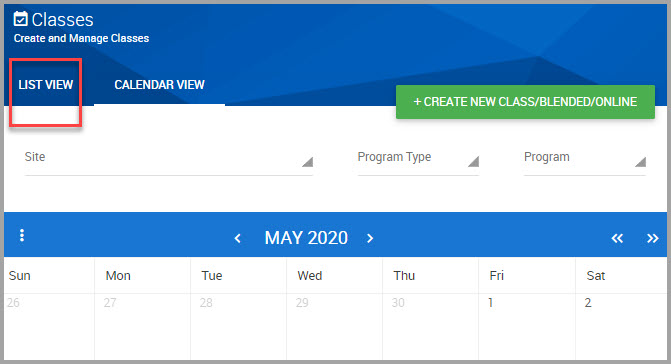
The Classes window provides two views in which to begin working with this module.
•Calendar View, which automatically opens by default, or
•List View
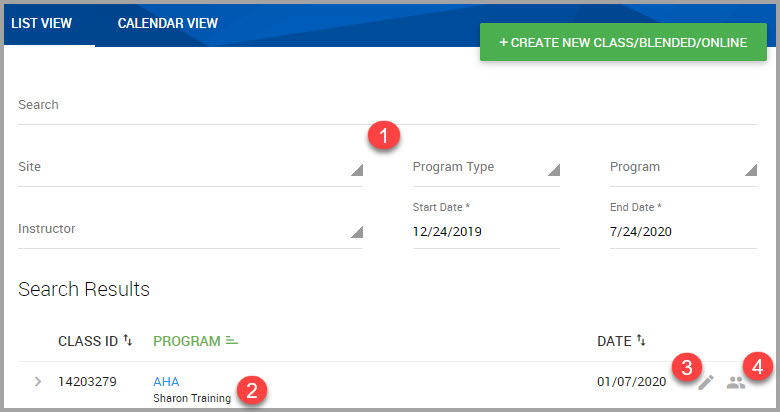
Switch views by clicking either tab, shown in the following image.
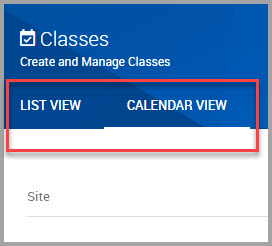
For additional information about these two views, see:
•Navigating the Calendar’s List View
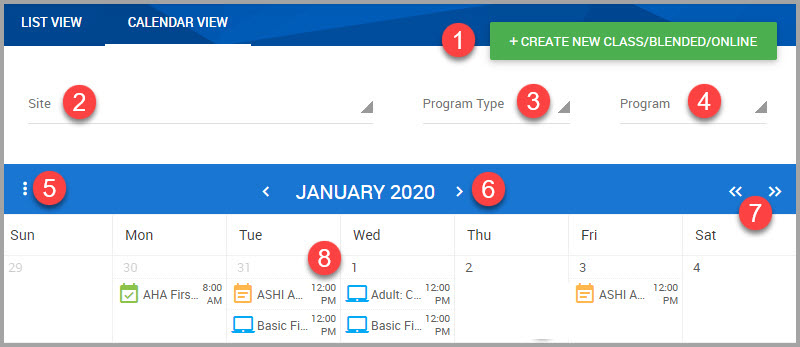
Navigating the Calendar View
At the top of the calendar are the following elements:
|
Number Key |
Description |
|---|---|
|
1 |
Click to build a class. |
|
2 |
Select a Site to narrow display results to the site you select. |
|
3 |
Select a Program Type to narrow display results to the program type you select. Choices include Blended, Classroom, Digital Certificates, and Online. |
|
4 |
Select a Program (course name) to narrow display results to the program you select. |
|
5 |
Click the ellipses to choose the calendar view you want to work with: month, week, agenda week, day and agenda day. Agenda views displays hourly breakdowns. |
|
6 |
Click the carats on either side of the month name to move forward or backwards by one month with each click. |
|
7 |
Click the double-carats to move forward one calendar year. |
|
8 |
Click the class title once to view the class roster. Click GO TO CLASS to access class building pages. Classes are color-coded so you can instantly recognize its program or if it is completed: Orange = Classroom | Digital Blue = Blended Green = Completed |
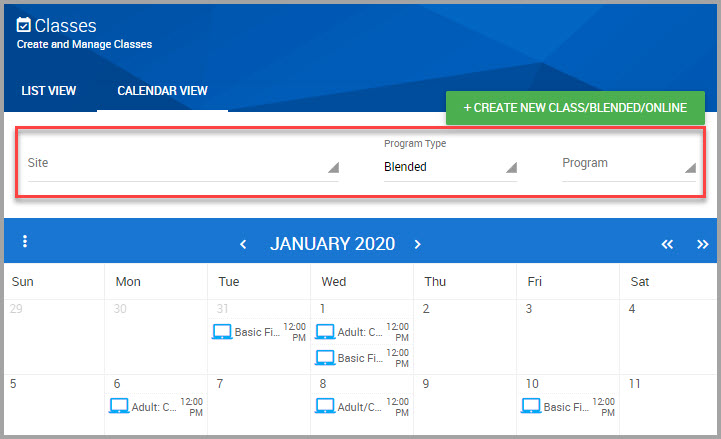
Viewing Several Course Schedules Simultaneously in the Calendar View
Besides clicking on a course name within the Calendar view, you can also access several course schedules at once by clicking and dragging your cursor on the calendar from the first date to the last date that you are interested in.
Step 1Select TRAINING > CLASSES/BLENDED/ONLINE from the navigation pane.
Step 2Using the Calendar View and in the calendar section of the window, find the dates of course schedules that you want to view.
Step 3On the calendar, click and hold down your cursor on the first date of classes.
Step 4Drag your cursor to the last date of courses.
Step 5Let go of the cursor to display the Class Schedule for the dates you selected.
In this page, you can also:
•Click the caret next to the class name to reveal the class’s basic details.
•Create a New Class.
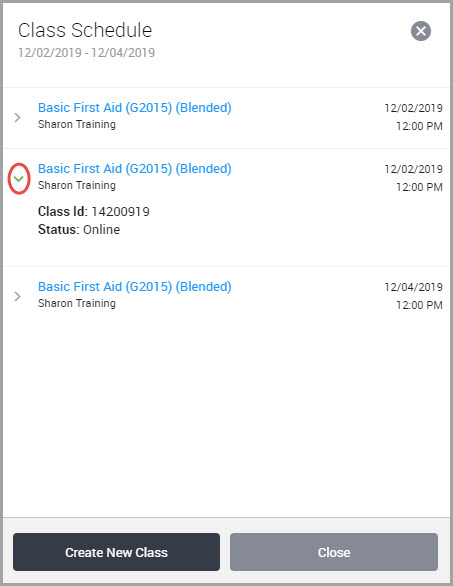
Step 6Click Close to dismiss the page.
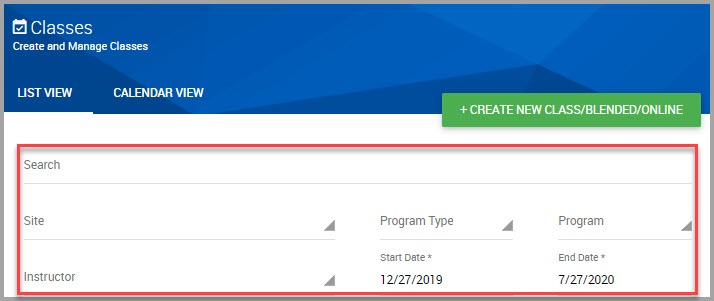
Navigating the Calendar’s List View
The List View provides the following additional filters that you can use to perform various training searches:
|
Number Key |
Description |
|---|---|
|
1 |
Use the search filters shown at the top of the window to narrow class results according to your selection(s). |
|
2 |
Double-click a hyperlinked class name to maneuver to the place where you left off during the course building process. |
|
3 |
Click the Edit Class icon to edit various course details. You can edit details up until you submit the course to the system. |
|
4 |
Click to View (the) Roster. You can also access the section of the course building process that you left off from. |
Note See Performing a Training Search for step-by-step instructions.
Creating and Managing Training Overview
This section provides instruction for building the basic details for a class.
Class program types includes:
•Blended—Blended courses combine the online learning component with either:
—a classroom, skills component
or
—a Remote Skills Verification (RSV) session to meet knowledge and skills objectives, and provide digital certification to students who successfully complete the cognitive and skills session. See for more information.
—Include the Digital Cert Card program type if you want to provide students digital certification at the successful completion of these courses This step is not necessary for the RSV program type.
Note When you complete building the online portion of the course, create and schedule the skills class that students must complete.
•Classroom—A course held in a conventional, on-site facility which provides both the lecture and the skills (“hands on”) components of the curriculum.
Note The Classroom program does not provide digital certification.
•Digital Cert Card—Select this program type when you want to provide students digital certification at the successful completion of a program.
The Otis user interface ushers you through the following processes for each program type:
—Enter Details—Where you select the course program type, the program, choose course dates, and the instructor(s) conducting the course.
—Build Roster—Where you can create your roster by adding new student names, selecting students with prior training, or uploading an Excel spreadsheet containing your student’s names and email address.
—Submit Class—Where you review and edit course details, enable the course email, and submit the class to the system.
—Track Progress—Where you can see how students are progressing through a course, and where you can add scores or pass/fail designations. For certain programs, there are additional features, such as copying a roster to build a new course, located in this section.
Before You Begin
•Check your credit balance before you begin building either a Blended, Remote Skills Verification, or Digital Certification course and make sure that the credits you have are applicable for the course you are building. For example, if you are building a Blended program, make sure you have enough Blended credits to begin building this program.
See for more information about how you can remotely evaluate and certify up to three students per remote session.
Creating a Blended Course
Step 1Select TRAINING > CLASSES/BLENDED/ONLINE from the navigation pane.
Step 2In the Create and Manage Classes window, click +CREATE NEW CLASS/BLENDED/ONLINE.
Step 3Enter Details from the following fields:
Note Fields accompanied with an asterisk (*) requires input.
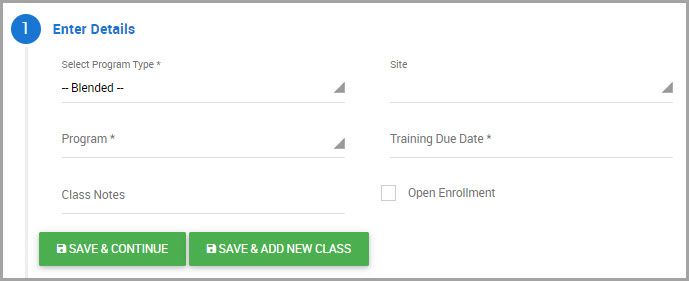
•Choose Blended from the Select Program Type* drop-down menu.
•Choose a Program* from its drop-down menu.
Note If you chose a Remote Skills Verification (RSV) program, an additional field (RSV Private Class) displays below the Open Enrollment check box, and is described later in these steps.
•(Optional) Include any Class Notes you may want to reference for the course. Students do not see these notes that you include.
•Ignore the Site field for this program type.
•Click the Training Due Date* field to pick the year, month, and day that this class must be completed in order to schedule the skills portion of the course.
•(Optional) Select Open Enrollment to generate a link for this course’s registration page. You can post this link to the training center’s website, or you can email the link to students so that they can self-register.
Clicking Open Enrollment also prompts the display of the following additional fields:
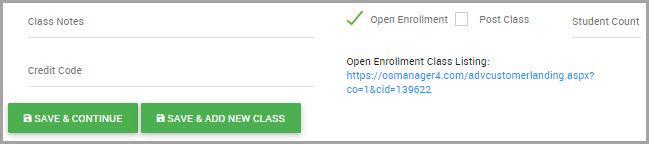
—Post Class—Click if you want the class to display on the HSI website when users perform a Training Center search.
—Student Count—Enter the maximum number of students that can enroll in this course.
—Credit Code—Enter the code that you created for this class so students do not have to enter a payment method when registering.
•(RSV programs only) Click RSV Private Class if you want to make the course visible to only those selected for the course roster (Step 5, below).
Step 4Decide to either:
•Click SAVE & ADD NEW CLASS if you have additional classes to build.
or
•SAVE & CONTINUE to begin adding students to the course roster.
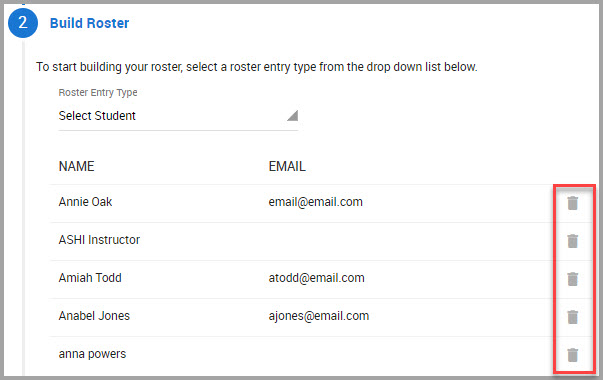
Step 5Click the Build Roster section header to choose among the following:
•Enter Student for students who have never attended ASHI/MEDIC & EMS Safety courses for your training center by:
—Entering a student’s first and last names, their email address, and then clicking SAVE.
•Select Student to add students who have previously been added to a roster at your training center by:
—Selecting student name(s), and then clicking Submit.
•Select Member is used to add instructors to the roster by:
—Selecting a member’s name(s), and then clicking SUBMIT MEMBERS.
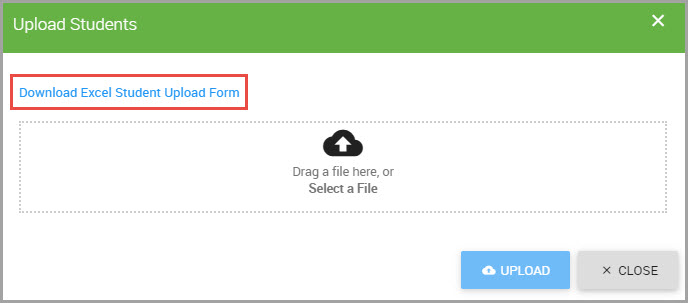
•Upload Students to invoke the Upload Students dialog box, where you can either:
—Import an Excel spreadsheet with a list of students that you have already prepared. The spreadsheet must contain their first and last names, along with their complete email address.
Note Excel (.xlsx) is the only document type this process accepts.
or (Recommended)
—Click the Download Excel Student Upload Form, which is prepared in the format that our system requires.
A) Save the file to your device.
B) Open the file and click Enable Editing to begin inputing student data.
C) Enter the following information into the spreadsheet:
-Student Last Name
-Student First Name
-Student Email Address
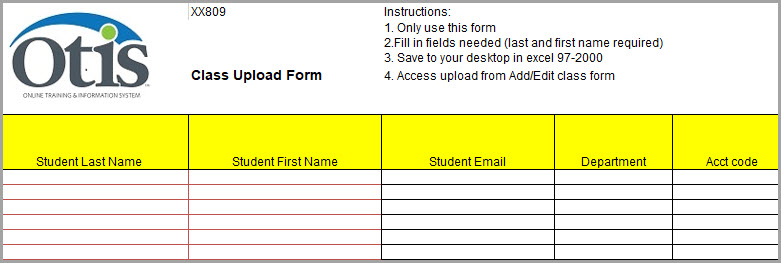
Note You do not need to provide input for Department and Acct Code columns.
D) Save the file to your device.
E) Return to the Build Roster page and click Select a File to upload the spreadsheet to the system.
F) Browse your system for the spreadsheet, and click Open.
G) After the spreadsheet name displays, click UPLOAD.
The page refreshes and student names display on the page.
Step 6(Optional) If you want to remove a student after submitting their name, you can remove them by:
(a)Returning to the Build Roster section.
(b)Finding their name, and click the trash icon shown at the end of their row.
Step 7Click the Review and Submit section header to reveal and review the course information you provided, and to make any edits to the course or student information to complete the building of this course
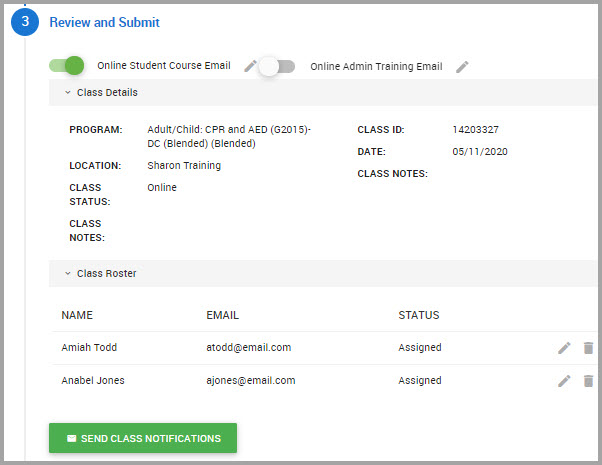
.
•Keep both Online Student Course Email and Online Admin Training Email toggles enabled to keep students informed about the class. This email delivers to students shortly after you click the SEND CLASS NOTIFICATIONS button in Step 8.
•Click the pencil icon shown next Online Student Course Email or Online Admin Training Email to create your own content for either email.
•You can Edit student details by clicking the pencil icon shown in the student’s row.
Note You can edit a student’s name only once per class. Email addresses can be updated several times.
•Delete a student by clicking the Remove icon (trash).
Caution Before clicking SEND CLASS NOTIFICATIONS, make sure your class structure (course dates, program type, program, etc) is set up to your satisfaction because these selections cannot be modified after clicking this button. You can still, however, add additional students, copy students into a new course, and add notes when you are Performing a Training Search.
Step 8Once your roster is complete and class details are finalized, click SEND CLASS NOTIFICATIONS.
Step 9CONFIRM this action. Credits are deducted from your credit balance.
Students should receive the class notification within approximately 15 minutes.
Note Additional students can be added to the roster in the Track Progress section.
You have completed all steps necessary to build this course.
To check to see if a student is still working on their course, add scores, or to indicate pass or fail for students, see Performing a Training Search.
Creating a Classroom Course
Classroom courses are entirely on-site and provides a mix of lecture and experiential, hands-on skills.
Note If you want to provide digital certification at the conclusion of this course, be sure to build a Digital-Cert Card course. See Creating a Digital Cert Card Course.
Step 1Select TRAINING > CLASSES/BLENDED/ONLINE from the navigation pane.
Step 2In the Create and Manage Classes window, click +CREATE NEW CLASS/BLENDED/ONLINE.
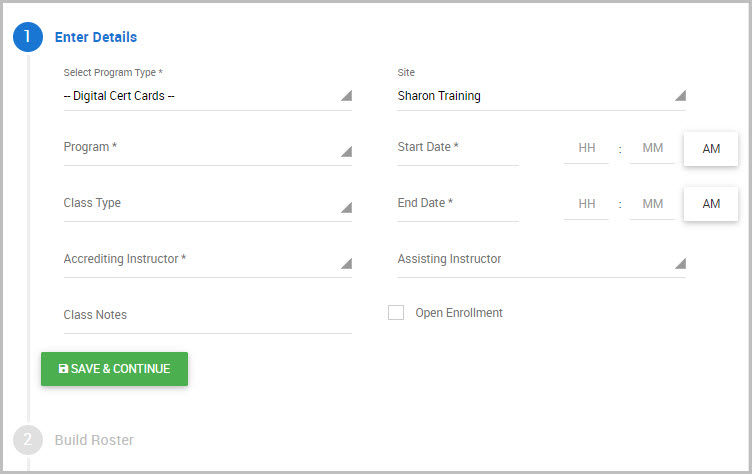
Step 3Enter Details for the following fields:
Note Fields accompanied with an asterisk (*) requires input.
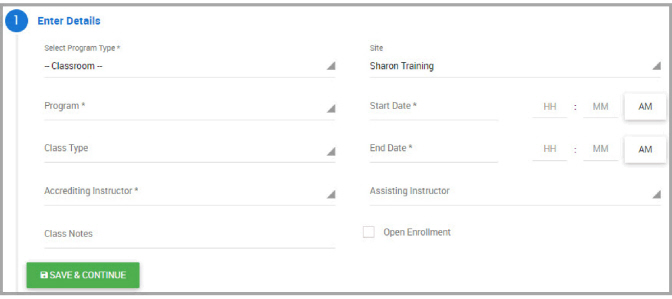
•Choose Classroom from the Select Program Type* drop-down menu.
•Choose a Program* from its drop-down menu.
•(Optional) Choose a Class Type from its drop-down menu.
•Select an Accrediting Instructor* from the drop-down menu.
•(Optional) Include any Notes you may want to reference during the course. Students do not see any notes that you include here.
•(Optional) Choose a Site from its drop-down menu. The system defaults to the top-level training center.
•Click the Start Date field to begin picking the year, month, and day that this training course begins.
•Click the End Date field to begin picking the year, month, and day that this course ends.
•Choose an Assisting Instructor if the student/instructor ratio exceeds the following HSI recommendations:
—ASHI=10 students per instructor
—MEDIC=12 students per instructor
—EMS Safety=12 students per instructor
Note The optimal ratio is six students per instructor. The assisting instructor typically assists during the skills-check portion of the class.
•(Optional) Selecting Open Enrollment displays a link for the course registration page. This link can be posted to the Training Center’s website or emailed to students so they can self-register.
Step 4Click SAVE & CONTINUE.
Step 5Click the Build Roster section header to choose among the following:
•Enter Student for students who have never attended ASHI/MEDIC & EMS Safety courses for your training center by:
—Entering a student’s first and last names, their email address, and then clicking SAVE.
•Select Student to add students who have previously been added to a roster at your training center by:
—Selecting student name(s), and then clicking Submit.
•Select Member is used to add instructors to the roster by:
—Selecting a member’s name(s), and then clicking SUBMIT MEMBERS.
•Upload Students to invoke the Upload Students dialog box, where you can either:
—Import an Excel spreadsheet with a list of students that you have already prepared. The spreadsheet must contain their first and last names, along with their complete email address.
Note Excel (.xlsx) is the only document type this process accepts.
or (Recommended)
—Click the Download Excel Student Upload Form, which is prepared in the format that our system requires.
A) Save the file to your device.
B) Open the file and click Enable Editing to begin inputing student data.
C) Enter the following information into the spreadsheet:
Student Last Name
Student First Name
Student Email Address
Note You do not need to provide input for both Department and Acct Code columns.
D) Save the file to your device.
E) Return to the Build Roster page and click Select a File to upload the spreadsheet to the system.
F) Browse your system for the spreadsheet, and click Open.
G) After the spreadsheet name displays, click UPLOAD.
The page refreshes and student names derived from the spreadsheet display on the page.
Step 6(Optional) If you want to remove a student after submitting their name, you can remove them by:
(a)Returning to the Build Roster section.
(b)Finding their name, and click the trash icon shown at the end of their row.
Step 7Click the Review and Submit section header to review the course information, make any edits to the course or student information to complete the building of this course.
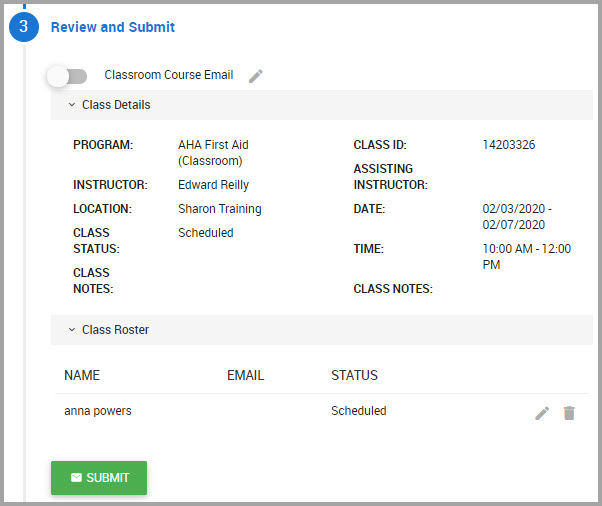
•Keep the Classroom Course Email toggle enabled to keep students informed about the class. This email delivers to students shortly after you click the SUBMIT button in Step 8.
•Click the pencil icon shown next to Classroom Course Email to create your own content for the email.
•You can edit student details by clicking the pencil icon shown in the student’s row.
Note You can edit a student’s name only once per class. Email addresses can be updated several times.
•Delete a student by clicking the trash icon.
Caution Before clicking SUBMIT, make sure your class structure (course dates, program type, program, etceteras) is set up to your satisfaction because these selections cannot be modified after clicking this button. You can still, however, add additional students, copy students into a new course, and add notes when you are Performing a Training Search.
Step 8Once your roster is complete and class details are finalized, click SUBMIT.
Step 9CONFIRM the action.
Students should receive the class notification within approximately 15 minutes.
Note Additional students can be added to the roster in the Track Progress window.
You have completed all steps necessary to build this course.
To check to see if a student is still working on their course, add scores, or to indicate pass or fail for students, see Performing a Training Search.
Creating a Digital Cert Card Course
Digital-Cert Card courses enables instructors to provide digital certification to students who have successfully completed a Blended or Classroom course.
Step 1Select TRAINING > CLASSES/BLENDED/ONLINE from the navigation pane.
Step 2In the Create and Manage Classes window, click +CREATE NEW CLASS/BLENDED/ONLINE.
Step 3Enter Details from the following fields:
Note Fields accompanied with an asterisk (“*”) requires input.
•Choose Digital Cert Cards from the Select Program Type* drop-down menu.
•Choose a Program* from its drop-down menu.
•Select a Class Type* from the following choices shown in the drop-down menu:
—Initial—Choose for students who have never taken a course at your training center.
—Renewal— Choose for students whose certification needs renewing.
Note Certifications need to be renewed every two years.
—Challenge—Choose for students who have learned the program’s curriculum elsewhere and want an opportunity to demonstrate their knowledge and hands on skills (without prompting by the instructor) in order to test out of the course.
•(Optional) Include any Class Notes you may want to reference for the course, such as a room number.
•Choose an Accrediting Instructor* from it’s drop down menu.
•(Optional) Choose a Site from its drop-down menu. The system defaults to the top-level training center.
•Click the Start Date field to begin picking the year, month, and day that this training course begins.
•Click the End Date field to begin picking the year, month, and day that this course ends.
•(Optional) Selecting Open Enrollment displays a link for the course registration page. This link can be posted to the Training Center’s website or emailed to students so they can self-register.
•Choose an Assisting Instructor if the student/instructor ratio exceeds the following:
HSI recommends the following:
—ASHI=10 students/per instructor
—MEDIC=12 students/per instructor
Note The optimal ratio is six students per instructor.
The assisting instructor typically assists during the skills-check portion of the class.
•(Optional) Click SELECT SUPPLEMENTAL TOPICS if you want to include additional topics in the course:
A) Select one or more topics in the dialog box.
B) Click OKAY when you finish.
Step 4Click SAVE & CONTINUE.
Step 5Click the Build Roster section header to choose among the following:
•Enter Student for those students who have never attended ASHI/MEDIC & EMS Safety courses at your training center by:
—Entering a student’s first and last names, their email address, and then clicking SAVE.
•Select Student displays a list of any student that has previously added to a class roster by:
—Selecting a student’s name, and then clicking Submit.
•Select Member is used to add instructors to the roster.
—Selecting a member’s name, and then clicking SUBMIT MEMBERS.
•Upload Students to invoke the Upload Students dialog box, where you can either:
—Import an Excel spreadsheet with a list of students that you have already prepared. The spreadsheet must contain their first and last names, along with their complete email address.
Note Excel (.xlsx) is the only document type this process accepts.
or (Recommended)
—Click the Download Excel Student Upload Form, which is prepared in the format that our system requires.
A) Save the file to your device.
B) Open the file and click Enable Editing to begin inputing student data.
C) Enter the following information into the spreadsheet:
Student Last Name
Student First Name
Student Email Address
Note You do not need to provide input for both Department and Acct Code columns.
D) Save the file to your device.
E) Return to the Build Roster page and click Select a File to upload the spreadsheet to the system.
F) Browse your system for the spreadsheet, and click Open.
G) After the spreadsheet name displays, click UPLOAD.
The page refreshes and student names derived from the spreadsheet display on the page.
Step 6(Optional) If you want to remove a student after submitting their name, you can remove them by:
(a)Returning to the Build Roster section.
(b)Finding their name, and click the trash icon shown at the end of their row.
Step 7When you finish this page, click Review and Submit.
Step 8In the Review and Submit section:
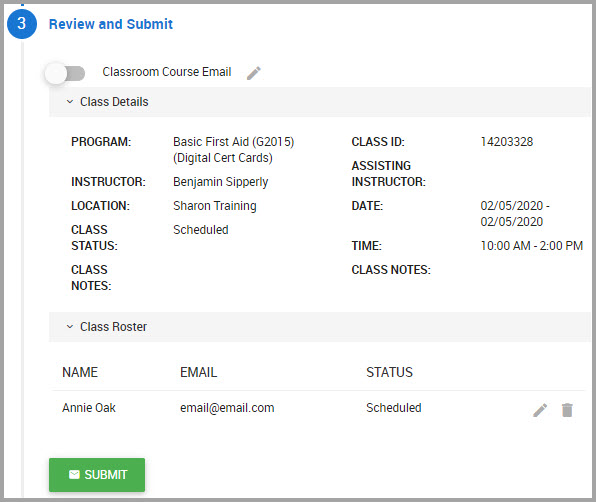
•Keep the Classroom Course Email toggle enabled to keep student’s informed about the class. This email delivers to students shortly after you click the SUBMIT button.
•Click the pencil icon shown next to Classroom Course Email to create your own content for the email.
Caution Do not click SUBMIT until you verified that the skills session is successfully completed by all students. --
Step 9After confirming the details shown in this page, click SUBMIT.
Step 10 CONFIRM the action. Credits are deducted from your credit balance.
You have completed all steps necessary to build this course.
To check to see if a student is still working on their course, add scores, or to indicate pass or fail for students, see Performing a Training Search.
Tracking Student Progress in a Course
The Track Students section provides a means for you to:
•See if students are progressing through their course.
•Add scores or pass/fail designations to the student’s record.
•Additional features are also available, depending on the course program type.
Each course program type provides the Track Student window, but each program’s Track Student window options (the green buttons) differ. The following image displays the Blended program’s Track Progress section.
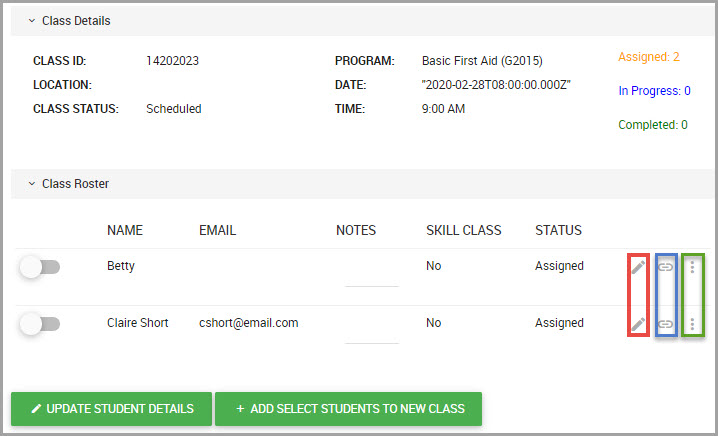
Icons in this window include:
•Editing icons (shown bordered in red) to update student information.
•Training link icons (shown bordered in blue) to copy the training link to your device’s clipboard for you to send to students who want to self-register for the course.
•Additional menus (shown bordered in green) to either resend the course email to the student, or to remove the student from the roster.
The following table lists and describes additional options, whose visibility varies depending on the program type.
|
|
After selecting a student’s toggle, click this button to add them to a new class. For example, you can add students from the blended class to the skills class. |
|---|---|
|
|
Click to add or remove topics from the course, clicking SAVE when you finish. |
|
|
Click this button only after ensuring students successfully completed both the curriculum and the skills portion of their Classroom or Digital Cert Card program. There’s no limit for providing a student their digital certificate. |
|
|
Click to print certifications to hand-deliver or to mail to students. |
|
|
Click this button after you update scores, the pass column, and any notes you include for Blended, Classroom, and Digital Cert Card programs. |


Certification using Remote Skills Verification
Remote Skills Verification (RSV) is a fully-integrated portal that delivers remote hands-on skills verification through the OTIS 3.0 platform. RSV is available through the Blended Course program.
This feature also allows you to:
•Designate the class as private, making the course visible only to the students you include in the roster. This is accomplished in the Enter Details page when you are Creating a Blended Course.
•Certify up to three students per remote session.
There are three versions of an RSV Program. Discuss each option with your students to determine which RSV program version to build.
|
RSV Version |
RSV Version Descriptions |
|---|---|
|
RSV |
The Training Center (TC) manages all the equipment and supplies. After the instructor certifies the student, the digital certification card delivers to the student in OTIS and via email. |
|
RSVM |
HSI ground-ships a loaner manikin that the student returns to HSI; additional supplies are included. Once Federal Express scans the return package, the student’s digital certification card is immediately emailed to the student. |
|
RSVD |
HSI ground-ships a manikin that the student keeps; additional supplies are included. Once the instructor certifies the student, the digital certification card delivers to the student in OTIS and via email. |
For additional information, including recorded seminars which describe and demonstrate this feature, see:
https://emergencycare.hsi.com/remote-skills-verification
Step Sequence for Building a Remote Skills Session
The following is the sequence you should follow to schedule and perform a skills verification session.
1Ensure you have RSV credits or purchase RSV credits by navigating to the DASHBOARD > CREDITS.
See Reviewing your Credit Balance and/or Purchasing Credits for more information.
2Build a Blended Class. See Creating a Blended Course for more information. You can designate your class as private as you build the blended class.
Note After you create the blended class, emails are sent to students to announce the class’s creation. Reminder emails are also sent periodically to the instructor and students up to one hour before the skills session. Ensure that Daily Email notifications enabled.
3The TC Director or instructors select their availability for remote skills session in the RSV Scheduling module, located at TRAINING > REMOTE TRAINING SCHEDULE. See Calendaring Your Availability for Remote Skills Verification Sessions.
Note After completing the online (cognitive) portion, students receive an email to choose a day/time that you designate for their skills assessment. Students are prompted to schedule at least 10 days out to ensure they have received their skills equipment.
4Launch the skills session in Otis and perform the skills assessment. See Launching a Remote Skills Session and Performing a Remote Skill Assessment & Issuing a Digital Cert Card for more information.
5After student successfully completes their skills session, you can provide them their digital certification card electronically. Students are also sent their digital certification card by email.
Note For students enrolled in the RSVM course, the student’s digital certification card is delivered electronically the moment that Federal Express scans the manikin’s return.
Calendaring Your Availability for Remote Skills Verification Sessions
You may need to schedule at least 10 days out from the time the student completes their cognitive section of the blended course to ensure that they have received their equipment.
Step 1Select TRAINING > REMOTE TRAINING SCHEDULE in the navigation pane.
Step 2In the Remote Training Schedule calendar, find the month you want to hold the session.
Step 3Click on the day you want to schedule.
Step 4Click Add Availability.
Step 5In the Add Available Timeslot page, respond to all fields.
For the Class Assignment field, select the course associated with the training session that you are scheduling your availability for.
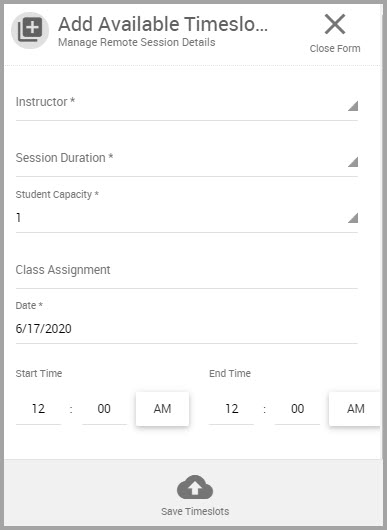
Step 6Click Save Timeslot when you finish.
Step 7Repeat Steps 2 through 6 for additional sessions you want to schedule.
Note Students use the link included in their blended course announcement email to schedule their skills session.
Launching a Remote Skills Session
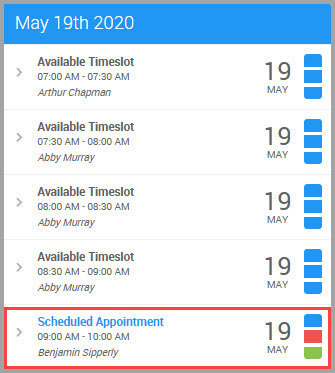
Step 1Select TRAINING > REMOTE TRAINING SCHEDULE in the navigation pane.
Step 2Find today’s appointments in the window, and click anywhere in your Scheduled Appointments cell to launch the Instructor Lobby page.
Step 3In the Instructor Lobby, click Launch Session when you are ready to begin the skills session.
Performing a Remote Skill Assessment & Issuing a Digital Cert Card
Step 1Perform Steps 1 through 3 in Launching a Remote Skills Session.
The left side of the session window displays the session’s student name(s). This is where you will check off their skills as they perform them.
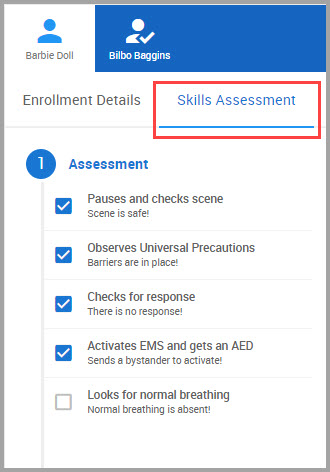
Step 2Click the Student’s name.
Step 3Click Skills Assessment to display the required skill-set for certification.
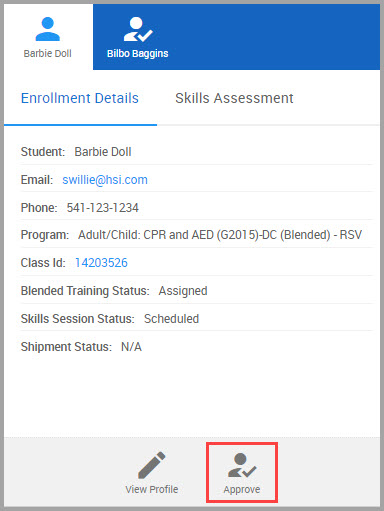
(a)When the student successfully performs all required skills, click that student’s Enrollment Details.
(b)Go to the bottom of this section, and click Approve to display the student’s digital certification card; it displays on the instructor and the student’s device.
The certification is also emailed to the student.
Note If the student successfully completed an RSVM course, their digital certification card is electronically delivered to them the moment Federal Express receives and scans the return package containing the loaner manikin.
Performing a Training Search
In this section, you can learn how to:
•Discover all trainings associated with a particular site
•Find all trainings conducted by a specific instructor
•Find a particular program type (Blended, Classroom, Digi, or Online course)
•Perform a training search based on program (i.e., course name)
•Find trainings for a specific time frame
•Use multiple filters to return more precise results
Note You can discover a course’s registered students in Searching for a Class Roster.
Step 1Select TRAINING > CLASSES/BLENDED/ONLINE in the navigation pane.
Step 2In the Classes window, click LIST VIEW.
Step 3Decide to perform a search using at least one of the following filters.
Note Results display after entering or selecting data.
•Enter key terms using the Search field
•Select a Site from its drop-down menu to find trainings based on location.
•Select an Instructor from its drop-down menu to find all trainings conducted by them
•Find a particular Program Type or Program from their drop-down menus.
•Find a training’s Start Date* by:
(a)Clicking in the Start Date* field
(b)Clicking on the Year
(c)Clicking on the Month
(d)Clicking on the date
•Find a training’s End Date* by:
(a)Clicking on the End Date* field
(b)Clicking on the Year
(c)Clicking on the Month
(d)Clicking on the date
Searching for a Class Roster
You can find a course’s roster in the Classes window:
•In Calendar View by clicking on a course name that displays in the calendar. See Viewing a Class Roster from the Class Calendar.
•Selecting the List View tab, locating the class, and clicking its View Roster icon. See Viewing a Class Roster from the Class Calendar’s List View.
Viewing a Class Roster from the Class Calendar
Step 1Choose TRAINING > CLASSES/BLENDED/ONLINE from the navigation pane.
Step 2Find the course by:
•Using one or more of the filters (bordered in red in the previous image) near the top of the Classes window.
OR
•Clicking the carats on either side of the month name to move forward or backwards by one month with each click to find the course name by month.
Step 3After you find the course, click on its name to prompt the roster’s display.
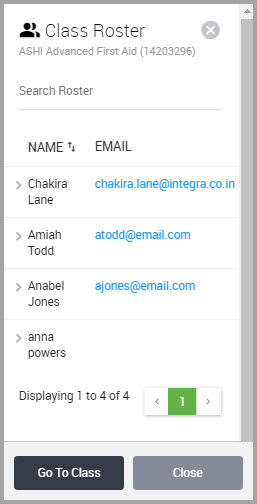
Step 4(Optional) If you are looking for a student name and the roster list is lengthy, enter the name in the Search Roster field to quickly locate the student.
Viewing a Class Roster from the Class Calendar’s List View
Step 1Choose TRAINING > COURSES & TASKS in the navigation pane.
Step 2Click LIST VIEW in the Classes window.
Step 3Find the course in the lower portion of the window or perform a search. See Performing a Training Search for information.
Step 4When you find the class, and in its row, click the View Roster icon.
Step 5(Optional) If you are looking for a student name and the roster list is lengthy, enter the name in the Search Roster field to quickly locate the student.
Creating Courses and Tasks
Use this module to create specialized courses to fulfill an organization’s (such as American Red Cross) requirements.
Step 1Choose TRAINING > COURSES & TASKS in the navigation pane.
Step 2Click +ADD NEW COURSES & TASKS.
Step 3In the Create New Course or Task window, choose or enter information for the following fields:
Note Fields accompanied by an asterisk (*) requires input.

•Provide a Title* for the course.
•Select Classroom as the course Type*.
•Enter the Estimate Time in Minutes of the course.
•Choose the course Status*.
•Enter the course Brand. This is not seen by students.
•Enter a course Description. This is not seen by students.
•Enter any course Notes. These are not seen by students.
Note If the Language field displays, keep the English setting.
•Click the plus sign next to Learning Objectives to provide course outcomes. These are not seen by students.
•Click Offer Preview Link if you want to provide a registration link for students or to upload the link to your website.
Step 4When you finish, click either Confirm or the CONTINUE button.
Step 5Click FINISH.
The new course now displays in the Courses & Tasks main window.
Editing a Course
Use this procedure to edit specialized courses to fulfill an organization’s (such as American Red Cross) requirements.
Step 1Choose TRAINING > COURSES & TASKS in the navigation pane.
Step 2In the Courses & Tasks window, find the course in the lower portion of the window and in its row, click its Edit Courses & Tasks icon.
Step 3See Searching for a Class Roster, Step 3 for field descriptions.
Step 4Click SAVE when you finish.
Searching for a Course
Use this procedure to locate specialized courses (such as American Red Cross).
Step 1Choose TRAINING > COURSES & TASKS in the navigation pane.
Step 2In the Courses & Tasks window, enter the full or partial course title in the Courses & Tasks field.
Step 3Click SEARCH COURSES & TASKS to display results.
Managing Student Records
The Student Search module enables you to:
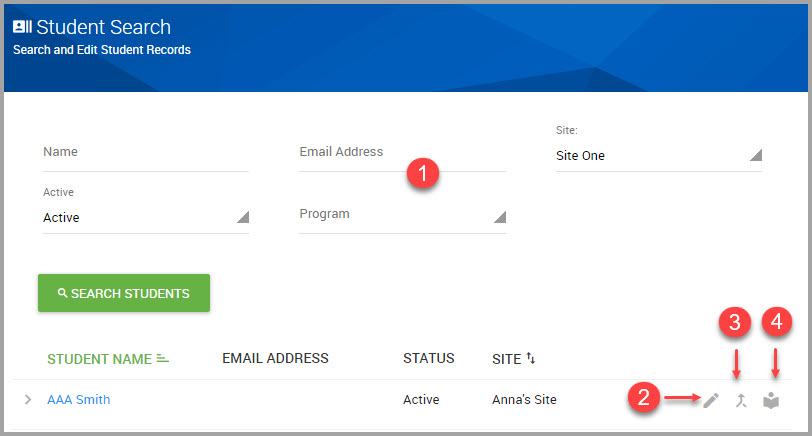
1Search for students using the search filters shown at the top of the Student Search window.
2Begin editing a student’s details by clicking the edit icon shown in their row.
3Check for and consolidate duplicate records that a student may have by clicking the merge icon shown in the student’s row.
4View a student’s training history by clicking the history icon shown in the student’s row.
Searching for a Student
Step 1Choose TRAINING > STUDENT SEARCH in the navigation pane.
Step 2In the Student Search window, enter or make selections from at least one field shown in the following image.
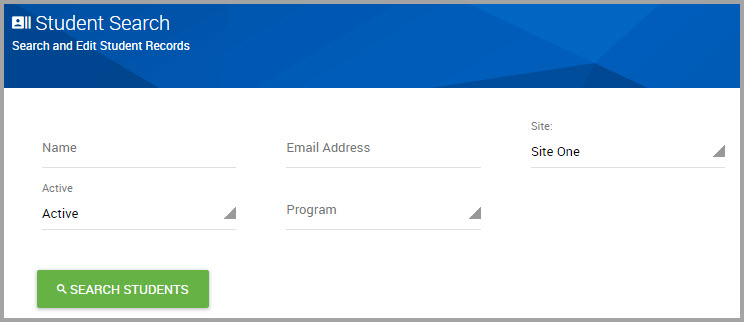
Step 3Click SEARCH STUDENTS to display results according to your input.
Editing Student Details
Step 1Choose TRAINING > STUDENT SEARCH in the navigation pane.
Step 2In the Student Search window, find the student name in the lower portion of the window, or begin Searching for a Student.
Step 3When you find their name, and in their row, click the edit icon.
Step 4When the student’s detail page opens, make the necessary modifications for any of the fields in this page.
Note Fields accompanied with an asterisk (*) requires input.
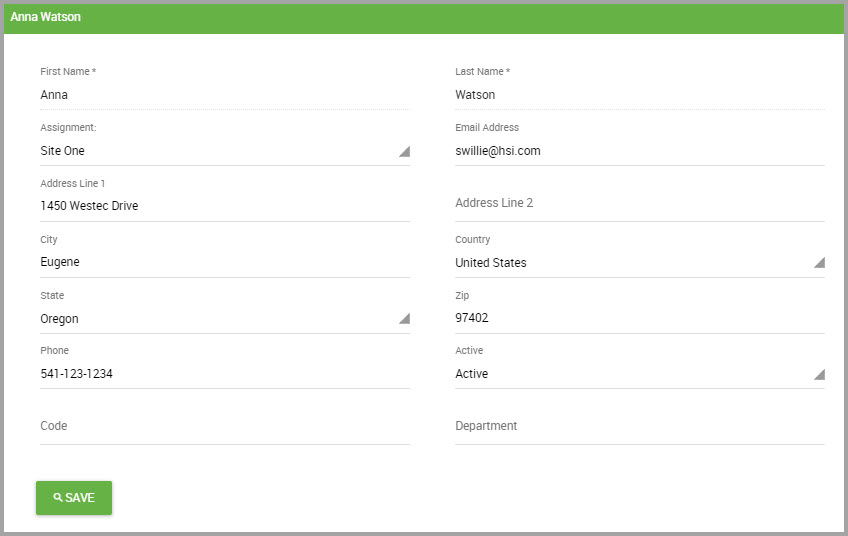
Step 5Click SAVE when you finish.
Merging Duplicate Student Records into One Record
This topic is publishing soon
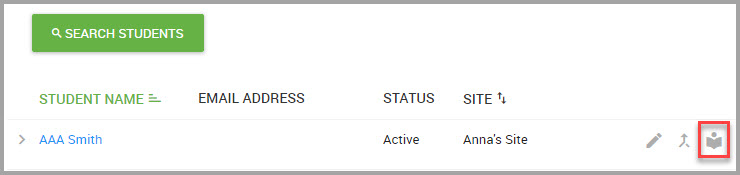
Viewing a Student’s Training History
Step 1Choose TRAINING > STUDENT SEARCH in the navigation pane.
Step 2Find the students name in the lower portion of the Student Search window, or perform a search. See Searching for a Student.
Step 3When you find the student’s name, click the icon shown below.
The students course history displays.
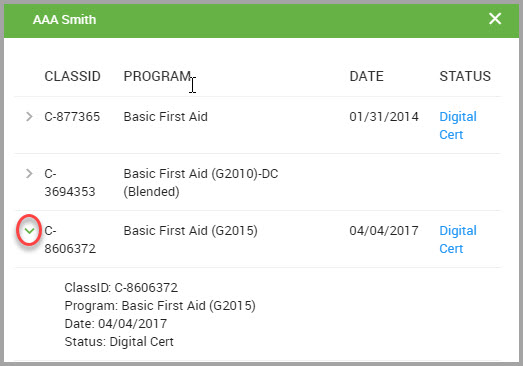
Step 4(Optional) Click the caret shown next to the course ID number to view additional course details, shown circled in the image above.
Step 5(Optional) To display the student’s certification for a completed course, click the Digital Cert hyperlink for that course.
Printing a Student’s Digital Certificate
Step 1Choose TRAINING > STUDENT SEARCH in the navigation pane.
Step 2Find the students name in the lower portion of the Student Search window, or perform a search. See Searching for a Student.
Step 3When you find the student’s name, click the icon shown below.
Step 4In the student’s training history page, click on the Digi Cert hyperlink to open the certification.