Managing Chemicals, SDSs, and Right To Know Access
Main chemical, SDS, Collection Management, and Right to Know topics are listed below, with their individual sub-topics listed within their respective sections.
Topics include:
Viewing and Managing your Material Collections
Searching for Chemicals, SDSs, and Inventory
Viewing and Managing Safety Data Sheets
Viewing and Managing Material Details
Updating and Analyzing your Chemical Data
Providing Users Right To Know Access
Appendix A—Inventory: Source Quantity Conversions
Viewing and Managing your Material Collections
The Chemical / SDS window is where you can perform general tasks related to a material such as adding or searching for materials for a location. This section also provides procedures for viewing, saving, and printing labels for Safety Data Sheets (SDS).
Topics include:
Adding a New Chemical / SDS to the System
Adding a New Chemical / SDS to the System
For document format types accepted by the system, see Supported Upload Formats.
Step 1Choose CHEMICAL / SDS > SEARCH > Chemical / SDS Search from the navigation pane.
Step 2Click +ADD NEW CHEMICAL / SDS.
Step 3Click the Upload a New Document radio button.
Step 4Decide which upload method you want to use. Either:
•Drag your document from your device’s desktop into the text box,
OR
(a)Click Select a File to browse your system.
(b)Browse your device for the document.
(c)Click Open when you find the document.
The file name displays below the text box.
Note If you decide to add a different document, click the trash icon to remove the document you selected in Step c.
Step 5Click NEXT.
Step 6(Required) In the Edit Details page, you must provide input for all fields accompanied with an asterisk (*):
•Select one or more Location Assignments* from the drop-down menu, and click Done when you finish.
•Choose to either keep the Product Name* or choose a different name for the document.
•Enter the material’s Manufacturer* name.
•Select the Document Type* from the drop-down menu.
•Select the Language* spoken at the location from the drop-down menu.
•Enter the document’s Revision Date*.
•Select the Language* spoken at the location from the drop-down menu.
Step 7Click NEXT.
Step 8In the Confirmation page, review the information you provided, and click SUBMIT when you finish.
Searching for Chemicals, SDSs, and Inventory
The search modules provides a convenient way for you to access SDS and Inventory information.
Use the search module to quickly:
•Access the SDS Library and your site’s collections
•Perform basic and advanced material searches
•Search your organization’s entire collection regardless of location security settings.
•Perform a search for inventory records
Note To maximize search results you can enable the system to automatically add wildcards to your search terms. See Including Wildcard with Search Terms for more information.
The system provides two material search modes: a basic search conducted by selecting location assignments and entering keywords, or an advanced search, which provides additional fields for more precise search results. See Performing a Basic Material Search or Performing an Advanced Material Search.
Note You can set user preferences to control which columns display in material search results lists and the order that columns display. See Customizing Search Results Columns.
To control which columns display in inventory search results, see Customizing Inventory Search Results Column Display.
Besides performing an inventory search, you can also use this module to:
•Update inventory records
•Change inventory periods
•Enable usage inventory fields
•Exporting inventory search results to a spreadsheet
Topics include:
Accessing the SDS Library and your Site’s SDS Collections
Performing a Basic Material Search
Performing an Advanced Material Search
Performing an Enterprise Search
Performing an Inventory Search
Filtering Quantity-Specific Inventory Search Results
Exporting Inventory Search Results to a Spreadsheet
Updating an Inventory Record after Performing an Inventory Search
Changing Inventory Periods after Performing an Inventory Search
Enabling Usage Inventory Fields After an Inventory Record Was Created
Accessing the SDS Library and your Site’s SDS Collections
You can quickly reach the SDS Library and your site’s collections by performing the following steps.
Step 1Choose CHEMICAL / SDS > SEARCH > Chemical / SDS Search from the navigation pane.
Step 2Choose which SDS set you want to search in the Chemical / SDS Search window by clicking one of the following tabs:
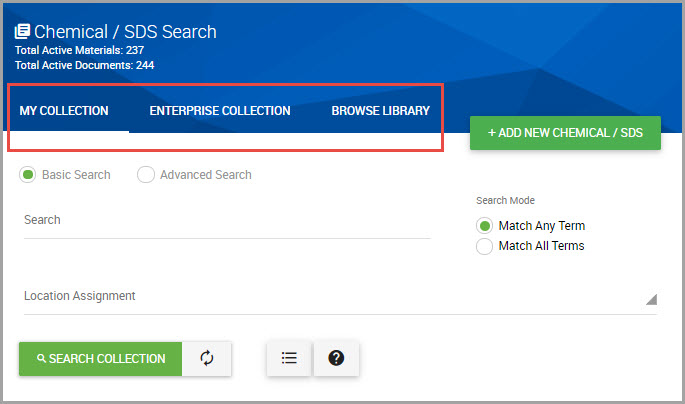
•MY COLLECTION—Your site’s entire set of SDSs. This tab is automatically selected in the system by default.
•ENTERPRISE COLLECTION—Your organization’s entire collection with view-only SDS access for materials outside of your assigned location(s).
Note Enable Enterprise Search by adding this feature to an administrator role. See Adding Features to an Administrator Role.
•BROWSE LIBRARY—SDSs owned by HSI and available for you to add to your site’s collection.
Step 3(Optional) Click BROWSE LIBRARY if you want to search HSI’s library to add SDSs to your site’s collection.
Step 4Begin your search. See Performing a Basic Material Search or Performing an Advanced Material Search
Performing a Basic Material Search
Use this method to perform a material search by entering search key words and selecting the location assignment.
Note
*To maximize search results you can enable the system to automatically add wildcards to your search terms. See Including Wildcard with Search Terms for more information.
*See Customizing your Default Search Mode to set your default search preferences.
*To control which columns display in material searches, see Customizing Search Results Columns.
Step 1Choose CHEMICAL / SDS > SEARCH > Chemical / SDS Search from the navigation pane.
Step 2Ensure the Basic Search radio button is selected.
Step 3Decide whether to use one or both of the following fields:
•Enter keywords or phrases in the Search field, separating words and phrases with a comma.
•Select one or more Location Assignments from the drop-down menu.
Step 4(Optional) Choose a Search Mode:
•Choose Match Any Term to return results that match any of the search terms you entered in the Search field, and in any order typed.
•Choose Match All Terms to return results that match all search terms you entered in the Search field, and in the order that you typed them.
Note For additional advanced search tips, click .
.
Step 5Click SEARCH COLLECTION.
Performing an Advanced Material Search
The advanced material search method provides additional fields to return more precise search results.
Note See Customizing your Default Search Mode and Including Wildcard with Search Terms for additional search tools.
Step 1Choose CHEMICAL / SDS > SEARCH > Chemical / SDS Search from the navigation pane.
Step 2Select the Advanced Search radio button.
Step 3Enter or select information in one or more of the following fields:
•Provide keywords or phrases in the Search field, separating words and phrases with a comma.
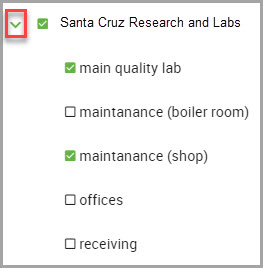
•Select one or more Location Assignments from the drop-down menu by clicking inside the location’s check box. Click DONE when you finish.
•Enter the Material Number.
•Enter the material’s Product Number.
•Select the material’s Status from the drop-down menu.
•Select the Document Format from the drop-down menu.
•Enter the material’s Barcode number.
•Select the material’s Classification from the drop-down menu.
Step 4When you finish, click SEARCH COLLECTION.
Performing an Enterprise Search
When you enable the enterprise search feature in the Administrator Role module, you can access your organization’s entire Chemical/SDS collection, with view-only access for SDSs located outside your assigned locations.
Note See Adding Features to an Administrator Role to add the enterprise search feature to administrator roles.
Step 1Choose CHEMICAL / SDS > SEARCH > Chemical / SDS Search from the navigation pane.
Step 2Click the ENTERPRISE SEARCH tab in the Chemical/SDS Search window.
Step 3To find the material, see either Performing a Basic Material Search or Performing an Advanced Material Search.
Step 4After you locate the material, click the PDF icon shown in its row to display the SDS.
The material is view-only if you are not assigned to the material’s site.
Performing an Inventory Search
Along with instructions for performing an inventory search, this section also includes instructions for:
Filtering Quantity-Specific Inventory Search Results
Exporting Inventory Search Results to a Spreadsheet
Updating an Inventory Record after Performing an Inventory Search
Changing Inventory Periods after Performing an Inventory Search
Enabling Usage Inventory Fields After an Inventory Record Was Created
Note Before you begin, ensure that inventory data is entered for at least one inventory period.
To control which columns display in inventory search results, see Customizing Inventory Search Results Column Display.
Step 1Choose CHEMICAL / SDS > SEARCH> Inventory Search
Step 2(Optional) Enter the Product Name.
Step 3(Required) Select one Location Assignment* from the drop-down menu by clicking its radio button.
Step 4Click DONE when you are finished to dismiss the drop-down menu.
Top-level (“parent”) locations display in the left-most position in the field, with any of its sub-locations automatically selected.
To remove any sub-locations from the search:
•Click the “x” next to the sub-location’s name to delete it.
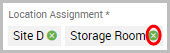
Note You cannot remove the parent location from the search. In the example above, Site D is the parent of Storage Room. Site D cannot be removed from the inventory search, but Storage Room can be.
Step 5Click SEARCH. The window refreshes to display the location’s inventory results.
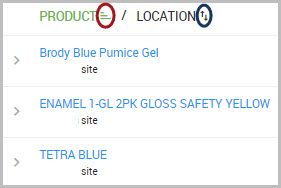
•You can sort results shown for each column in ascending or descending order by clicking the icon shown to the immediate right of each column header.
For example, to sort results for the PRODUCT and LOCATION columns, click the icons shown encircled in the following image.
•You can review a material’s inventory details by clicking the carat next to the material name, shown in the following image.
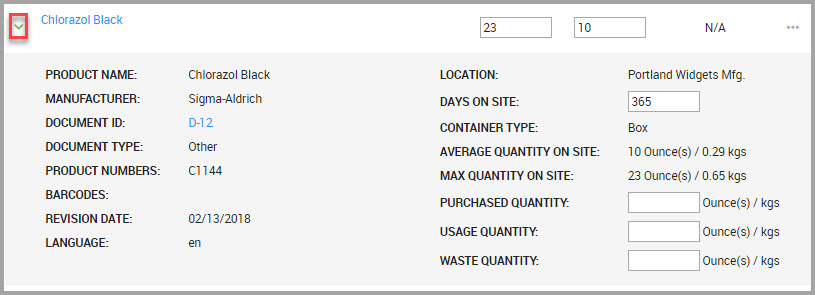
Quantity values display both the source quantity and converted quantity values. For example, the MAX QUANTITY ON SITE source quantity=23 ounces, with a converted value of 0.65 kilograms.
Filtering Quantity-Specific Inventory Search Results
If you need to modify inventory quantity data fields, you can utilize the Show Filters button, shown bordered in red in the image below.
After performing an inventory search, the show filters button displays so you can further refine results to show or hide:
•Inventory tracked with the Capture Inventory by Container Count field in the inventory record page.
•Inventory tracked using other QUANTITY TYPE fields in the inventory record page.
Note A Show All option is also available.
To show or hide inventory quantity fields, perform the following steps.
Step 1Perform an inventory search. See Performing an Inventory Search.
Note The search filters button displays only after clicking SEARCH INVENTORY.
Step 2After clicking SEARCH INVENTORY, click the Search Filters button.
Step 3Click the caret icon shown next to Filter Results to display the two categories of show/hide filter options, shown in the following image.
Search filter options are described in the table below:
|
Filter Option |
Description |
|---|---|
|
INVENTORY QUANTITY STATUS |
|
|
Captured |
Only displays specified fields containing data. |
|
Not Captured |
Only displays specified fields without data. |
|
Show All |
Displays specified fields with and without data. |
|
INVENTORY CAPTURE |
|
|
Container Count Inventory |
Displays inventory records with TYPE Capture Inventory by Container Count selected. |
|
Standard Inventory |
Displays inventory records with Max Quantity on Site, Average, Purchased/Received, Usage, or Waste quantity type values selected, but not Capture Inventory by Container Count. |
|
Show All |
Displays records tracked by both Capture Inventory by Container Count and other inventory quantity type fields shown in the Inventory Record page. |
Note For inventory field descriptions, see Field Information for Creating an Inventory Record for a Material.
For example, to find inventory records specifically missing MAX QUANTITY ON SITE data, select its Not Captured radio button to immediately display records matching this criteria.
Step 4(Optional) For each field name shown beneath the INVENTORY QUANTITY STATUS column, select a radio button for the inventory field status that you are interested in. As you make your selections, the window immediately displays its results.
Step 5(Optional) Select the INVENTORY CAPTURE TYPE that you want the system to return. As you make your selection, the window immediately displays its results.
Exporting Inventory Search Results to a Spreadsheet
You can download inventory search results into spreadsheet by performing the following steps.
Step 1Perform an inventory Search. See Performing an Inventory Search.
Step 2When results display, click EXPORT SEARCH.
Step 3Browse your device’s system, and decide on a location to save the spreadsheet.
Step 4Rename the file, and click Save. The spreadsheet downloads to your device.
Updating an Inventory Record after Performing an Inventory Search
Note
1) Ensure you’ve enabled usage inventory fields before you begin to view the following additional usage inventory fields: Purchased Quantity, Usage, and Waste input fields. See Enabling Usage Inventory Fields After an Inventory Record Was Created.
2) To view and update all inventory fields, access the inventory record in the Inventory section of the Material Detail window. See Updating an Inventory Record for a Material for more information.
You can make quick revisions to an inventory record by performing the following steps.
Step 1Perform an Inventory Search. See Performing an Inventory Search.
Step 2In the lower portion of the window, find the Product whose data needs updating, and click the carat adjoining the Product name to reveal additional inventory fields.
Step 3(Required) When you finish, save your work by clicking the icon shown bordered in red in the following image.
Changing Inventory Periods after Performing an Inventory Search
Note If you are planning to roll the inventory period forward, it is important that you ensure all inventory data is entered for the current period.
Using this procedure, you can choose to either start a new inventory period or rollback to a previous period, with or without quantities, for one or more facilities.
Note Caution! Rolling back a record deletes all data, and once deleted it cannot be recovered.
Step 1Perform an Inventory Search. See Performing an Inventory Search.
Step 2In the lower portion of the window, click the icon bordered in red in the following image.
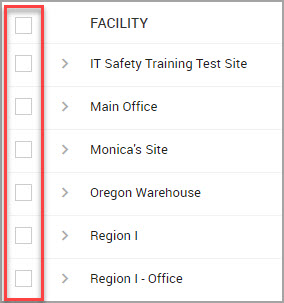
Step 3Find the FACILITY whose inventory period you want to change and select its check box. The check boxes are shown bordered in red in the following image.
Note You can select more than one facility.
Step 4Scroll down the page until you see the buttons shown in the following image.

Step 5Click either:
•START NEXT PERIOD—Choose from three options, described in Step 6.
Continue to Step 6.
OR
•ROLLBACK TO PREVIOUS PERIOD—Deletes all inventory records captured in the current period, and reinstates the previous period for the target location name.
Continue to Step 8.
Step 6If you chose START NEXT PERIOD, choose one of the following Rollover Options from the drop-down menu:
—Rollover Inventory without Quantities
This option creates the next inventory period and copies all inventory records from previous periods, but DOES NOT copy numerical quantitative data to the next inventory period.
—Rollover Inventory with Quantities
This option creates the next inventory period and copies all inventory records from the previous period including numerical quantitative data to the next inventory period.
—Start Next Period without Rollover
This option creates the next inventory period but does not copy ANY inventory data from the previous inventory period.
Note Choosing Start Next Period without Rollover requires re-entry of ALL inventory data for the new period.
Step 7Click SUBMIT to complete the procedure.
Step 8If you chose ROLLBACK TO PREVIOUS PERIOD, read the dialog box’s message, and then click CONFIRM to complete the procedure.
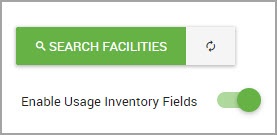
Enabling Usage Inventory Fields After an Inventory Record Was Created
Note Usage inventory fields can be enabled or disabled at any time. We recommend that users enable these fields at the time of configuring inventory for a facility. See Configuring Inventory Settings for a Facility.
Enabling usage inventory fields allows you to view additional inventory record fields such as Purchased Quantity, Usage, and Waste input fields.
Step 1Perform an Inventory Search. See Performing an Inventory Search.
Step 2In the lower portion of the window, click the icon bordered in red in the following image.
Step 3In the Manage Inventory Configuration window, enable inventory fields by clicking the toggle shown in the following image.
The system automatically saves this action.
Viewing and Managing Safety Data Sheets
You can view and manage the Safety Data Sheets (SDSs) in the system by performing the tasks documented in this section
Topics include:
Saving a Product’s SDS to the System
Adding a Material to a Location
Workflow Management Material Location Approval Overview*
Note *The Decisions workflow approval feature is available to Premium accounts that includes the Decision Workflow add-on.
Viewing a Product’s Safety Data Sheet
Step 1Choose CHEMICAL / SDS > SEARCH > Chemical / SDS Search in the navigation pane.
Step 2Find the material in the lower portion of the Chemical / SDS Search window, or perform a search. See Searching for Chemicals, SDSs, and Inventory.
Step 3After finding the material listed under Product, in its row click the PDF icon to open the SDS.
Step 4(Optional) Decide to:
—Save the SDS to your system. See Saving a Product’s SDS to the System.
—Print the SDS. See Printing an SDS.
Saving a Product’s SDS to the System
Step 1Perform Steps 1 through 3 in Viewing and Managing Safety Data Sheets.
Step 2After the SDS opens, click the Download icon located at the top of the SDS, and shown bordered in red in the following image.
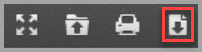
The SDS’s pdf downloads to your device.
Printing an SDS
Step 1Perform Steps 1 through 3 in Viewing and Managing Safety Data Sheets.
Step 2Click the Print icon located at the top of the SDS, and shown bordered in red in the following image.
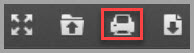
Step 3Click PRINT.
Printing a Material Label
Step 1Choose CHEMICAL /SDS > SEARCH > Chemical / SDS Search from the navigation pane.
Step 2Find the material in the lower portion of the window, or perform a search. See Searching for Chemicals, SDSs, and Inventory.
Step 3In the material’s row, click the Print Labels icon.
In the Print Label dialog box, you must provide input for all fields accompanied with an asterisk (*).
Step 4(Required) Select the label identifier Type*.
Step 5(Required) Select the label Size*.
Step 6(Required) Select the label Format*.
Step 7Click PRINT.
Merging Materials
You can choose to merge materials for any number of reasons that include, but are not limited to, the following:
•To consolidate documents that are for the same product.
•To gather documents that are written in different languages but are for the same product.
•To organize by documentation type (for example, TDS, SDS, et cetera).
Note Only two materials can be merged at one time.
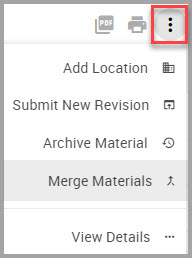
Step 1Choose CHEMICALS / SDS > SEARCH > Chemical / SDS Search from the navigation pane.
Step 2Find the material in the lower portion of the Chemical / SDS Search window, or perform a search. See Searching for Chemicals, SDSs, and Inventory.
Step 3After locating the product, in the product’s row click the ellipses > Merge Materials.
Step 4In the Choose Materials page, search for the materials you want to merge. See Searching for Chemicals, SDSs, and Inventory.
Step 5After the window refreshes, find the materials you want to merge and click their toggles.
Step 6Scroll down the page, and click NEXT.
Step 7In the Edit Details page:
•(Optional) Update the Material Name.
•Choose the appropriate Material Number if it is not selected.
Step 8Click NEXT.
Step 9Any custom fields that are configured display in the Resolve Conflicts page. Select the toggle(s) for the data that you want to keep for the merge.
Note If this page is empty, continue to Step 10.
Step 11 The Confirmation page displays the results of your input, with the newly merged document name displaying at the top of the PRODUCT list.
Step 12 Review the information on this page, and either:
•Click SAVE to submit the merge.
OR
•Click PREVIOUS until you reach the page you want to modify, make your edits, and proceed through the screens as described in previous steps.
topic updated 2/2019
Adding a Material to a Location
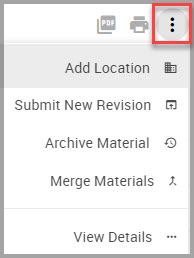
Step 1Choose CHEMICAL / SDS > SEARCH > Chemical / SDS Search from the navigation pane.
Step 2Find the material in the lower portion of the Chemical / SDS Search window, or perform a search. See Searching for Chemicals, SDSs, and Inventory.
Step 3In the material’s row, click the ellipses > Add Location.
Step 4In the Add Material Location dialog box, select a Location Assignment* from the drop-down menu, and click inside the location’s check box to select it.
Step 5Click DONE to dismiss the drop-down menu, if necessary.
Step 6Click SUBMIT.
Workflow Management Material Location Approval Overview*
Note *The Decisions workflow approval feature is available to Premium accounts that includes the Decision Workflow add-on.
When Workflow Management’s New Material Location Approvals toggle is enabled, any locations that have not been approved within certain workflows must go through an approval process before the location can be added to an existing material. The request for review process is triggered whenever an administrator tries to add a new location to a material.
Email notifications are provided to:
•Reviewers to alert them of their pending approval requests
•Requesters to provide status of their location approval petitions
Note You can also check location approval status by navigating to Chemical / SDS > SDS SUBMISSIONS > View SDS Submission Statuses.
After a location is approved, that location’s approval cascades to all of its sub-locations and facilities.
Note You can configure the system to display a facility approval/status column when you conduct chemical/SDS searches. See Customizing Search Results Columns.
Topics include:
Viewing Workflow Management Settings
Managing the Display of Workflow Approval Status Type Indicators
Renaming Workflow Approval Type Fields
Submitting a Workflow Location Approval Request
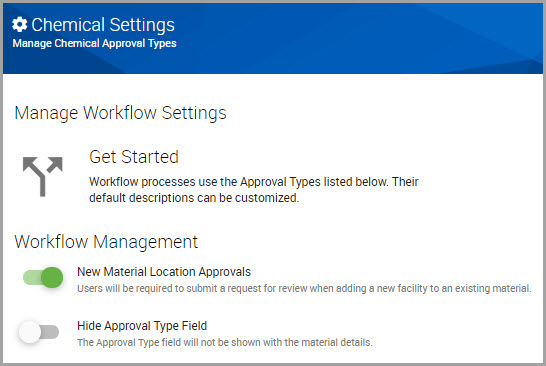
Viewing Workflow Management Settings
There are two workflow management settings:
•New Material Location Approvals
•Hide Approval Type Field
Caution The New Material Location Approvals toggle shouldn’t be modified by users as this might affect system routing processes. If you need to edit this setting, contact Technical Support by phone, or by clicking the Support Center icon that is shown in all application windows, and then selecting Create a Support Ticket.
Managing the Display of Workflow Approval Status Type Indicators
If you do not want workflow approval type status indicators to display in a product’s material details window, perform the following steps.
Step 1Select SETTINGS > Chemical / SDS > Chemical Approvals in the navigation pane to open the Manage Workflow Settings window.
Step 2Find the Hide Approval Type Field toggle, and if the toggle is enabled, click it to hide these status types in the UI.
Renaming Workflow Approval Type Fields
You can change the name of any workflow approval type by performing the following steps:
Step 1Select SETTINGS> Chemical/SDS > Chemical Approvals in the navigation pane to open the Manage Workflow Settings window.
Step 2Find the approval TYPE name that you want to modify, and in its row click its Rename Approval Type icon.
Step 3In the Update Approval Type dialog box, replace the current name and provide a new one.
Step 4Click CONFIRM.
Submitting a Workflow Location Approval Request
Step 1Navigate to the Add location window one of two ways:
Either by:
(a)Perform a material search. See Performing a Basic Material Search.
(b)Clicking the material’s hyperlinked name.
(c)Clicking Storage / Use Locations from the Material Details page.
(d)Clicking ADD NEW LOCATION.
OR
(a)Performing a material search.
(b)From the Chemical / SDS Search window, find the material you want to add a location to and in its row, click the Additional Actions menu > Add Location.
Step 2In the Add Material Location dialog box:
Note Fields accompanied by an asterisk (*) requires input.
(a)Select a Location Assignment.
After selecting a location, additional Requester Details fields display data culled from your login profile.
(b)(Optional) Modify any details shown in the dialog box.
(c)Click SUBMIT.
The approval request loads, and your system refreshes to display the New Request window.
Step 3Provide responses for all required fields, clicking NEXT when you finish each window.
Note If any empty window displays, click NEXT.
Step 4When you finish your input in the final window, click Submit.
You can check your location approval request at CHEMCIAL / SDS > SDS SUBMISSIONS > View SDS Submission Statuses.
Viewing and Managing Material Details
This section’s topics range from editing and applying codes or classifications to materials, to creating and modifying inventory records.
After Searching for Chemicals, SDSs, and Inventory, click the material’s Product hyperlink to open the Material Detail window to view and manage additional material and SDS information:
•Specific, tabbed categories of material information are available along the blue navigational bar at the top of the window, and are described in Material Detail Menu Bar Descriptions, Features, and Procedures.
•SDS details are available using the tabs shown along the gray navigational bar in the lower portion of the window. See SDS Material Menu Descriptions, Features, and Procedures for descriptions.
Additional information regarding feature icons are provided in SDS Material Menu Icon Descriptions, Features, and Procedures.
Topics include:
Material Detail Menu Bar Descriptions, Features, and Procedures
Editing a Material’s Description
Adding a Material to a Location via Storage/Use Locations Tab
Activating a Material for a Location
Deactivating a Material for a Location
Applying a Material Classification to a Material
Applying Hazard Classifications to a Material
Adding Attachments to a Material
Downloading a Material’s Attachment
Editing an Attachment’s Description and Expiration Date
Viewing a Material Attachment’s Expiration Date
Archiving a Material’s Attachment
Creating an Inventory Record for a Material
Field Information for Creating an Inventory Record for a Material
Updating an Inventory Record for a Material
Viewing Inventory Details for a Material
Viewing Inventory History for a Material
Adding Details to a Custom Field
Material Detail Menu Bar Descriptions, Features, and Procedures
Note The tabs that display are based upon features your organization purchased.
|
Tab |
Description |
|---|---|
|
Details |
Select this tab if you want to: •Edit a material’s description •View the material’s: —number —manufacturer —status See: |
|
Storage/Use Locations |
Select this tab if you want to: •See where materials are located at your facilities •See whether materials are active or archived •Activate or deactivate materials. See: Adding a Material to a Location |
|
Identification |
Select this tab to apply a material code or classification to a material. See: |
|
Attachments |
Select this tab to add supplemental documentation for the material. See: Adding Attachments to a Material Downloading a Material’s Attachment Editing an Attachment’s Description and Expiration Date |
|
Inventory |
Select this tab to capture inventory data for a material. Note: Chemicals must be configured for the location, and locations must be configured for inventory before you can add an inventory data. See: Enabling Chemical Management for a Site Updating an Inventory Record for a Material Field Information for Creating an Inventory Record for a Material |
|
Custom Fields |
Select this tab to edit the material’s product name. Note: This tab does not display if custom fields are not configured. See Creating a Custom Field for more information. |
Editing a Material’s Description
The system derives a material’s description from the SDS when it was uploaded to the system.
Step 1Choose CHEMICAL / SDS > SEARCH > Chemical / SDS Search from the navigation pane.
Step 2Find the material in the lower portion of the Chemical / SDS Search window, or see Searching for Chemicals, SDSs, and Inventory for information about performing a search.
Step 3After locating the material, click the material’s hyperlinked PRODUCT name to open the Material Detail window.
Step 4At the top of the window, ensure the DETAILS tab is selected, and then click the edit icon (pencil) shown at the end of the Material Description field.
Step 5In the Material Description dialog box, delete the current description and then enter a new Material Description.
Step 6Click SAVE.
Adding a Material to a Location via Storage/Use Locations Tab
Step 1Choose CHEMICAL / SDS > SEARCH > Chemical / SDS Search from the navigation pane.
Step 2Find the material in the lower portion of the window, or see Searching for Chemicals, SDSs, and Inventory for information about performing a search.
Step 3After locating the material, click the material’s hyperlinked PRODUCT name to open the Material Detail window.
Step 4Click the STORAGE/USE LOCATIONS tab at the top of the window.
Step 5Click ADD NEW LOCATION.
Step 6In the Add Material Locations dialog box, select the Location Assignment* from the drop-down menu.
Step 7Click DONE to dismiss the drop-down menu.
Step 8Click SUBMIT.
Activating a Material for a Location
Step 1Choose CHEMICAL / SDS > SEARCH > Chemical / SDS Search from the navigation pane.
Step 2Find the material in the lower portion of the window, or see Searching for Chemicals, SDSs, and Inventory for information about performing a search.
Step 3After locating the material, click the material’s hyperlinked PRODUCT name to open the Material Detail window.
Step 4Click the STORAGE/USE LOCATIONS tab at the top of the window.
Step 5Find the LOCATION and in its row, click the ellipses.
Step 6Click Activate Material at this Location.
Deactivating a Material for a Location
Step 1Choose CHEMICAL / SDS > SEARCH > Chemical / SDS Search from the navigation pane.
Step 2Find the material in the lower portion of the window, or see Searching for Chemicals, SDSs, and Inventory for information about performing a search.
Step 3After locating the material, click the material’s hyperlinked PRODUCT name to open the Material Detail window.
Step 4Click the STORAGE/USE LOCATIONS tab at the top of the window.
Step 5Find the LOCATION and in its row, click the ellipses.
Step 6Click Deactivate Material at this Location.
Step 7CONFIRM the action.
Applying a Code to a Material
Note To create a material code, see Working with Code Types.
Step 1Choose CHEMICAL / SDS > SEARCH > Chemical / SDS Search from the navigation pane.
Step 2Find the material in the lower portion of the window, or see Searching for Chemicals, SDSs, and Inventory for information about performing a search.
Step 3After locating the material, click the material’s hyperlinked PRODUCT name to open the Material Detail window.
Step 4Click the IDENTIFICATION tab at the top of the window.
Step 5Click +ADD CODE.
Step 6In the Add Material Code dialog box, select the Code Type from the triangular drop-down menu.
Step 7Enter an alpha-numeric Value.
Step 8Click SAVE.
Applying a Material Classification to a Material
Step 1Choose CHEMICAL / SDS > SEARCH > Chemical / SDS Search from the navigation pane.
Step 2Find the material in the lower portion of the window, or see Searching for Chemicals, SDSs, and Inventory for information about performing a search.
Step 3After locating the material, click the material’s hyperlinked PRODUCT name to open the Material Detail window.
Step 4Click the IDENTIFICATION tab at the top of the window.
Step 5Click +ADD CLASSIFICATION.
Step 6In the Add Material Classification dialog box, click the triangular drop-down menu from the Classification* field to display material locations.
Step 7Click the check boxes of the locations you want to apply classifications to.
Step 8Click SUBMIT.
Applying Hazard Classifications to a Material
Note Before you begin, you must enable this feature in the system first. See Enabling Material Hazard Classifications.
Material Hazard Classes can identify materials that are hazardous under NYC Hazard, 209-U Hazard, or Fire Code regulations. These classes can also satisfy additional reporting requirements in some U.S. jurisdictions.
Step 1Choose CHEMICAL / SDS > SEARCH > Chemical / SDS Search from the navigation pane.
Step 2Find the material in the lower portion of the window, or see Searching for Chemicals, SDSs, and Inventory for information about performing a search.
Step 3After locating the material, click the material’s hyperlinked PRODUCT name to open the Material Detail window.
Step 4Click the IDENTIFICATION tab at the top of the window.
Step 5Scroll down the window to find the Hazard Classes section, and click +ADD HAZARD CLASS.
Note Fields accompanied by an asterisk (*) requires input.
Step 6In the Add Material Hazard Class dialog box, select a Hazard Class Type* from the drop-down menu.
Step 7Select Hazard Classes* from the drop-down menu.
Step 8Click SUBMIT.
Adding Attachments to a Material
See Supported Upload Formats to ensure you upload a document format the system supports.
Supplemental information, including hyperlinks, can be added to a material.
Note You may want to check the system’s attachment categories to ensure it contains the relevant categories for the document or hyperlink that you want to add. See Configuring Inventory Settings for a Facility for information.
Step 1Choose CHEMICAL / SDS > SEARCH > Chemical / SDS Search from the navigation pane.
Step 2Find the material in the lower portion of the window, or see Performing a Basic Material Search.
Step 3After locating the material, click the material’s hyperlinked PRODUCT name to open the Material Detail window.
Step 5Click +ADD NEW ATTACHMENT.
Step 6Click either:
—Upload a Document (Continue to Step 7)
OR
—Link to Website URL (Continue to Step 12)
Step 7(Required) After clicking Upload a Document’s radio button, enter the document’s Description*.
Step 8(Required) Choose document’s Category* from the drop-down menu.
Note Attachment categories are created at SETTINGS > CHEMICAL MANAGEMENT / SDS > Material Components > Attachment Categories section of the UI. See Creating an Attachment Category for instructions.
Step 9(Optional) Pick an Expiration Date for the document.
Note The expiration date is for display purposes only, and does not affect access to the attachment.
Step 10 Drag the file inside the text box or click the Select a File link to browse your device.
Step 11 Click SUBMIT. The window refreshes to display the attachment’s file name and icons that enable you to download, edit, or archive the attachment file.
Step 12 (Optional) If you are adding a link to the material, click the Link to Website URL radio button.
Step 13 (Required) Enter a Description for the URL you are adding.
Note Ensure a URL category has been created before proceeding.
Step 14 (Optional) Pick an Expiration Date for the URL you will add in Step 16.
Note The expiration date is for display purposes only, and does not affect access to the attachment.
Step 15 (Required) Choose the Category relevant to the URL address that you add in Step 16.
Note For Step 16, you must also include the protocol portion of the web address (either http:// or https://) for the URL to validate in the system.
Step 16 (Required) Enter the entire URL address for your URL attachment.
Step 17 Click SUBMIT. The window refreshes and displays the HTTP icon that users click to access the linked website.

Downloading a Material’s Attachment
Step 1Perform Steps 1 through 4 in Adding Attachments to a Material.
Step 2In the Attachments section of the window, click the download icon, shown below.
Step 3Browse your device for a location to save the document, or create a New Folder for it.
Step 4(Optional) Provide a new name for the document.
Step 5Click Save.
Editing an Attachment’s Description and Expiration Date
Step 1Perform Steps 1 through 4 in Adding Attachments to a Material.
Step 2In the Attachments section of the window, click the edit icon, shown below.
Step 3Edit the following fields:
•(Optional) Provide a new Description*.
•(Optional) Pick or edit the Expiration Date using the calendar tool.
Step 4Click SAVE.
Viewing a Material Attachment’s Expiration Date
Expiration dates are for display purposes only and do not affect access to the attachment.
To view an attachment’s expiration date:
•Perform Steps 1 through 4 in Adding Attachments to a Material.
Archiving a Material’s Attachment
Step 1Perform Steps 1 through 4 in Adding Attachments to a Material.
Step 2In the Attachments section of the window, click the archive icon, shown below.
Step 3CONFIRM the action.
Creating an Inventory Record for a Material
Note Before you begin:
Ensure chemical management is enabled for your facility.
See Enabling Chemical Management for a Site for more information.
To prompt the system to ensure inventory record information is complete, see Enforcing Chemical Properties Validation.
Step 1Choose CHEMICAL / SDS > SEARCH > Chemical / SDS Search from the navigation pane.
Step 2In the Chemical / SDS Search window, select a Location Assignment from the drop-down menu.
Step 3Click SEARCH COLLECTION.
Step 4Click the Product hyperlink of the material you want to add an inventory record for.
Step 5Click the INVENTORY tab in the Material Detail section of the window.
Step 6Click +ADD INVENTORY RECORD.
Step 7In the Add Inventory Record page, provide input for the fields.
Note Field Information for Creating an Inventory Record for a Material immediately follows this procedure if you need additional information. Physical state conversion methods can be found in Appendix A—Inventory: Source Quantity Conversions.
You must provide input for all fields accompanied with an asterisk (*).
Step 8(Recommended) In the QUANTITY TYPE section of the window, find the Max on Site field, and enter the material quantities in its text box.
Step 9When you are finished inputting data, scroll down the page and click SAVE INVENTORY.
Field Information for Creating an Inventory Record for a Material
The following information provides additional guidance for most of the fields and other elements shown in the Add Inventory Record page.
Note Learn methods for calculating conversions for the physical state of a material for inventory record creation. See Appendix A—Inventory: Source Quantity Conversions.
|
Inventory Record Field |
Description |
|---|---|
|
CHANGE DATA SOURCE |
Choose a different document appropriate for the material you are accounting for. For example, if a material has more than one document associated with it, such as a kit with parts A and B, you can collect quantities for each part independently. Note: |
|
Location Assignment |
The material’s storage or use location. |
|
Capture Inventory by Container Count |
Select this toggle when a material exists in several containers; for example, a pallet of cans that are 12 fluid ounces each. The system calculates the QUANTITY column based on your input for Container Size, Unit of Measure, and number of containers. Note: Selecting/de-selecting the toggle after entering input values may require re-entering certain inputs because the calculation mode has changed. |
|
Container Type |
Displays a list of container types for you to select from. |
|
Conversion Type |
Choose the appropriate selection from the drop-down menu. The conversion type is connected to the Physical State of the material. Note: •If you don’t need conversion figures, select Bulk Quantities in Pounds (or Kilograms). You can select this option regardless of the material’s physical state being a liquid or a gas. •If you select Liquid Volume to Pounds, ensure you make a selection for the Specific Gravity field. •If you select Gas Volume to Pounds, enter input for Gauge Pressure (psig), Storage Temperature, Units, and Molecular Weight (g/mol) fields. Additional information is available at the end of this topic, Appendix A—Inventory: Source Quantity Conversions. |
|
Container Size |
Enter a numeric value. This field displays when the Capture Inventory by Container Count toggle is selected. |
|
Days On Site |
System calculates days on site based on period start/end dates as defined when the facility was configured for inventory. |
|
Unit of Measure |
The defined unit by which the material quantity is measured. |
|
Max On Site |
The maximum amount of a material onsite for the inventory period. |
|
Average |
Indicates the average amount of a material onsite for the inventory period. |
|
Purchased / Received |
Indicates the amount of a material brought onsite for a given period. |
|
Usage |
Indicates the amount of a material consumed for a given period. |
|
Waste |
Indicates the amount of a material that will enter a waste stream. |
|
Gauge Pressure (psig) |
Displays if Gas Volume to Pounds is selected in the Conversion Type field. Refers to the pressure indicated on the gauge of the cylinder the gas is contained in. |
|
Storage Temperature |
Displays if Gas Volume to Pounds is selected in the Conversion Type field. Refers to the temperature based on the storage conditions for the gas. |
|
Units |
Displays if Gas Volume to Pounds is selected in the Conversion Type field. Refers to the preferred temperature unit when entering Storage Temperature. |
|
Molecular Weight (g/mol) |
Displays if Gas Volume to Pounds is selected in the Conversion Type field. Refers to the chemical ingredient Molecular Weight. Each chemical ingredient requires this be entered for the gas conversion to function correctly. |
|
Physical State |
Displays information if associated data is found in the material’s SDS. |
|
Hazard Properties |
Displays information if associated data is found in the material’s SDS. |
|
Specific Gravity |
Displays information if associated data is found in the material’s SDS. Enter a valid pattern (for example: 3, ~3, <3, <=3, >3, >=3, 3-5). Input for this field is required if Liquid Volume to Pounds was selected in the Conversion Type field. |
|
Reference Material |
Displays when prompted to input Specific Gravity pattern. Make a selection from the drop-down menu. |
|
Chemical Type |
Displays information if associated data is found in the material’s SDS. |
|
Pressure Condition |
Indicates the material’s stored pressure condition. Ambient is the default condition. |
|
Temperature Condition |
Indicates the material’s stored temperature condition. Ambient is the default condition. |
|
EPCRA 312 Exempt |
Click the toggle to exclude the material from EPCRA 312 reporting. Default setting is False (gray). |
|
EPCRA 313 Exempt |
Click the toggle to exclude the material from EPCRA 313 reporting. Default setting is False (gray). |
Updating an Inventory Record for a Material
Before you begin, have the following information available:
•For inventory record field information, see:
—Field Information for Creating an Inventory Record for a Material
•For source quantity conversion details, see:
—Appendix A—Inventory: Source Quantity Conversions
Note To prompt the system to ensure inventory record information is complete, see Enforcing Chemical Properties Validation.
Step 1Choose CHEMICAL / SDS > SEARCH > Chemical / SDS Search from the navigation pane.
Step 2In the Chemical / SDS Search window, select a Location Assignment from the drop-down menu.
Step 3Click SEARCH COLLECTION.
Step 4Click the Product hyperlink whose inventory record requires updating.
Step 5Click the INVENTORY tab in the Material Detail section of the window.
Step 6Click the hyperlink for the material whose inventory record needs updating. This section of the window is outlined in red in the following image.
Step 7In the Update Inventory Record page, modify the fields as needed.
Note For field descriptions, see Field Information for Creating an Inventory Record for a Material
Step 8After you finish, scroll down the page and click SAVE INVENTORY.
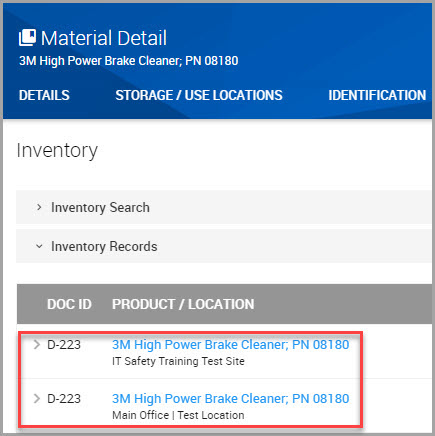
Viewing Inventory Details for a Material
You can view a summary of a material’s inventory by performing the following steps.
Step 1Choose CHEMICAL / SDS > SEARCH > Chemical / SDS Search from the navigation pane.
Step 2Locate the material in the lower portion of the window. To perform a material search, see Searching for Chemicals, SDSs, and Inventory.
Step 3After locating the material, click its PRODUCT hyperlink.
Step 4In the Material Detail window, click the INVENTORY tab.
Step 5Find the material below the PRODUCT / LOCATION section, and click the carat, shown bordered in red in the following image, to reveal inventory details.
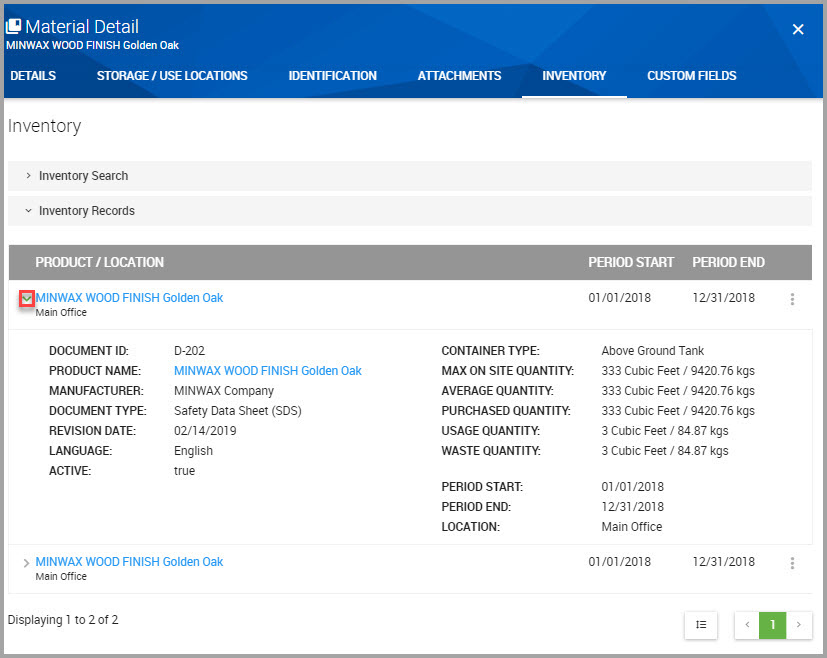
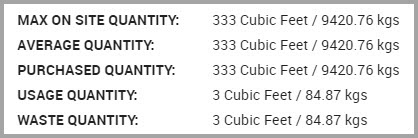
Quantity values display both the source and converted quantity values. For example, the MAX ON SITE QUANTITY = 333 cubic feet, with a converted value of 9420.76 kilograms.
Viewing Inventory History for a Material
You can view inventory activity such as inventory creation, or changing inventory cycles) by performing the following steps.
Step 1Choose CHEMICAL / SDS > SEARCH > Chemical / SDS Search from the navigation pane.
Step 2In the Chemical / SDS Search window, locate the material in the lower portion of the window. To perform a material search, see Searching for Chemicals, SDSs, and Inventory.
Step 3After locating the material, click its PRODUCT hyperlink.
Step 4In the Material Detail window, click the INVENTORY tab.
Step 5Find the Product/Location hyperlink for the inventory record you are interested in and in its row, click Additional Actions > View History.
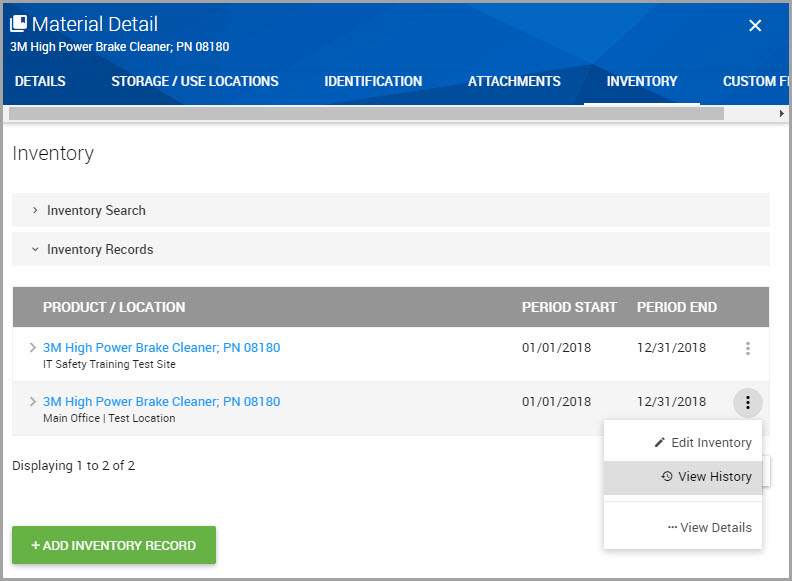
The records Inventory History page displays, where you can see when a record was created or updated, the date the update occurred, the material’s location, and who updated the inventory record.
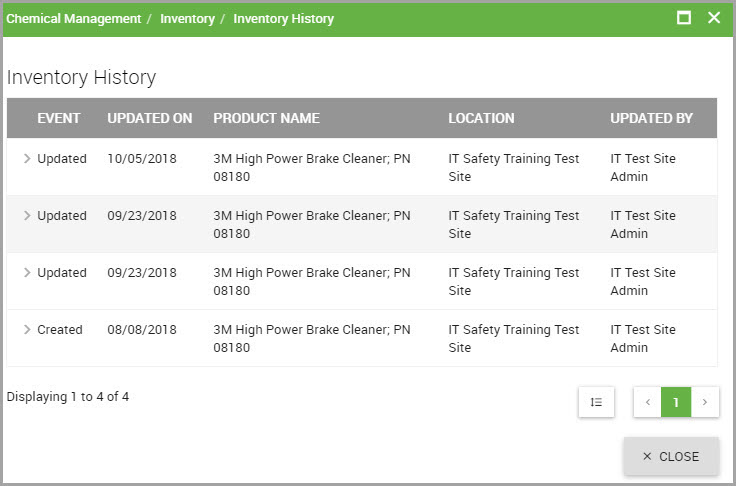
Click the carat next to the event (either Created or Updated) to view inventory details, shown in the following image.
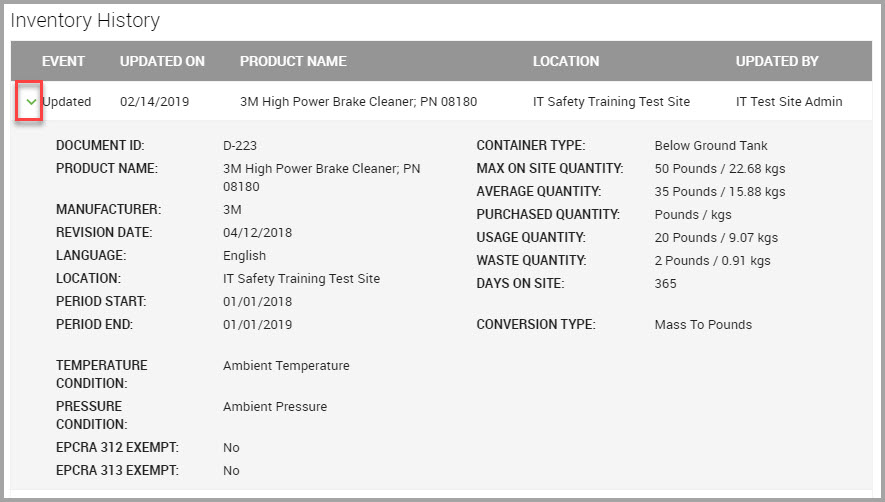
Quantity values display both the source and converted quantity values. For example, the MAX ON SITE QUANTITY = 50 pounds, with a converted value of 22.68 kilograms.
Adding Details to a Custom Field
Before you begin, ensure that the custom field that you want to add details to is activated. See Activating an Archived Custom Field.
Step 1Choose CHEMICAL / SDS > SEARCH > Chemical / SDS Search from the navigation pane.
Step 2In the Chemical / SDS Search window, click on any material’s hyperlinked PRODUCT name.
Step 3In the Material Detail window, click the CUSTOM FIELDS tab.
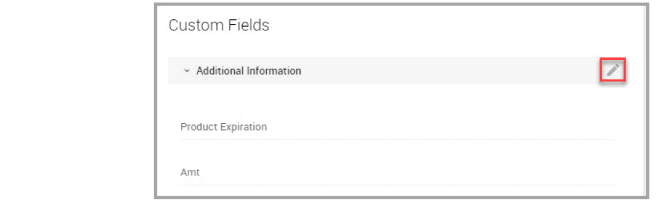
Step 4If custom field names don’t display in the Custom Fields section of the window, click the caret adjoining Additional Information to reveal these fields.

Step 5At the end of the Additional Information row, click the edit icon, shown bordered in red in the following image, to display an edit icon for each custom field shown in the window.
Step 6Click the edit icon next to the custom field that you want to provide additional information for.
Step 7In the Edit Material Custom Field Value dialog box, click where the custom field name displays and enter the information.

Note Clicking the gear icon opens the Manage Custom Fields window, where you can add, modify, or archive custom fields.
Step 8When you finish, click SAVE.
SDS Material Menu Descriptions, Features, and Procedures
The topics in this section range from viewing an SDS’s chemical summary to editing an SDS’s override settings.
Topics include:
Viewing and Exporting a Material’s Regulated Chemical Summary
SDS Material Menu Icon Descriptions, Features, and Procedures
Editing Override Settings in the Material Details Window
Viewing Data Capture Attributes
Data Capture Attribute Descriptions
Viewing Override and Source Data Values
Reviewing History for a Material’s Documents, Locations, and Components
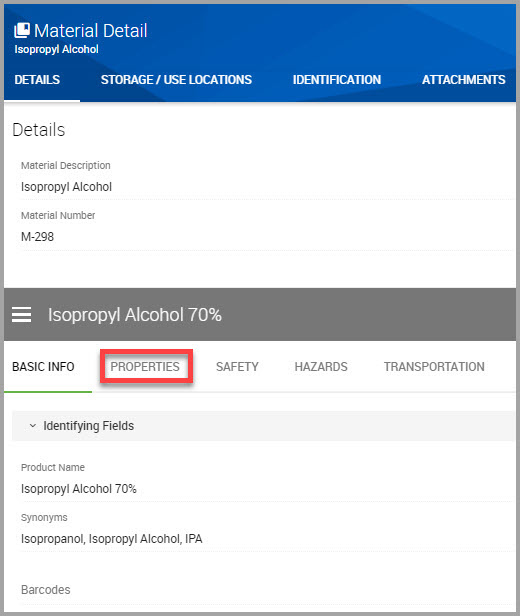
You can review SDS data by navigating through the tabbed menus shown in the material’s SDS gray title bar, described in the table below.

Note The menu tabs that display are dependent on the features your organization purchased.
|
Tab |
Description |
|---|---|
|
Basic Info |
Where you can view product name, product numbers, bar codes, and latest SDS revision dates. |
|
Properties |
Where you can view chemical properties, physical and chemical properties, Hazard categories, and the Volatile Organic Compounds associated with the material. You can also export a list of regulated ingredients, which outputs in the .xlsx format. See Viewing and Exporting a Material’s Regulated Chemical Summary for information. |
|
Safety |
Where you can view First Aid, Personal Protective Equipment (PPE), Fire Fighting and Spill measures, and Handling/Storage details. |
|
Hazards |
Where you can view HMIS/NFPA, WHMIS, and GHS hazard details, and where you can print HMIS/NFPA labels. Note: You can hide the WHMIS portion of this section. See Showing or Hiding WHMIS Canada Details. |
|
Transportation |
Where you can view Department of Transportation, International Air Transport Association, and International Maritime Dangerous Goods details. The system derives this information directly from the SDS. Note: You can display additional IATA fields by Enabling Transportation Supplemental Fields, performed in the SETTINGS module. |
Viewing and Exporting a Material’s Regulated Chemical Summary
You can view, filter, and export a list of chemical regulations for a material by performing the following steps.
Step 1Choose CHEMICAL /SDS > SEARCH > Chemical / SDS Search from the navigation pane.
Step 2Find the material in the lower portion of the Chemical / SDS Search window, or see Searching for Chemicals, SDSs, and Inventory.
Step 3After locating the material, click the material’s hyperlinked PRODUCT name to open its Material Detail window.
Step 4Click the PROPERTIES tab.
Step 5In the Ingredients section of the window click the ellipses, shown bordered in red in the following image.
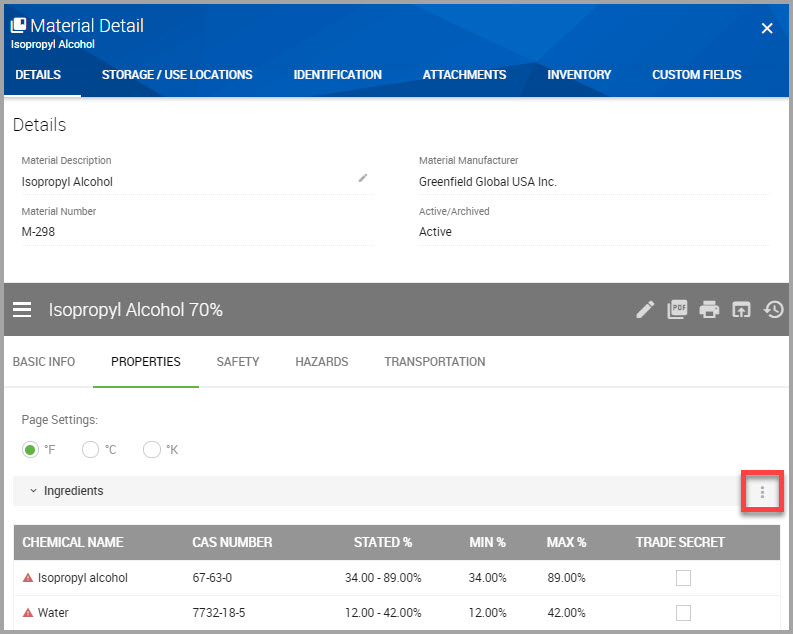
Step 6Click View Regulations to open its Regulated Chemicals Summary page.
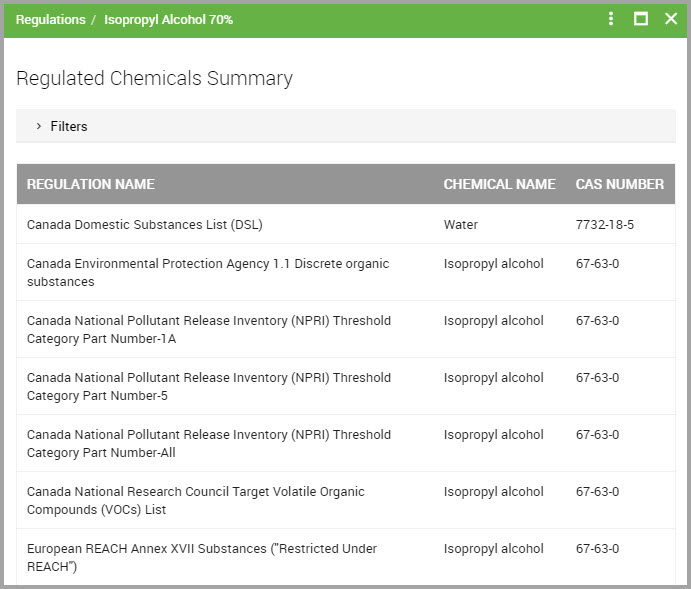
Step 7(Optional) Click Filters to display additional filters to reduce the listings shown in the page. You can filter by:
•Regulation Name
•Country
•Region (Europe, International, or North America)
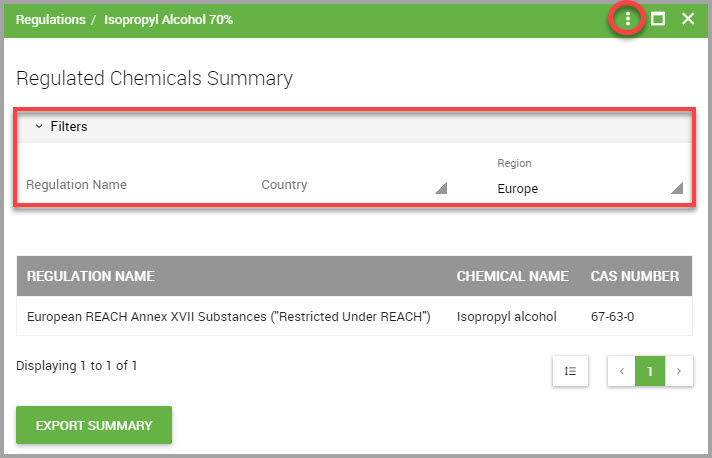
Step 8To download the summary to your device, click either the ellipses (circled in red in the previous image), or the EXPORT SUMMARY button, location at the bottom of the page.
The window prompts you to save the report locally as the .xlsx-formatted summary downloads to your device.
SDS Material Menu Icon Descriptions, Features, and Procedures
The SDS material menu bar includes the following five icons displaying to the right of the product’s name. The following table describes these icons and how to use them with the SDS portion of the window.

|
Menu Icon |
Description |
|---|---|
|

|
Edit Override Settings—Click to modify fields shown in conjunction with most of the SDS material menu tabs. After clicking the Edit Override Settings icon, any field accompanied by a pencil icon is editable. See Editing Override Settings in the Material Details Window. Descriptions for fields accompanied by red flags are found at Viewing Data Capture Attributes. Blue flags indicate an override was applied to that field. See Viewing Override and Source Data Values. |

|
View Document—Click to open the entire SDS. Icons display at the top of the page for you to use to download and print. |

|
Print Labels—Click to print chemical labels for the material currently on screen. See Printing a Material Label for instructions. |

|
Submit New Revision—Click to upload an updated SDS. See Submitting a New Revision for instructions. |
|

|
History—Click to view an accounting of a material’s documentation, location, and material components history. See Reviewing History for a Material’s Documents, Locations, and Components for information. |
Editing Override Settings in the Material Details Window
You can replace data for certain material fields by performing the following steps.
Step 1Choose CHEMICAL / SDS > SEARCH > Chemical / SDS Search from the navigation pane.
Step 2Find the material in the lower portion of the Chemical / SDS Search window, or see Searching for Chemicals, SDSs, and Inventory for information about performing a search.
Step 3After locating the material, click the material’s hyperlinked PRODUCT name to open the Material Detail window.
Step 4In the SDS material menu bar, click the Edit Override Settings icon, shown bordered in red in the following image.
After you click this icon, editable fields display a miniature version of the Edit Override Settings icon. An example is shown bordered in red in the following image.
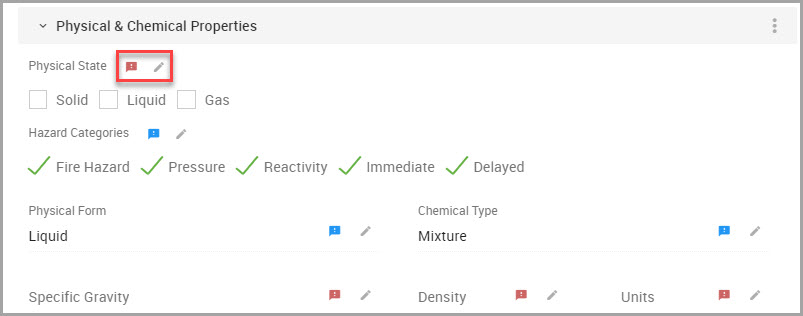
Note The following colored Flag icons may also accompany fields.
—Red flags indicate data capture attributes and display when field information was not captured during SDS processing. See Step 7 and Viewing Data Capture Attributes.
—Blue flags indicate that an override has been applied to that field. See Viewing Override and Source Data Values.
Step 5Find the field that you want to edit, and click the editing icon adjoining it.
Step 6In the dialog box, edit the field. You must provide input for all fields accompanied with an asterisk (*).REVERT TO SOURCE replaces any editing you performed with the original data for that field.
Step 7(Optional) Click on any flags to view additional information:
•Click on red flags to review the data capture attribute for that field. See Data Capture Attribute Descriptions for attribute definitions.
•Click on blue flags to review its override and source data details.
Step 8Click SAVE when you finish.
Viewing Data Capture Attributes
Fields may display a red flag which denotes a data capture attribute. Data capture attributes are applied to fields to reflect the data that could not be acquired during the SDS data capture process.
To view the data capture attribute description:
•Click on the flag to display its Data Capture Attribute dialog.
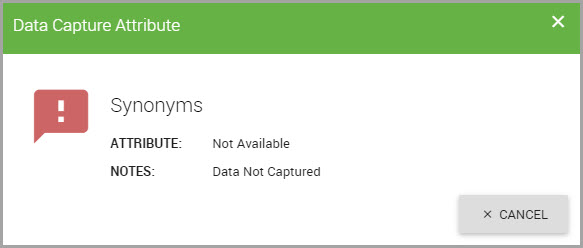
Data Capture Attribute Descriptions
The following table identifies and describes the five data capture attributes.
|
Attribute |
Description |
|---|---|
|
Illegible |
The data value existed but was undecipherable. |
|
Missing Or Not Available |
The data value was not found in the document or was listed as Not Available. |
|
Unreasonable Value |
The data value existed, but was outside of acceptable limits. |
|
Not Applicable |
The data value existed, but was cited as Not Applicable. |
|
Wrong Format |
The data value existed, but was not in the appropriate format, according to Data Capture Guidelines. |
Additional processing information, if available, display in the NOTES section of the dialog.
Viewing Override and Source Data Values
Blue flags indicate that an override was applied to that field by an administrator.
To view the override and source data details:
•Click the flag to display the override and source value information.

Submitting a New Revision
Step 1Choose CHEMICAL / SDS > SEARCH > Chemical / SDS Search from the navigation pane.
Step 2Find the material in the lower portion of the Chemical / SDS Search window, or see Searching for Chemicals, SDSs, and Inventory for information about performing a search.
Step 3Click the hyperlinked PRODUCT name of the material.
Step 4In the SDS material menu bar, click the Submit New Revision icon, shown bordered in red in the following image.
•Drag your document from your device’s desktop into the text box,
OR
(a)Click Select a File to browse your system.
(b)Browse your device for the document.
(c)Click Open when you find the document.
The file name displays below the text box.
Note If you decide to add a different document, click the trash icon to remove the document you selected in Step 5c.
Step 6Click NEXT.
Step 7(Required) You must provide input for all fields accompanied with an asterisk (*):
(a)Enter the Product Name*.
(b)Enter the Revision Date* for the revised document. This date cannot be older than the date shown for the Current Revision Date field.
Note If no date is listed, enter today’s date.
(c)Enter the Manufacturer* name for the revised document.
(d)Select the Language* for the revised document from the drop-down menu.
(e)Enter the Document Type for the revised document from the drop-down menu. The type must match the type shown in Current Document Type field.
Step 8Click NEXT.
Step 9In the Confirmation page, review the information and when you are satisfied, click SUBMIT.
Reviewing History for a Material’s Documents, Locations, and Components
You can view a material’s documentation, location history and material components by performing the following steps.
Step 1Choose CHEMICAL / SDS > SEARCH > Chemical / SDS Search from the navigation pane.
Step 2Find the material in the lower portion of the Chemical / SDS Search window, or see Searching for Chemicals, SDSs, and Inventory for information about performing a search.
Step 3After locating the material, click the material’s hyperlinked PRODUCT name to open its Material Detail window.
Step 4In the SDS material menu bar, click the History icon, shown bordered in red in the following image, to open its history page.
The History opens with the DOCUMENT tab selected, which is where you can view the material’s document history for:
•SDS Refresh events
•Document Revisions, and
•Document History, which provides data regarding document creation and when field overrides were performed.
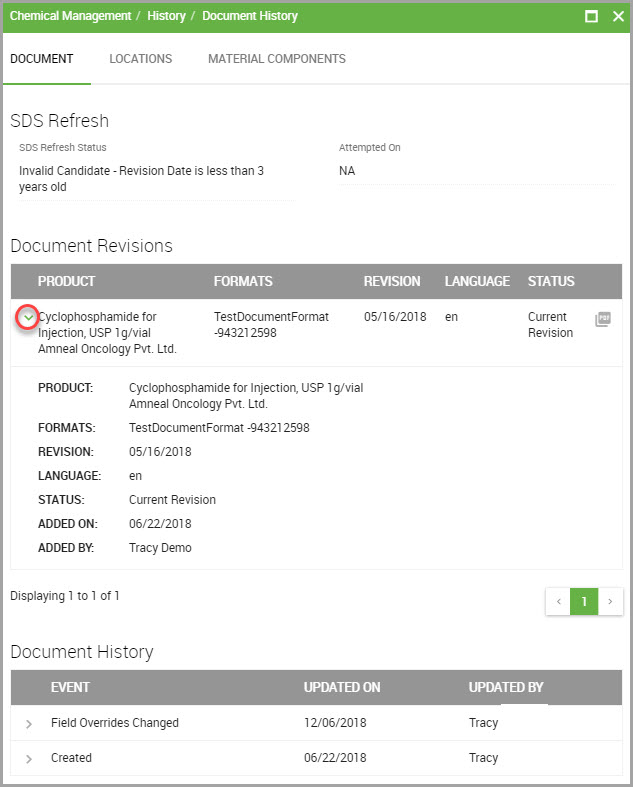
Step 5(Optional) View additional information by:
•Clicking a carat, shown encircled in red in the previous image, to reveal that item’s detailed information.
•Clicking the PDF icon to view the material’s current SDS.
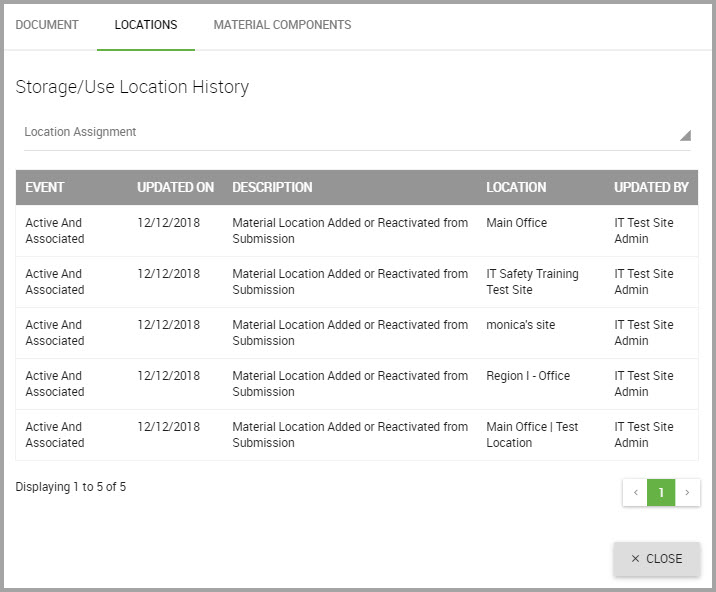
Step 6Decide to click either
•the CLOSE button to exit the page, or
—the LOCATIONS tab to view its location history.
—the Material Components tab to review history pertaining to the material detail, codes, custom fields, and classifications for the material.
Step 7(Optional) Select a Location Assignment from the drop-down menu to refine the location list.
This page provides an overview for:
•What the specific EVENT was
•The date the event was UPDATED ON
•A DESCRIPTION for the event
•The exact LOCATION for the event
•Who UPDATED the location.
Step 8(Optional) To review history for material details, codes, custom fields, or material classifications, click the MATERIAL COMPONENTS tab.
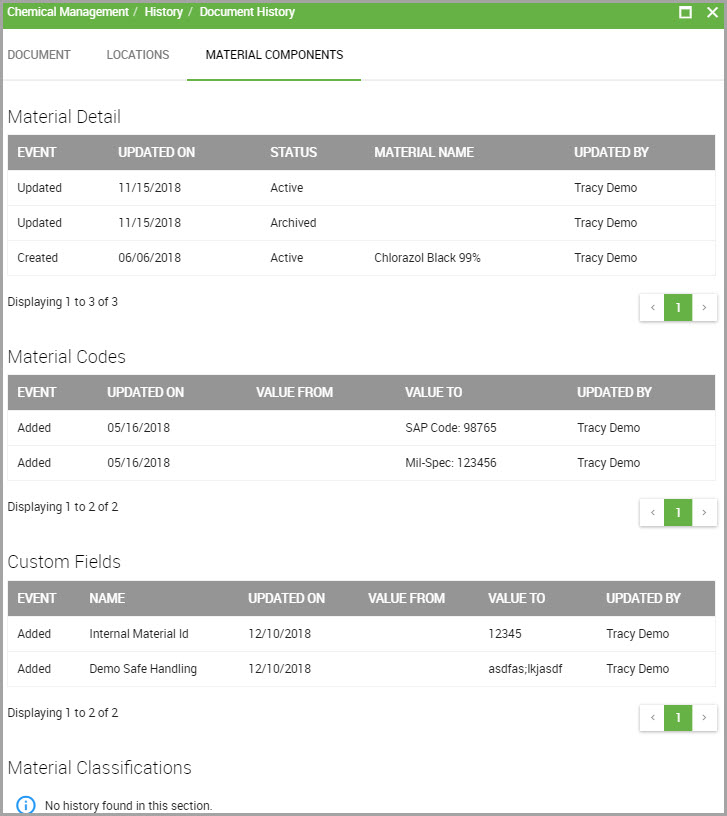
Step 9Click CLOSE when you are finished reviewing the page.
Submitting SDSs
You can submit single or bulk documentation to the system and view upload status by following the procedures in this section.
Topics include:
SDS Submission & Access Overview
Uploading an Existing Document
Viewing SDS Submission Statuses
Adding a New Submission after Viewing SDS Status
Submitting New Chemicals for Review and Approval using the Decisions Chemical Workflow Feature**
Submitting Revised SDSs for Review with Decision Matrix*
Note * Decisions Workflow and Decision Matrix features are available to Premium users with the Decisions Workflow or Decisions add-on.
SDS Submission & Access Overview
•Document Availability:
—Document availability spans between one to two days, depending on the size of the uploaded document.
•Checking Document Status:
—Check status by performing a search for it after selecting the Submitted Documents tab in the Submit Documents window.
•Access the Documents
—Available documents are accessed the Chemicals / SDS Module.
Supported Upload Formats
Portable Document Format (PDF), is preferred, but the following formats are also accepted by the system:
|
.bmp |
.doc |
.docx |
|
.gif |
.jpeg |
|
|
.png |
.pps |
.ppsx |
|
.ppt |
.pptx |
.rtf |
|
.txt |
.xls |
.xlsx |
Uploading a Single SDS File
Step 1Choose CHEMICAL/ SDS > SDS SUBMISSIONS > Upload Single SDS File from the navigation pane.
Step 2Select one of the following upload choices:
•Browse SDS Library—Perform this procedure to ensure documents aren’t duplicated within the system. See Uploading an Existing Document for instructions for completing this procedure.
Or
•Upload a New Document. See Uploading a New Document for instructions for completing this procedure.
Uploading an Existing Document
Step 1Choose CHEMICAL/ SDS > SDS SUBMISSIONS > Upload Single SDS File from the navigation pane.
Step 2Click Browse SDS Library.
Step 3Choose to perform either a Basic Search, or an Advanced Search if you need additional search parameters.
Step 4Choose one of the following Search Modes:
—Choose Match All Terms to return results that match all search terms you entered in the Search field, and in the order that you entered them.
—Choose Match Any Term to return results that match any of the search terms you entered in the Search field, in any order.
Note Click the Search Help hyperlink for additional search tips.
Step 5Enter a key word in the Search field.
Step 6Click SEARCH LIBRARY.
Step 7Locate the Product you are looking for in the lower portion of the window.
Step 8Click the Product’s toggle.
Step 9Scroll down the page and click NEXT.
Note Fields accompanied by an asterisk (*) require input.
Step 10 In the Edit Details window, review the field data and make any necessary updates.
Note If you entered a Revision Date in SETTINGS > CHEMICAL / SDS Settings> Revision Date Restrictions, the system prevents you from uploading a document with a revision date older than the date you specified in the SETTINGS module. See Imposing Revision Date Restrictions for more information.
Step 11 Click the Location Assignment* field to select one or more locations by clicking inside the location’s check box.
Step 12 Scroll down the page, and click NEXT.
Step 13 Review the information in the Confirmation page and when you are satisfied, click SUBMIT.
Uploading a New Document
Step 1Choose CHEMICAL/ SDS > SDS SUBMISSIONS > Upload Single SDS File from the navigation pane.
Step 2Choose to perform either a Basic Search, or an Advanced Search if you need additional search parameters. See Performing a Basic Material Search or Performing an Advanced Material Search.
Step 3Enter a key word in the Search field.
Step 4Choose one of the following Search Modes:
—Choose Match All Terms to return results that match all search terms you entered in the Search field, and in the order that you entered them.
—Choose Match Any Term to return results that match any of the search terms you entered in the Search field, in any order.
Note Click the Search Help hyperlink for additional search tips.
Step 5Click SEARCH LIBRARY.
Step 6Locate the Product you are looking for in the lower portion of the window.
Step 7Click the Product’s toggle.
Step 8Scroll down the page and click NEXT.
Note Fields accompanied by an asterisk (*) require input.
Step 9 In the Edit Details window, review the field data and make any necessary updates.
Note
If you entered a Revision Date in SETTINGS > CHEMICAL / SDS Settings > Revision Date Restrictions, the system prevents you from uploading a document with a revision date older than the date you specified in the SETTINGS module. See Imposing Revision Date Restrictions.
You may see a Proprietary check box, which is visible in this window when enabled in SETTINGS > CHEMICAL / SDS Settings > Proprietary Flag. See Marking SDS Submissions with a Proprietary Flag for information.
Click the Location Assignment* field to select one or more locations by clicking inside the location’s check box.
Step 10 Scroll down the window, and click NEXT.
Step 11 Review the information in the Confirmation page and when you are satisfied, click SUBMIT.
Uploading Bulk SDS Folders
You can upload one or multiple compressed (zip) folders by performing the following steps.
Note The maximum file size for a bulk upload is 100 MB.
Before you begin, place the documents you plan to upload into a zip file.
Step 1Choose CHEMICAL/ SDS > SDS SUBMISSIONS > Upload Bulk SDS Folder from the navigation pane.
Step 2Select a Location Assignment* for the upload.
Note You may see a Proprietary check box, visible in this window when the feature is enabled in SETTINGS > CHEMICAL / SDS Settings. See Marking SDS Submissions with a Proprietary Flag for more information.
Step 3Either drag the zip file into the interior of the text box, or click Select a File to browse your device for the zip file.
Step 4Click UPLOAD.
Step 5A message appears confirming the upload. Choose either:
•NO, VIEW SUBMISSIONS if you don’t have additional files to upload.
You are finished with this procedure.
Or
•YES, SUBMIT ANOTHER FILE (continue to Step 6).
Step 6(Optional) Perform Steps 2-5 for additional folders you want to upload.
Note You can choose a different upload location from the previous upload.
See Uploading Bulk SDS Folders for upload status and access details.
Viewing SDS Submission Statuses
Step 1Select CHEMICAL / SDS from the navigation pane.
Step 2Select SDS SUBMISSIONS > View SDS Submission Statuses.
Step 3Perform a search by entering information in the fields.
Step 4Click SEARCH SUBMITTED DOCUMENTS to display submitted SDSs.
Adding a New Submission after Viewing SDS Status
Step 1Select CHEMICAL / SDS from the navigation pane.
Step 2Select SDS SUBMISSIONS > View SDS Submission Statuses.
Step 3Click +ADD NEW SUBMISSION.
Step 4In the Upload Single SDS File window, choose to either:
—Drag the file to the inside the text box, or
—Click the Select a File link shown inside the text box to browse your system for the document.
The file name displays just below the perimeter of the text box.
Note If you uploaded a file in error, click the trash icon shown in the row and to the right side of the uploaded file’s name.
Step 5Click NEXT.
Step 6(Required) In the Edit Details window, you must provide input for all fields accompanied with an asterisk (*).
—Location Assignment*
—Product Name*
—Manufacturer*
—Document Type*
—Revision Date*
Note If no date is listed on the document, enter today’s date.
—Language*
Step 7 In the Confirmation window, review the information and when you are satisfied, click SUBMIT.
Submitting New Chemicals for Review and Approval using the Decisions Chemical Workflow Feature*
Note *The Decisions chemical workflow approval feature is available to Premium accounts that includes the Decision Workflow add-on.
You can have new SDSs reviewed and approved by administrators before they become available to your users by performing the Decisions workflow new chemical approval processes provided in this section.
Topics include:
•Configuring Decisions Chemical Workflow Settings
•Pathways for Creating a New Decisions Chemical Review Request
•Creating a New Decisions Chemical Review Request via the Search Module
•Uploading a Library Document for a New Decisions Chemical Review Request
•Submitting a New Decisions Chemical Review Request
•Creating a New Decisions Chemical Review Request via the SDS Submission Module
•Accessing Decisions Chemical Review Requests
•Accessing a Decisions Chemical Review Request via Email Link
•Accessing a Decisions Chemical Review Request via the Chemical Approvals Module
•Checking Status of your Decisions Chemical Review Request
Note You can configure the system to display a material approval column when you conduct chemical/SDS searches. See Customizing Search Results Columns.
Decisions Chemical Workflow Approval Overview
This section describes the preliminary steps that you may need to perform, the pathways in which you can submit requests through, how reviewers access reviews, and how requesters can check status for their submitted requests.
The processes are performed in the following sequence:
1See Before you Begin to ensure that your device and system are configured so that you and your reviewers can perform the tasks in this section.
2See Pathways for Creating a New Decisions Chemical Review Request to determine the route that you want to take to begin the decisions chemical approval process.
As you create the request, you are asked to provide requester details in case a reviewer needs to contact you, and then you finalize this portion of the process by submitting the SDS to the system.
After submitting the SDS, the system navigates to the Decision Assignment component where you provide additional SDS details.
Note Because each upload is unique, and the resulting Decision Assignment window’s fields reflect this, the Help system does not provide step-by-step procedures for the Decision Assignment segment of the chemical request process.
3Next, review notifications are provided to assigned reviewers. See:
—Accessing a Decisions Chemical Review Request via Email Link
or
—Accessing a Decisions Chemical Review Request via the Chemical Approvals Module
4Finally, after accessing and reviewing the request, decide whether to accept or reject it.
Note
You can check the status of a chemical request via CHEMICAL / SDS > SDS SUBMISSIONS >View SDS Submission Statuses.
Submitted SDSs are available to users upon their approval.
Before you Begin
•Disable pop-up blockers for:
—your browser
—the address bar
Note You may need to restore your browsers default settings to allow pop-ups.
•Make sure a reviewer role is created for the facility that you are initiating a chemical request for. See Creating and Managing Administrator Roles.
Configuring Decisions Chemical Workflow Settings
Perform the steps in this process to ensure that the reviewers’ site assignments and administrative roles are set.
Step 1Choose USERS > ADMINISTRATORS from the navigation pane.
Step 2Locate the administrator in the lower portion of the Administrators window, or perform a search for them. See Searching for an Administrator.
Step 3Click on the administrators hyperlinked NAME to open the Edit Administrator window.
Note Fields accompanied by an asterisk (*) requires input.
Step 4Confirm that the administrator is assigned to the facility related to the request that you are submitting.
Step 5Choose ALL FEATURES for the Admin Role.
Step 6Click SAVE when you finish.
Pathways for Creating a New Decisions Chemical Review Request
There are two main paths in which you can begin the new SDS chemical review request process. These are:
•Creating a New Decisions Chemical Review Request via the Search Module
•Creating a New Decisions Chemical Review Request via the SDS Submission Module
After submitting the SDS through one of these avenues, the system triggers the Decisions Assignment component for you to complete the request.
Creating a New Decisions Chemical Review Request via the Search Module
Step 1Choose CHEMICAL / SDS > SEARCH > Chemical / SDS Search from the navigation pane.
Step 2Click +ADD NEW CHEMICAL/SDS.
Step 3In the Add New Chemical/SDS window, select one of the following upload choices:
•Browse SDS Library—Perform this procedure to ensure documents aren’t duplicated within the system. See Uploading a Library Document for a New Decisions Chemical Review Request for instructions for completing this procedure.
Or
•Upload a New Document. See Uploading a Library Document for a New Decisions Chemical Review Request for instructions for completing this procedure.
Uploading a Library Document for a New Decisions Chemical Review Request
Step 1Perform Steps 1 and 2 in Creating a New Decisions Chemical Review Request via the Search Module or Step 1 in Creating a New Decisions Chemical Review Request via the SDS Submission Module.
Step 2Click the Browse SDS Library radio button.
Step 3Choose to perform either a Basic Search, choose Advanced Search if you need additional search parameters.
Step 4Enter a key word in the Search field.
Step 5Choose one of the following Search Modes:
—Choose Match All Terms to return results that match all search terms you entered in the Search field, and in the order that you entered them.
—Choose Match Any Term to return results that match any of the search terms you entered in the Search field, in any order.
Note Click the Search Help icon for additional search tips.
Step 6Click SEARCH LIBRARY to display products.
Step 7Locate the Product you are looking for in the lower portion of the window.
Step 8Click the Product’s toggle.
Step 9Click NEXT.
Note Fields accompanied by an asterisk (*) requires input.
Step 10 Review the data shown in the Requester Details portion of the page. For administrators, these fields auto-populate with their profile data.
Make any necessary modifications for:
•Name*
•Email*
•Phone
Step 11 Choose one facility and one or more of its associated sub-locations required for the request from its drop-down menu.
Note
You can submit only one request per facility at a time.
You can reveal a facility’s nested sub-locations by clicking the karat next to the location’s name.
Step 12 Ensure required fields contain the correct information in the lower portion of the window.
These fields are auto-populated with information culled from the existing SDS, provided that these fields are included in the document.
Step 13 Click NEXT.
Step 14 Review the information in the Confirmation page, and click SUBMIT.
The Decisions Assignment component opens in a new tab for you to complete the New Request application.
When you finish submitting the application, a system-generated email delivers to the reviewer(s) to alert them that a chemical request awaits their review. Alternatively, reviewers can monitor the Chemical Approval module for their pending reviews.
Next Step
Accessing Decisions Chemical Review Requests
Submitting a New Decisions Chemical Review Request
Note To avoid duplications, we recommend performing a search for the document you want to upload before you begin this procedure.
Step 1Perform Steps 1 and 2 in Creating a New Decisions Chemical Review Request via the Search Module or Step 1 in Creating a New Decisions Chemical Review Request via the SDS Submission Module.
Step 2Ensure Upload a New Document is selected.
Step 3In the Choose Document window, choose to either:
—Drag the file to the inside the text box, or
—Click the Select a File link shown inside the text box to browse your system for the document.
Step 4Click Open to select the document.
The file name displays just below the perimeter of the text box.
Note If you uploaded a file in error, click the Trash icon shown in the row and to the right side of the uploaded file’s name.
Step 5Click NEXT.
Note Fields accompanied with an asterisk (*) requires input.
Step 6Review the data shown in the Requester Details portion of the Edit Details page. For administrators, these fields auto-populate with information derived from their profile data.
Make any necessary modifications for:
•Name*
•Email*
•Phone
Step 7Choose one Location Assignment*, and any of its associated facilities required for the request, from the drop-down menu.
Note
You can:
-submit only one request per Location at a time.
-reveal a location’s nested facilities by clicking the karat next to the location’s name, shown in the image below.
Step 8Provide input for all required fields shown in the lower portion of the page.
Step 9Click NEXT.
Step 10 Review the information in the Confirmation page, and then click SUBMIT.
The Decisions Assignment component opens in a new tab for you to complete the New Request application.
When you finish submitting the application, a system-generated email delivers to the reviewer(s) to alert them that a chemical request awaits their review. Alternatively, reviewers can monitor the Chemical Approval module for their pending reviews.
Next Step
Accessing Decisions Chemical Review Requests
Creating a New Decisions Chemical Review Request via the SDS Submission Module
Step 1Choose CHEMICAL / SDS > SDS SUBMISSION > Upload Single SDS File from the navigation pane.
Step 2In the Choose Document window, choose to either:
•Browse SDS Library—Perform this procedure to ensure documents aren’t duplicated within the system. See Uploading a Library Document for a New Decisions Chemical Review Request for instructions for completing this procedure.
Or
•Upload a New Document. See Submitting a New Decisions Chemical Review Request for instructions for completing this procedure.
Accessing Decisions Chemical Review Requests
There are two ways in which you can access and review Decisions Workflow chemical requests:
•Accessing a Decisions Chemical Review Request via Email Link
•Accessing a Decisions Chemical Review Request via the Chemical Approvals Module
Accessing a Decisions Chemical Review Request via Email Link
Step 1Access your organizational email account, find the review notification, and click on the review hyperlink.
Step 2Follow steps shown in subsequent windows by logging into the system, and providing responses for all required fields.
Note The Workflow Management window may display during this process. If it does, click the VIEW WORKFLOW DASHBOARD to access the review.
Fields accompanied by an asterisk (*) requires input.
Step 3Follow steps shown in subsequent windows by providing responses for all required fields.
Step 4Decide to APPROVE or REJECT the request.
Accessing a Decisions Chemical Review Request via the Chemical Approvals Module
Step 1Click CHEMICAL / SDS > SDS SUBMISSIONS > Chemical Approvals in the navigation pane.
Step 2Follow steps shown in subsequent windows by clicking the review link and providing responses for all required fields.
Note
Required fields are accompanied by an asterisk (*).
The Workflow Management window may display during this process. If it does, click the VIEW WORKFLOW DASHBOARD to access the review.
Step 3Decide to APPROVE or REJECT the request.
Checking Status of your Decisions Chemical Review Request
You can check the status of chemical requests you submitted by navigating to:
•CHEMICAL / SDS > SDS SUBMISSIONS > View SDS Submission Statuses.
Submitting Revised SDSs for Review with Decision Matrix*
Note *This feature is available to Premium accounts with the Decisions add-on.
If you want revised SDSs to be reviewed and approved before they are available to your organization’s users, follow the Decision Matrix procedures in this section.
Topics include:
Choosing the Revision Upload Path
Locating the Submit New Revision Tool after a Chemical / SDS Search
Locating the Submit New Revision Tool from the Chemical / SDS Search Window
Submitting a Revised SDS for Review
Reviewing a Revised SDS Candidate
Comparing Current and Revised Versions of an SDS Side-By-Side
Comparing Regulatory Impacts Between Current and Revised SDSs
Decision Matrix Overview
This revision approval feature enables administrative reviewers to:
•Analyze data variances between the system’s current SDS and the revision candidate
•Identify new regulatory impacts
•Track any other changes between the current SDS and the revision candidate
•Accept or reject the latest revision based on your analysis
By default, the decision matrix feature auto-approves all SDS revisions submitted to the system. Depending on your organization’s subscriptions, additional approval options are available to prompt reviews for:
—All SDS revisions.
—Revisions where only the ingredient composition changed from the current version to the revised SDS.
—Revisions when essential material identifiers changed from the current version to the revised SDS. These identifiers include the product name, manufacturer, product number, language, or SDS format changed.
—Revisions where field overrides are present.
Before You Begin
Review the following to determine the steps you need to perform:
•First:
Determine if you need to create administrators to perform decision matrix reviews. See Creating an Administrator.
•Second:
Create the decision matrix reviewer role. See Creating an Administrator Role.
•Third:
Add features to the reviewer role to enable reviewer access to the necessary feature module. See Adding Features to an Administrator Role.
•Fourth:
Configure decision matrix settings
Decision Matrix settings configuration is performed at SETTINGS > Chemical /SDS > Collection Management > Decision Matrix Options. See Configuring Decision Matrix Review Options for more information.
Note
The email notification feature is coming soon. Reviewers can also access reviews by navigating to CHEMICAL / SDS > COLLECTION MANAGEMENT > Decision Matrix in the navigation pane. When you reach the Decision Matrix window, ensure the PENDING tab is selected.
To ensure that there is review coverage for your organization, we recommend that, at the minimum, two administrators be assigned as reviewers: one reviewer for the facility to which they are assigned, and one reviewer positioned at the organization’s highest hierarchical level, which allows them to perform SDS revision reviews for any facility within their organization.
Choosing the Revision Upload Path
Note Ensure you have reviewed Before You Begin before performing the following procedures.
After configuring the Decision Matrix review options and triggers and ensuring your organization has sufficient review coverage, you can begin submitting SDS revisions to the system.
There are two pathways in which you can begin submitting a new SDS revision to the system:
•From a Chemical /SDS search result
or
•From the Chemical / SDS window
Both paths result with the user reaching the Submit New Revision page, and whose steps are described in Submitting a Revised SDS for Review.
Locating the Submit New Revision Tool after a Chemical / SDS Search
Step 1From the navigation pane, select CHEMICAL / SDS > CHEMICAL / SDS SEARCH.
Step 2Enter keywords in the Search field.
Note To perform a more rigorous search, click the Advanced Search radio button, enter information in the additional fields, and then click SEARCH COLLECTION.
Step 3Click SEARCH COLLECTION.
Step 4In the PRODUCT’s row, select the Ellipses >Submit New Revision. The window refreshes to display the Choose Document step in the Submit New Revision page.
Step 5Continue to Submitting a Revised SDS for Review.
Next Step:
Submitting a Revised SDS for Review
Locating the Submit New Revision Tool from the Chemical / SDS Search Window
Step 1After performing an SDS search, click on the product’s hyperlink to open the Material Detail window.
Step 2Click the Submit New Revision icon, shown bordered in red in the following image. The window refreshes to display the Choose Document step in the Submit New Revision page.
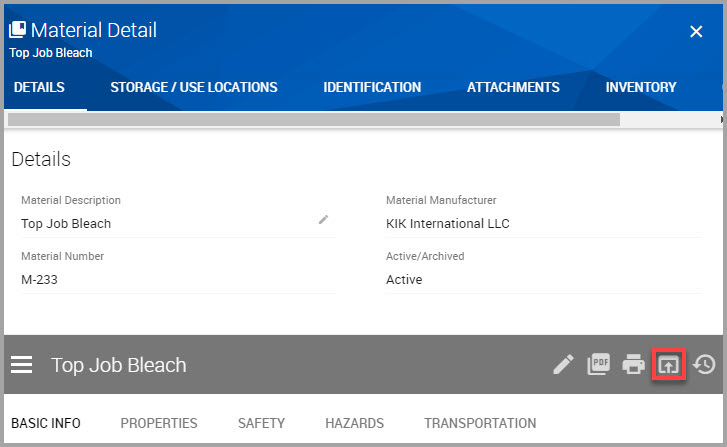
Step 3Continue to Submitting a Revised SDS for Review.
Submitting a Revised SDS for Review
These steps are performed after you select the Submit New Revision tool from either:
•Locating the Submit New Revision Tool after a Chemical / SDS Search
or
•Locating the Submit New Revision Tool from the Chemical / SDS Search Window
Step 1In the Choose Document step in the Submit New Revision page, click the Browse SDS Library radio button if it isn’t already selected.
Step 2Enter keywords in the Search field to find the product.
Step 3Click SEARCH LIBRARY to display results.
Step 4After the window refreshes, locate the product you are looking for in the lower portion of the page and click its toggle.
Step 5Click NEXT. You may need to scroll down the page to see this button.
Step 6In the Edit Details step, review the information shown in the window below. The following fields must match between the Current Product Name and Product Name:
—Language
—Document Type
Note Ensure that the Revision Date is newer than what is shown for the Current Revision Date. The system does not accept a new revision that has either the same date or older than the current SDS revision.
Fields accompanied by an asterisk (*) requires input.
Step 7Click either:
—PREVIOUS to return to the previous page.
OR
—NEXT to continue to the next page.
Step 8In the Confirmation page, review the details again and click either:
—PREVIOUS to return to the previous page.
OR
—Click SUBMIT to initiate the system’s Decision Matrix processing.
Within the time range of several minutes to two-three days and if the system determines that the revision is a candidate to replace the current SDS, the system pushes the revision to the Decision Matrix PENDING queue.
Users can check processing results by navigating to CHEMICALS / SDS> SDS SUBMISSIONS > View SDS Submission Statuses, performing a search for the Product Name of the revision that they submitted, and then checking its PROCESSING STATUS in the SDS File Submissions window.
If a flag displays in the row of the document you are interested in, click the flag to reveal additional details.
Next Step
Reviewing a Revised SDS Candidate
Reviewing a Revised SDS Candidate
In the following procedure, you have an opportunity to review the current and revised SDS to compare their data values. If you want these documents to open in a new window, review your preferences (SETTINGS > CHEMICAL / SDS Settings, and ensure that the PDF Viewer toggle is selected.
Decision Matrix reviewers can access the revision review queue via:
•Navigating to CHEMICAL /SDS > COLLECTION MANAGEMENT > DECISION MATRIX from the navigation pane.
•Email notification.
Note See Comparing Current and Revised Versions of an SDS Side-By-Side for an alternate way of reviewing their data.
The following procedure describes the review process when accessed from the navigation pane.
Step 1Navigate to CHEMICAL / SDS > COLLECTION MANAGEMENT > DECISION MATRIX.

The following table provides descriptions for the elements shown in the Decision Matrix window’s interface.
|
Elements |
Descriptions |
|---|---|
|
|
Displays total number of pending revisions queued for review. Reviews placed ON HOLD can stay in that queue indefinitely, or until it is moved to the PENDING queue. See . |
|
|
The default window setting, the PENDING queue is where you can see the revisions that are awaiting reviews. |
|
|
Click to check for revisions that were placed ON HOLD. To move these revisions to the PENDING queue, see . |
|
Search or Location Assignment fields |
See Performing a Basic Material Search for field information. |
|
|
Click to clear the search form. |
|
|
Click Search Filters to view a summary of the categories that contain data differences between the current SDS and the revision. |
|
|
Click to select all pending revisions to either Approve or send to the ON Hold queue in bulk. |
|
|
Column data can be sorted in ascending or descending order by clicking the icon adjacent to each column header titles, shown encircled in red in the previous image. |
|
|
Click Approve Selected after clicking either the bulk or |
|
|
Click Hold Selected after selecting either the bulk or |
|
|
Click individual revision check boxes along with either the Approve Selected or Hold Selected hyperlinks/icons, depending on your decision. |
|
|
Click to Approve this row’s revision. |
|
|
Click to place this row’s revision in the ON HOLD queue. |
|
|
Click View Details to review this row’s revision data in the Decision Matrix Details page. |


Step 2Locate the revision in the window and in the revision’s row, click its View Details icon to open the Decision Matrix Details page, shown in the image below and whose elements are described in the table following in the image.
The Decision Matrix Details page is where you can:
•Click VIEW DOCUMENTS to review the current and revised SDSs in the same window. See Comparing Current and Revised Versions of an SDS Side-By-Side.
•Compare contrasting data between the current SDS and the revision candidate ranging from basic information, chemical compositions, properties, and any regulatory impacts.
•See where field overrides exist between version.
•APPROVE, place ON HOLD, or REJECT revision.
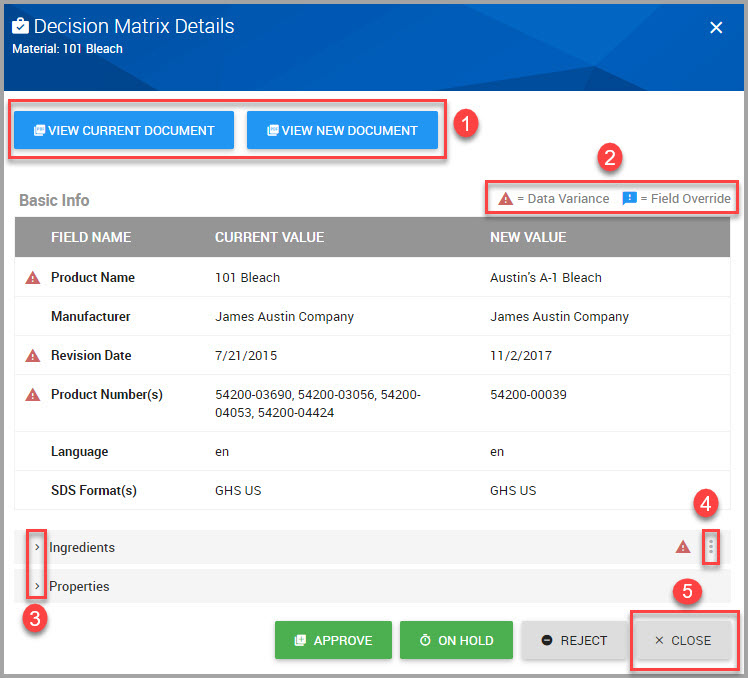
|
Number Keys |
Descriptions |
|---|---|
|
|
Click to VIEW CURRENT DOCUMENT or VIEW NEW DOCUMENT. Note: To open the documents in a new window, go to If you want these documents to open in a new window, review your Application Preferences (SETTINGS > CHEMICAL / SDS Settings, and ensure that the PDF Viewer toggle is selected. |
|
|
These flags alert you to SDS fields containing either data variances or field overrides. |
|
|
Click these carats to reveal section details. |
|
|
Click to reveal the Regulated Chemical Summary page for the product. |
|
|
Click to CLOSE the page and return to the Decision Matrix window. |
Step 3In the Decision Matrix Details window, review the information shown on-screen and decide to:
•APPROVE the revision.
You are prompted to confirm the action by pressing YES, or you can CANCEL this action. If the revision contains overrides, continue to Step 4.
•Place the revision ON HOLD.
You are prompted to confirm the action by pressing YES, or you can CANCEL this action. You have completed this procedure.
•REJECT the revision.
You are prompted to confirm the action by pressing YES, or you can CANCEL this action. You have completed this procedure.
Step 4If the revision contains field overrides, the system prompts you to copy them over to the revision, shown in the following image.
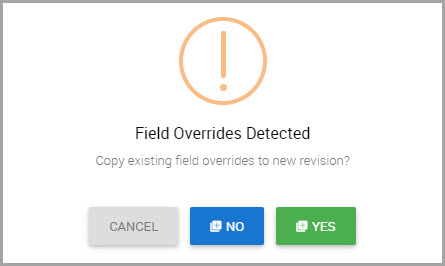
Step 5Decide to:
•Click YES to copy all field overrides to the new revision.
•Click NO to opt out of copying field overrides.
•Click CANCEL to exit the procedure without saving your work.
Comparing Current and Revised Versions of an SDS Side-By-Side
You can review the current version of an SDS with its latest version by performing the following steps:
Step 1Select CHEMICAL / SDS > COLLECTION MANAGEMENT > Decision Matrix from the navigation pane.
Step 2Find the current SDS you want to compare and in its row, click the View Details icon, shown bordered in red in the image below.
Step 3In the Decision Matrix Details window, click VIEW DOCUMENTS.
The window displays the current and revised versions of the SDS side-by-side for your review.
•To scroll the SDSs independently from one another, make sure the Scroll Together toggle is not selected (gray setting), shown in the following image. Toggle this setting to green to scroll down the SDSs in tandem.
•To download, print, or manipulate the pdf, click the pdf’s Tools icon, circled in red in the following image.
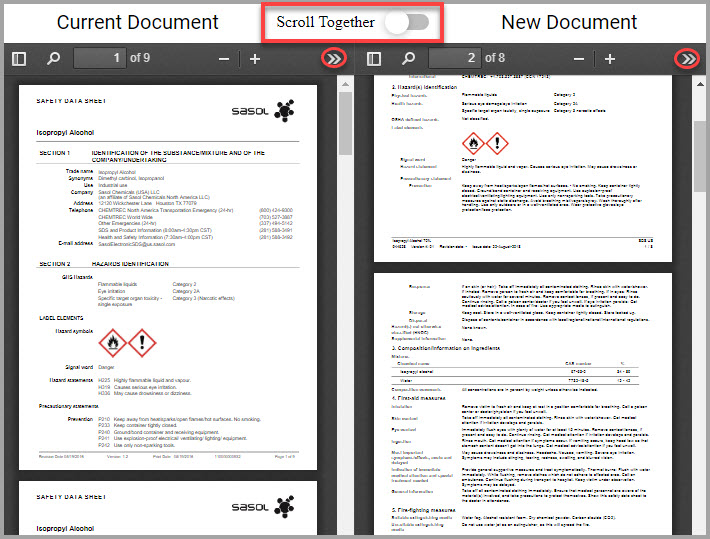
Comparing Regulatory Impacts Between Current and Revised SDSs
The regulatory impacts section of the Decision Matrix Details window allows you to compare the current and the new revision’s regulated ingredients.
Regulation comparison includes:
|
•California Proposition 65 |
•TSCA Section 8(b) |
|---|---|
|
•EPCRA SARA 312 |
•TSCA Section 12(b) |
|
•EPCRA SARA 313 |
•DHS/CFATS |
|
•TSCA Section 5 |
|
Step 1Select CHEMICAL / SDS > COLLECTION MANAGEMENT > Decision Matrix from the navigation pane.
Step 2Find the current SDS you want to compare and in its row, click the View Details icon.
Step 3Scroll down the Decision Matrix Details page to find the Regulatory Impacts section.
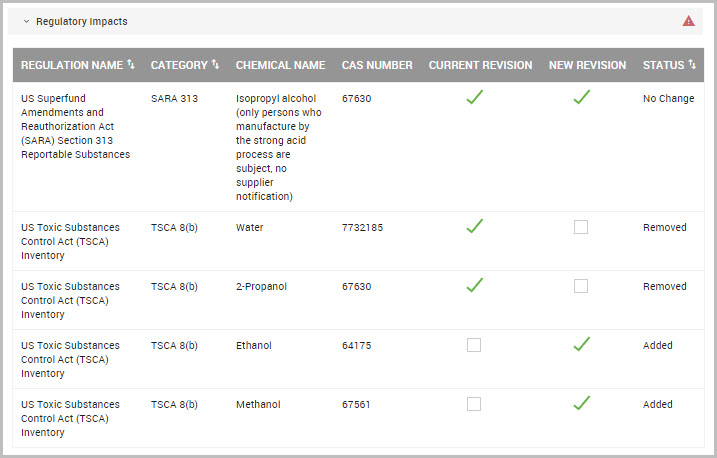
Step 4Find the STATUS column to discover the regulatory differences between the current and revised SDS.
Moving an SDS Revision from On Hold to the Pending Queue
Step 1Choose CHEMICAL/ SDS > COLLECTION MANAGEMENT >DECISION MATRIX from the navigation pane.
Step 2Click the ON HOLD tab in the Decision Matrix window.
The window refreshes and displays revisions placed on hold.

Step 3Remove the revision’s hold status by any one of the following methods:
•Selecting the revision’s check box, and then clicking the Remove Hold icon  in it’s row. Continue to Step 4.
•Selecting a revision’s check box and clicking the Remove Hold on Selected hyperlink. Continue to Step 4.
•If you have several revisions on hold, you can perform a bulk transfer by clicking the top-most check box  , and then selecting the Remove Hold on Selected hyperlink. Continue to Step 4.
Step 4Confirm the action by clicking YES.
The revision(s) immediately transfers to the PENDING queue.
Updating and Analyzing your Chemical Data
The tools in this module enable you to:
•View SDS refresh status and provide any required details using the SDS Refresh Analytics service.
•Determine why certain data fields were not captured during the SDS submission process by using the Data Quality Analytics feature
•Override uncaptured fields with Data Quality Analytics
•Update specific materials after performing a chemical search using the Filter & Update feature.
Topics include:
SDS Refresh Analytics Overview
Data Quality Analytics Overview
Reasons Why Data Could Not be Captured in an SDS
Using the Data Quality Analytics Window
Exporting a Data Quality Analytics Report
Moving an SDS to the Ignored Queue
Resolving Data Discrepancies for SDSs in the Ignored Queue
Filtering & Updating your Chemical Collection
Searching for and Filtering Materials
Updating Filtered Materials by Adding Locations
SDS Refresh Analytics Overview
SDS refresh analytics is one of two SDS refresh services (the other being SDS Acquisitions, see below) that HSI provides in which our Operations team automatically sources newer SDS revisions on your behalf, providing a way for you to:
—Monitor our efforts for the refresh status. See Using the SDS Refresh Analytics Main Window.
—See which SDSs that haven’t been refreshed and the reasoning for this status by reading the Operations staff comments. See Using the SDS Refresh Analytics Main Window.
—Provide any required SDS feedback using our follow-up feature. See Providing SDS Refresh Feedback Using the FOLLOW-UPS Tab.
Note Administrators have up to 90 days in which to provide feedback to our Operations team. If feedback is not provided within 90 days, the refresh effort is suspended until the following year.
—Select only the SDS documents that you that you need in the event that a manufacturer has divided one SDS document into multiple versions due to regulatory updates or changes in the material’s composition. These are known as multi-composition documents. See Selecting Component SDSs using the MULTI-COMPOSITION Tab.
For example, a paint manufacturer may have previously published one SDS that included all paint color variations, but now must provide separate SDSs reflecting each color. SDS refresh enables you to choose amongst those SDS variations, or you can also decide to allow the system to automatically add any additional SDS documents for that one product.
Note Administrator permissions must be updated in order for administrators to choose SDS components, or engage with our Operations team via the SDS Refresh Analytics interface. See Updating SDS Refresh Settings Before You Begin.
SDS refreshes are conducted once yearly over a three year period, with one-third of your collection being updated each year, resulting with your entire library being completely updated after three years.
•SDS Acquisitions, is our additional SDS Refresh service. This is a one-time project in which you can request that we update your entire collection expediently. You can initiate this one-time service by contacting your account manager.
Topics include:
Updating SDS Refresh Settings Before You Begin
Changing the SDS Refresh Reporting Role Access Setting
Viewing SDS Refresh Candidacy Conditions
Using the SDS Refresh Analytics Main Window
SDS Refresh Analytics Column Descriptions
Providing SDS Refresh Feedback Using the FOLLOW-UPS Tab
Selecting Component SDSs using the MULTI-COMPOSITION Tab
Identifying Icons shown on Subsequent Refresh Windows
Viewing SDS Refresh Analytics Column Definitions
Updating SDS Refresh Settings Before You Begin
Set the permissions for the following procedures:
•See Setting SDS Refresh Multi-Composition Options if you want to set the multi-composition separation to Auto, which allows the system to accept all SDS refresh components. The default setting is Manual, in which case you must choose amongst the provided SDS refresh variations.
•Access to the SDS Analytics tool is restricted by administrator role feature settings. See Adding Features to an Administrator Role and perform the following steps.
Changing the SDS Refresh Reporting Role Access Setting
Step 1See Adding Features to an Administrator Role.
Step 2In Step 3 of Adding Features to an Administrator Role, select the administrator role you want to provide SDS Refresh access to, and then return to this procedure.
Step 3Click +ADD FEATURES.
Step 4Scroll down the page, and select the SDS Refresh Reporting toggle.
Step 5At the end of this toggle’s row, choose the administrator access level:
•Read—Administrator can view the SDS Refresh status reports and details, but cannot update the settings.
•Update—Administrator can provide customer follow-up responses to the HSI Operation team.
•Write—Administrator can select among any multi-composition SDS documents.
Step 6Click SAVE FEATURES.
Viewing SDS Refresh Candidacy Conditions
The following Chemical/SDS materials are considered invalid if at least one of the following condition are present:
•Chemical/SDS is currently active in the refresh process
•The previous SDS refresh occurred less than one year ago
•SDS revision date is less than three years old
•SDS revision date is more than 15 years old
•The product is discontinued
•The SDS is not required
•Manufacturer is out-of-business
•Manufacturer refuses to release to a 3rd party
Using the SDS Refresh Analytics Main Window
•Choose CHEMICAL/SDS> COLLECTION MANAGEMENT > SDS Refresh from the navigation pane.
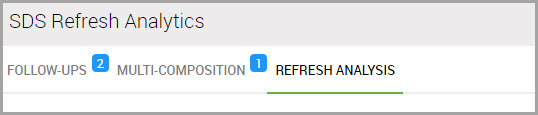
At the top of the page, there are three tabs to select from, each displaying the number of records that need additional details from an administrator:
•FOLLOW-UPS—Lists SDS Refresh records flagged by HSI Operations staff requiring additional customer feedback in order to acquire a new SDS. See Providing SDS Refresh Feedback Using the FOLLOW-UPS Tab.
Note Administrators have up to 90 days in which to provide feedback. If feedback is not provided within 90 days, the refresh effort is suspended until the following year.
•MULTI-COMPOSITION—Lists SDS Refresh records in which the manufacturer divided an old SDS into one or more component SDSs. Administrators provided with Write access can choose which documents should be added to their Chemical/SDS collection. See Selecting Component SDSs using the MULTI-COMPOSITION Tab. To update administrator access settings, see Changing the SDS Refresh Reporting Role Access Setting.
•REFRESH ANALYTICS—The default setting, this window provides a search mechanism to filter search results, view details, and download a spreadsheet populated with your Chemical/SDS collection data. This selection’s tools are described immediately below.
Additional interface tools which display across the FOLLOW-UPS, MULTI-C0MPOSITION, and REFRESH ANALYTICS main windows include:
a—Click to download the records shown on the window into an Excel spreadsheet. You may want to filter your results; see b and c, below.
b and c—Click either icon to open the Advanced Search page to filter results. Any filter name(s) you select displays in the same field that Add Filters displays.
d—Use the up/down arrows next to each column name to sort column results.
e—Click the caret adjoining a material’s name to view additional material details.
f—Click the View Candidate icon to review Refresh Status and additional material details.
g—Click the edit icon to view any refresh notes or actions that you must take to refresh an SDS for your library. Fields requiring additional information are flagged with both an asterisk (*) and an orange triangle. Scroll down the page to view any SDS Refresh Notes. See Providing SDS Refresh Feedback Using the FOLLOW-UPS Tab.
See SDS Refresh Analytics Column Descriptions and Viewing SDS Refresh Analytics Column Definitions for Status and Lifecycle descriptions and definitions.
SDS Refresh Analytics Column Descriptions
|
SDS Refresh Analytics Columns |
Column Descriptions |
|---|---|
|
Lifecycle |
Indicates the stage a document is in relative to an SDS Refresh effort. |
|
Status |
Indicates the current refresh status of a document. |
|
Candidacy |
Indicates whether the document is eligible for an SDS Refresh. |
|
Candidacy Description |
Indicates why a document is valid or invalid for an SDS Refresh. |
Providing SDS Refresh Feedback Using the FOLLOW-UPS Tab
Use the FOLLOW-UPS tab to view refresh records flagged by the HSI Operations team to provide us additional input necessary to acquire a new SDS on your behalf.
Note Administrators have up to 90 days in which to provide feedback. If feedback is not provided within 90 days, the refresh effort is suspended until the following year.
Step 1Choose CHEMICAL/SDS> COLLECTION MANAGEMENT > SDS Refresh from the navigation pane.
Step 2Click on the FOLLOW UPS tab to display its window.
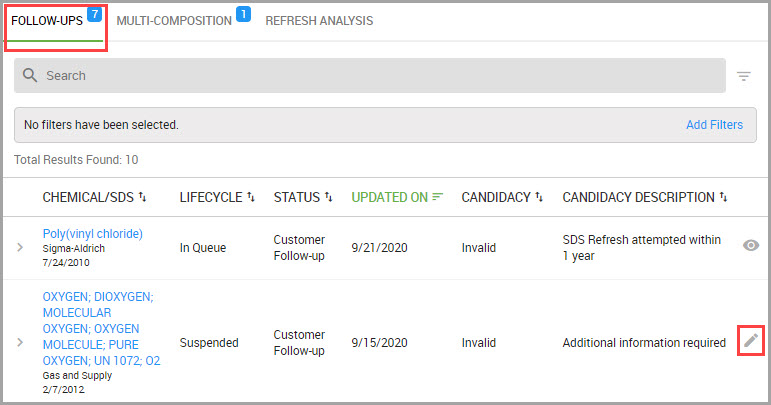
Step 3Click the Edit Candidate icon, shown bordered in red in the previous image to display the Customer Follow-up window.
Fields that require editing are shown accompanied with an asterisk (*) and an orange triangle, shown below.
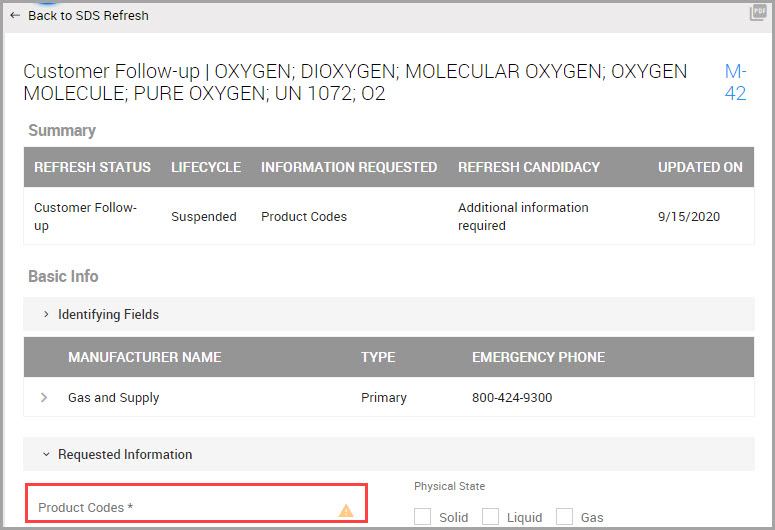
Step 4Provide the requested information.
As you enter or make selections in a field, a Save button displays toward the bottom of the page and below SDS Refresh Notes section.
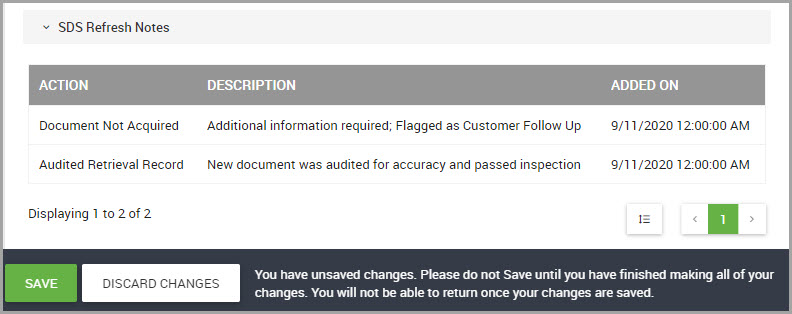
Step 5Click SAVE when you finish providing feedback.
Selecting Component SDSs using the MULTI-COMPOSITION Tab
Use the MULTI-COMPOSITION tab to make selections of the precise SDSs that your library requires in the event that the manufacturer splits one SDS into multiple versions based on regulatory updates or changes in the material’s composition.
Step 1Choose CHEMICAL/SDS> COLLECTION MANAGEMENT > SDS Refresh from the navigation pane.
Step 2Click the MULTI-COMPOSITION tab.
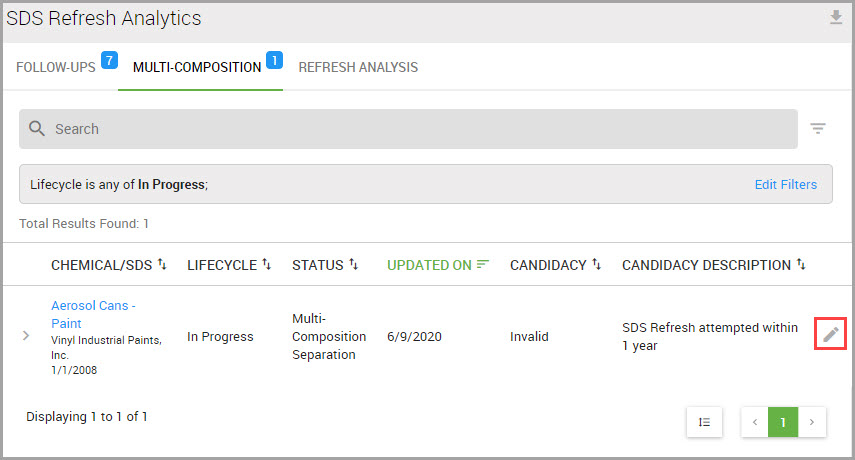
Step 3Click the Edit Candidate icon, bordered in red in the previous image.
Step 4Scroll down the page until you see the Multi-Composition Separation section.
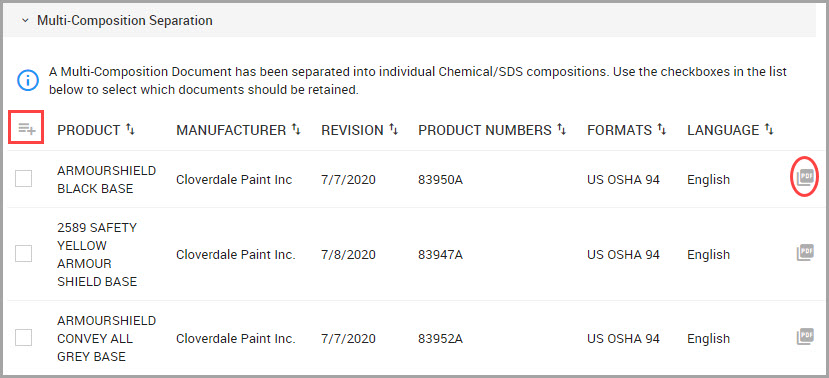
Step 5(Optional) Click any selection’s PDF icon (circled) to display the current SDS.
Step 6You can select component SDSs one of two ways:
•Click the icon (bordered in red) above the individual check boxes to select all SDSs,
or
•Click individual check boxes.
When you select either choice, a SAVE button displays in the lower portion of the window.
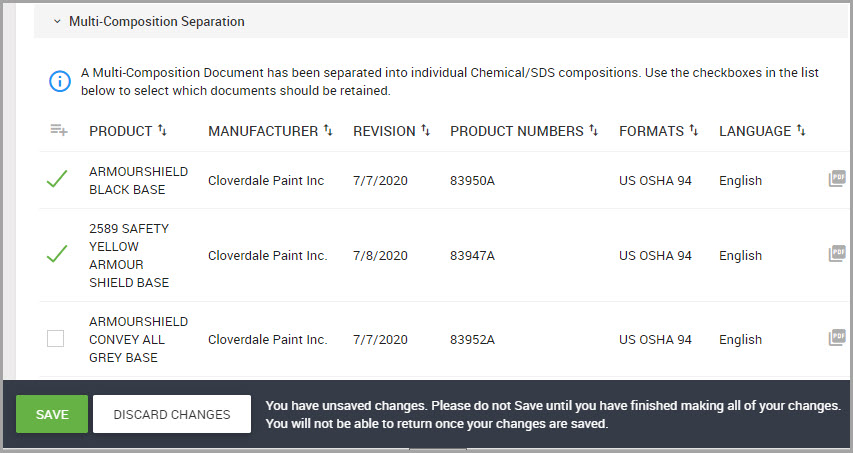
Step 7Click SAVE when you finish.
Identifying Icons shown on Subsequent Refresh Windows
The following image displays additional icons that appear after selecting FOLLOW-UP, MULTI-COMPOSITION, or REFRESH ANALYTICS tabs.
1—Returns you to the previous SDS Refresh page.
2—Click to display the current SDS.
3—Click to view this product’s Material Details page.
Viewing SDS Refresh Analytics Column Definitions
|
Status Category |
Status |
Lifecycle |
Definitions |
|---|---|---|---|
|
Complete w/Document |
New Document Required |
Complete |
Vendor successfully acquired a new revision for this document. |
|
|
Multi- Composition Separation |
In progress/ Complete |
Vendor found a multi-composition document that is now separated into individual documents representing distinct products. |
|
|
Same Revision, Better Copy |
Complete |
Vendor located a better copy of the current document revision. |
|
|
Acquired Document Needs Review |
In Progress |
Vendor marks SDS Refresh record complete, but Operations needs to review records. |
|
|
|
|
|
|
Complete w/out Document |
Product Discontinued |
Complete |
Manufacturer confirms that the product or material is discontinued, and no further documents are being authored. |
|
|
Customer Follow-Up |
In Progress |
Vendor is unable to locate and/or acquire an appropriate document revision due to an ambiguous data attribute, incomplete information, or a document which previously covered several product variations is now divided into individual documents representing each variation distinctly, and customer clarification or additional information is required to successfully complete the SDS Refresh record effort. |
|
|
Manufacturer is unresponsive |
Complete |
Vendor made several attempts, exhausting all means of contact with the manufacturer, and was unable to acquire a new document or receive a response. This SDS Refresh record effort is suspended but will be re-attempted in approximately one year. |
|
|
Manufacturer Not Found/Out-of -Business |
Complete |
Vendor has made several attempts to locate the manufacturer, but was either unable to locate suitable contact information, or discovered the manufacturer is out-of-business |
|
|
Manufacturer Will Not Release |
Complete |
Vendor contacted the manufacturer, receiving a response stating that the manufacturer will not release document to a 3rd party. Customer must submit a request to the manufacturer directly to receive updated documents. |
|
|
New Revision Unavailable |
Complete |
Vendor verified that the current document is up-to-date, and a newer revision is not available. |
|
|
Not Available in Requested Format |
Complete |
The requested document format or language is unavailable. |
|
|
SDS Not Required |
Complete |
Vendor received a response from the manufacturer stating that an SDS is not required for this material. |
|
|
|
|
|
|
Pending Next Attempt |
Needs Research |
In Progress |
The SDS Refresh record could not be acquired due to some level of ambiguity surrounding the document details, which requires an escalated review by Operations staff. |
|
|
Needs 1st Request |
In Progress |
The resulting default SDS Refresh record status if a contact preference is not set for the manufacturer. |
|
|
Needs 2nd Request |
In Progress |
The vendor has made at least one attempt, but the next preferred method of contact is unknown. |
|
|
Needs Call |
In Progress |
The SDS Refresh record is in the “Call Manufacturer” queue. |
|
|
Needs download |
In Progress |
The SDS Refresh record is in the “Download from Website” queue. |
|
|
Needs Email |
In Progress |
The SDS Refresh record is in the “Email Manufacturer” queue. |
|
|
Needs Fax |
In Progress |
The SDS Refresh record is in the “Send Fax to Manufacturer” queue. |
|
|
|
|
|
|
On Hold |
Authorization Letter Not Provided |
In Progress |
System should notify Customer Support indicating that they need to send a request to the affiliated customers asking that they complete an Authorization Letter. |
|
|
Awaiting Call |
In Progress |
Vendor attempted to contact the manufacturer and is awaiting a responsive call back. |
|
|
Awaiting Email |
In Progress |
Vendor emailed the manufacturer and is waiting for a responsive email in return. |
|
|
Awaiting Fax |
In Progress |
Vendor faxed the manufacturer and is awaiting a responsive fax. |
|
|
Awaiting Mail |
In Progress |
Vendor attempted contact by mail and is awaiting a mailed response. |
|
|
|
|
|
|
Auditing |
Audit rejected |
In Progress |
Auditor rejected the acquired document. The vendor will be notified, along with instructions to correct the SDS Refresh record. |
|
|
Pending Audit |
Auditing |
SDS Refresh record is in the auditing pool awaiting auditing batch placement. |
|
|
Audit Complete |
Auditing |
Auditing is complete for the SDS Refresh record. |
|
|
|
|
|
|
Pre-Stage Candidate |
Pending |
Pre- staging |
The Chemical/SDS is ready to be picked up as a valid SDS Refresh candidate. |
|
|
|
|
|
|
System |
Pending Check-Out |
In Progress |
The SDS Refresh record has been placed in a project but has not been picked up or checked out to be worked by the vendor. |
|
|
Data Processing Error |
Error |
The SDS Refresh record encountered a data processing error. |
|
|
Pending Data Capture |
Post Processing |
Status is temporarily set while the document is processing in the data processor. |
Data Quality Analytics Overview
Data quality analytics enables administrators to view critical data that could not be captured during SDS processing, apply overrides to fields to resolve discrepancies, and export an accounting of your data discrepancies to a spreadsheet.
Before You Begin
Review the following to determine the steps you need to perform:
•First:
Determine if you need to create administrators to perform data discrepancy reviews. See Creating an Administrator.
•Second:
Create the data quality analytics reviewer role. See Creating an Administrator Role.
Note The email notification feature is coming soon. Reviewers can also access reviews by navigating to CHEMICAL /SDS > Collection Management in the navigation pane, and then select the DATA QUALITY ANALYTICS tab.
To ensure that there is review coverage for your organization, we recommend that, at the minimum, two administrators be assigned as reviewers: one reviewer for the facility to which they are assigned, and one reviewer positioned at the organization’s highest hierarchical level, which allows them to perform data discrepancy reviews for any facility within their organization.
•Third:
Add features to the reviewer role to enable their access to the necessary feature module. See Adding Features to an Administrator Role.
•Fourth:
Configure data quality analytics settings.
Settings configuration is performed at SETTINGS > Chemical / SDS Settings > Collection Management, and then select the Data Quality Analytics Options.
See Configuring Data Quality Analytics Options for more information.
Reasons Why Data Could Not be Captured in an SDS
There are five reasons data cannot be captured during data processing:
•Illegible—The data value existed, but is unreadable or undecipherable by the system.
•Missing data or data not available—The data value is not found in the document or is listed as Not Available.
•Unreasonable Value—The data value existed, but the value was outside of acceptable limits.
•Not Applicable—The data value existed, but was cited as “Not Applicable.”
•Wrong Format—The data value existed, but was not in an appropriate format, according to Data Capture Guidelines.
Using the Data Quality Analytics Window
After navigating from CHEMICAL / SDS > COLLECTION MANAGEMENT > Data Quality Analytics, you arrive at the Data Quality Analytics opening window, shown below.
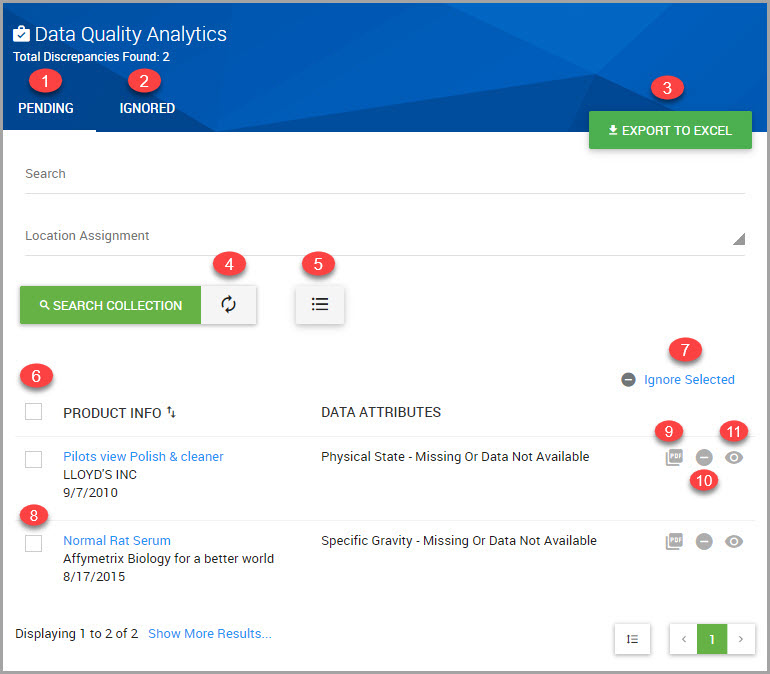
The following table provides descriptions for the elements shown in the Data Quality Analytics interface.
|
Number Keys |
Descriptions |
|---|---|
|
|
The default setting, PENDING is where you can view the list of SDSs containing data discrepancies. |
|
|
IGNORED is where you can view the list of SDSs that have been tagged to review and resolve data discrepancies at a later time. |
|
|
Click to export data discrepancy report to your device. |
|
|
Click to clear Location Assignment selections and/or Search input from fields. |
|
|
Click to reveal additional Search Filters. Filters include FIELD NAME, DATA VARIANCE TYPE, and LANGUAGE. |
|
|
Click to select all documents in bulk. Used in conjunction with the Ignore Selected hyperlink. |
|
|
Click Ignore Selected after selecting either the bulk check box or individual check boxes to move SDSs to the IGNORED queue to review and resolve data at a later time. |
|
|
Choose individual boxes. Used in conjunction with the Ignore Selected hyperlink.
|
|
|
Click View Document to review this row’s SDS. |
|
|
Click to Ignore this row’s SDS so you can review and resolve its data at a later time. |
|
|
Click View Details to open this SDS’s Data Quality Analytics Details page, which is where you can view and resolve its data differences. |
Resolving Data Discrepancies
Step 1Navigate to CHEMICAL / SDS > COLLECTION MANAGEMENT > Data Quality Analytics.
Step 2Ensure the PENDING tab is selected. The list of pending data discrepancy reviews display in the lower portion of the window.
Step 3(Optional) If you need to refine results to locate an SDS quickly, you can perform a search by:
(a)Entering key terms in the Search field.
(b)Selecting a Location Assignment from the drop-down menu.
(c)Clicking SEARCH COLLECTION.
Step 4After finding the SDS, in its row click the View Details icon to open the Data Quality Analytics Details page.
The top portion of this page is shown below, with the Summary section bordered in red. This section encapsulates the sections of the SDS which contain data discrepancies so you can quickly locate the fields that you need to resolve.
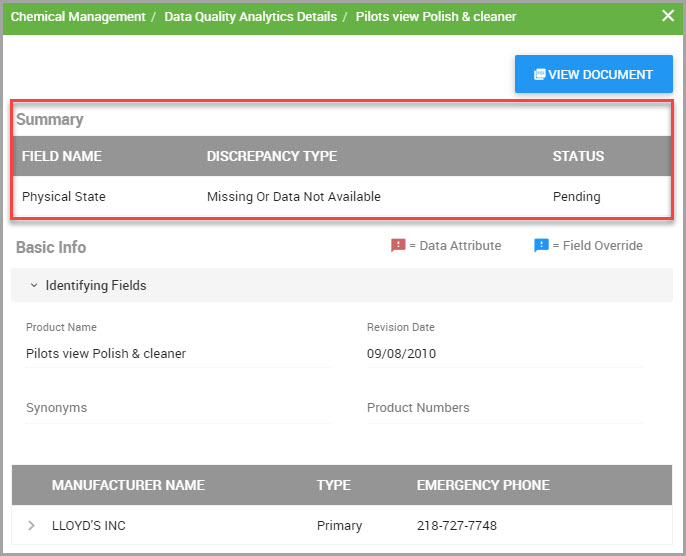
Note The following colored Flag icons may also accompany fields.
—Red flags indicate data capture attributes and display when field information was not captured during SDS processing. See Viewing Data Capture Attributes.
—Blue flags indicate that an override has been applied to that field. See Viewing Override and Source Data Values.
Step 5Locate the section(s) with discrepancies in the page that are listed in the Summary section. These sections include flags which indicate either a data discrepancy or field override.
Step 6When you find the category you need to edit, click its pencil icon to open its editing dialog box.
Step 7Enter or select information in the dialog box. You must provide input for all fields accompanied with an asterisk (*). An example is shown in the following image.
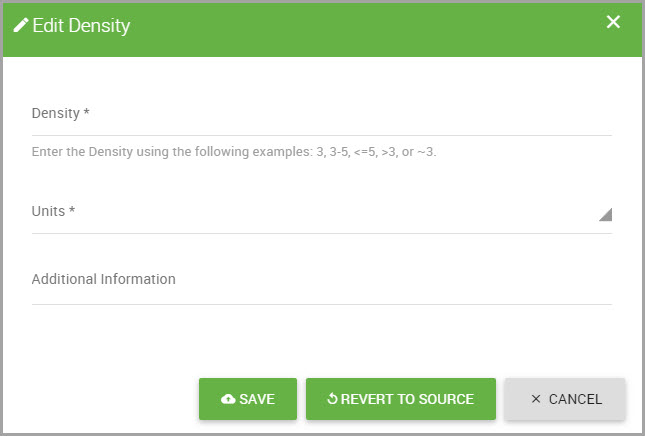
Step 8When you finish, click SAVE.
Note The EPCRA Hazard Category section in the Data Quality Analytics Details page may be flagged for missing information. If you determine that it is valid to keep these selections un-checked, click the Mark Chemical as Non-Hazardous toggle to dismiss this discrepancy.
Step 9When you finish, scroll down the Data Quality Analytics Details page and click DONE.
Exporting a Data Quality Analytics Report
You can easily export a list of your system’s current data discrepancies by performing the following steps.
Step 1Navigate to CHEMICAL / SDS > COLLECTION MANAGEMENT > Data Quality Analytics.
Step 2In the Data Quality Analytics window, click EXPORT TO EXCEL to browse your system to house the report.
Step 3Provide a File name, and click Save.
The report name saves as directed and downloads to your device.
Moving an SDS to the Ignored Queue
If you want to review one or more SDSs in the future, you can move them from the PENDING queue to the IGNORED queue.
Step 1Navigate to CHEMICAL / SDS > COLLECTION MANAGEMENT > Data Quality Analytics.
Step 2Ensure the PENDING tab is selected.
Step 3The list of pending data reviews display in the lower portion of the window.
Step 4(Optional) If you need to refine results to locate an SDS quickly, you can perform a search by:
(a)Entering key terms in the Search field.
(b)Selecting a Location from the drop-down menu.
(c)Clicking SEARCH COLLECTION.
Step 5After locating the SDS, you can move the SDS(s) to the IGNORED queue in one of the following ways:
•If you are only moving one SDS, find that SDS in the list and in it’s row, click its Ignore icon to move the SDS.
•If you are moving several but not all SDS’s, click their individual check boxes, and then click the Ignore Selected hyperlink to move the SDSs.
•To move all, click the top-most check box to select all boxes, and then click the Ignore Selected hyperlink to move all SDSs.
Resolving Data Discrepancies for SDSs in the Ignored Queue
Revisions for ignored SDSs are performed in the SDS’s Material Detail window.
Step 1Navigate to CHEMICAL / SDS > COLLECTION MANAGEMENT > Data Quality Analytics.
Step 2Click the IGNORED tab.
Step 3Find the SDS in the lower portion of the window, and note its DATA ATTRIBUTES category. In the example below, the Specific Gravity is missing data.
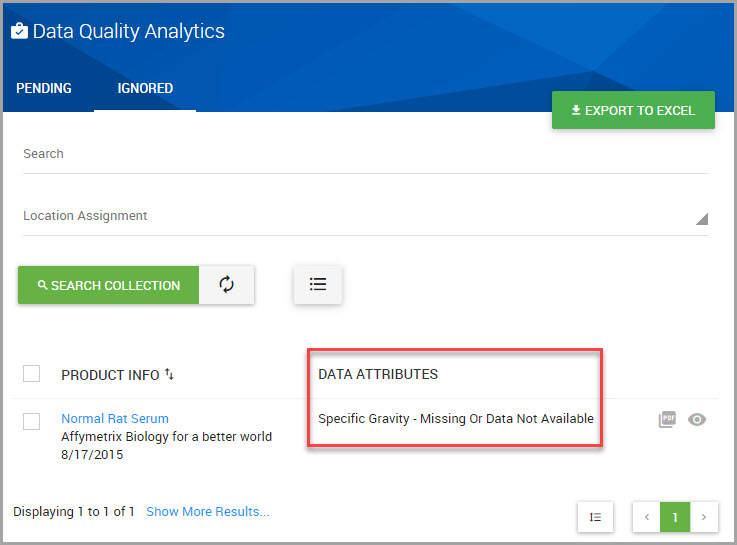
Step 4Click the hyperlink shown beneath the PRODUCT INFO column to open its Data Quality Analytics Detail window.
Step 5In the window, look for the category that was listed in the DATA ATTRIBUTES column, which you noted in Step 3.
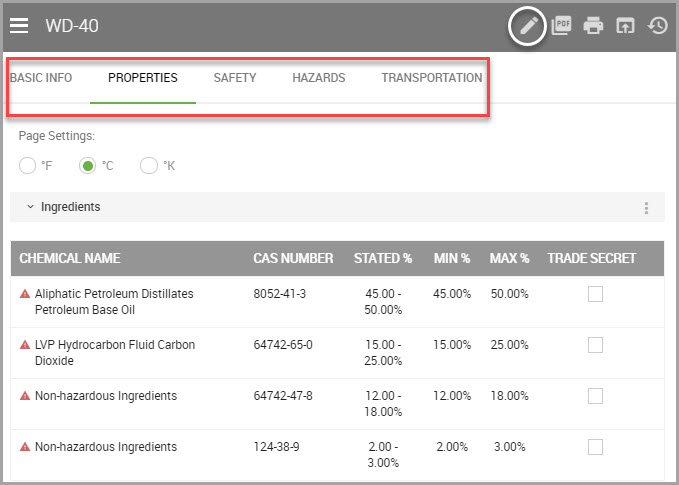
Step 6Click the Edit Override Settings icon, shown encircled in white in the previous image, to display field editing icons.
Step 7Find the category that you need to edit, and click its edit icon to display its editing dialog box.
Note The following colored Flag icons may also accompany fields.
—Red flags indicate data capture attributes and display when field information was not captured during SDS processing. See Viewing Data Capture Attributes.
—Blue flags indicate that an override has been applied to that field. See Viewing Override and Source Data Values.
Step 8Select or enter data information in the dialog box. You must provide input for all fields accompanied with an asterisk (*).
Step 9When you finish, click SAVE. The SDS no longer displays in the IGNORED queue.
Filtering & Updating your Chemical Collection
With the Filter & Update feature, you can update specific materials by performing a search filtered by data that you specify, and which you then update the materials by adding locations to materials.
Searching for and Filtering Materials
You can search for materials based on various chemical criteria that you specify in the following procedure.
Step 1Choose CHEMICAL / SDS > COLLECTION MANAGEMENT > Filter & Update in the navigation pane to display the Chemical / SDS Filter & Update window. Ensure the SELECT SEARCH CRITERIA tab is selected in this window.
Step 2(Optional) Choose a different Temperature Unit of Measurement.
Step 3Choose material criteria that you want the system to return by making selections from the categories (Basic Info, Material Components, Custom Fields, Material Codes, Hazards, Properties, Ingredients, Regulations) shown in this window.
Note Be sure to select at least one toggle, otherwise the system returns your entire material collection.
As you select a toggle, the toggle turns red to prompt your response for the dialog box that displays. A dialog box example is shown below.
Step 4Select or enter criteria for the dialog box. In the case of drop-down menus, you may need to click DONE to dismiss the menu.
Step 5Click CLOSE to dismiss the dialog box.
Step 6(Optional) To edit previous input, click the pencil icon that displays in a selection’s row, shown bordered in red in the following image, to prompt its dialog box to display. Make your edits, and click CLOSE when you finish.
To remove a criteria completely, click its toggle to de-select it.

Step 7After you finish making your selections in the Chemical Material Update window, click the UPDATE MATERIAL RESULTS tab shown at the top of the window to display the materials resulting from your selections.
You are now ready to update the filtered materials by performing the procedures that follow this section.
Next Steps:
Updating Filtered Materials by Adding Locations
Updating Filtered Materials by Adding Locations
You can add locations to filtered materials by performing the following steps.
Step 1Ensure you complete the steps outlined in Searching for and Filtering Materials.
After completing Step 7 in Searching for and Filtering Materials, the window refreshes to display the filtered material results. Elements in this window include:
•Material Action—Click this field to display the three actions that you can perform for all of the materials returned by the system.
•Filter Results—Refine material search results further by entering material metadata in this field. As you input data, the window responds by condensing the material search results list based on your input.
• — Click to remove the material from the list.
Step 2(Optional) Enter metadata in the Filter Results field to further refine the MATERIAL SEARCH RESULTS shown in this window.
Step 3(Optional) If you want to remove a material from the material search results, click the “X” shown at the end of its row.
Step 4Click Material Action > Add Material Locations.
Step 5Click the Locations* drop-down menu.
Step 6Click inside the check boxes for the locations you want to add the filtered materials to.
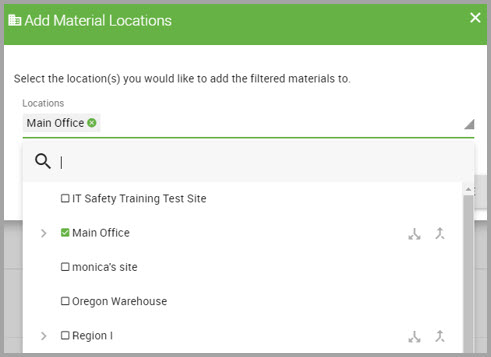
Step 7Click DONE to dismiss the drop-down menu.
Step 8Click SUBMIT.
Step 9(Optional) Return to the Material Action field to perform additional actions for the filtered materials.
Providing Users Right To Know Access
Right to Know Access provides a method for you to download a location’s SDS binder to generate a link containing your site’s SDS collection which you can then distribute to personnel. You have the option to set distribution security measures such as link expiration dates and / or limit the total number of link views.
Topics include:
Providing Right to Know Access with the Kiosk Manager
Using Right To Know Access Link Landing Pages
SDS Binder Overview
SDS Binders:
•Can be generated between several minutes to an hour, depending on the collection size.
•Can be produced as one book in Portable Document Format (PDF), or generated as individual PDFs per product. Either choice can be printed or delivered electronically to personnel.
•Are available for download for 30 days from the day it was generated. Binders are view-only for an additional 30 days.
Generating an SDS Binder
You can generate an SDS binder for one or more locations by performing the following steps.
Step 1Navigate to CHEMICAL / SDS > RIGHT TO KNOW ACCESS > Download SDS Binder.
Step 2Click +GENERATE SDS BINDER.
Step 3In the Generate SDS Binder dialog box, select one or more SDS Binder Locations* from the drop-down menu.
Step 4Click DONE when you finish choosing locations.
Step 5Select a Language.
Step 6(Optional) Click the Disable Page Numbering toggle if you do not want to include consecutive page numbers for the collection.
Step 7Click +Generate SDS Binder.
When the collection is available, its STATUS displays as Complete in the SDS Binders window.
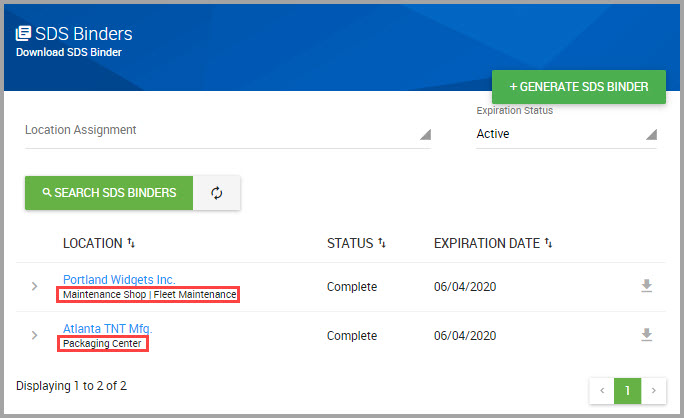
Note Any sub-locations that were included for the binder display immediately below the LOCATION name.
Related topics:
Searching for an SDS Binder
You can search for active or expired SDS binders by performing the following steps.
Note SDS binders are available for download for 30 days from the day it was generated. Binders are view-only for an additional 30 days.
Step 1Choose CHEMICAL / SDS in the navigation pane.
Step 2Click RIGHT TO KNOW ACCESS > Download SDS Binder.
Step 3Locate the binder by:
•Selecting the binder’s Location Assignment from the drop-down menu.
•Selecting the binder’s Expiration Status.
Step 4Click SEARCH SDS BINDERS to display the collection.
Note Any sub-locations that were included for the binder display immediately below the LOCATION name.
Downloading an SDS Binder
Note SDS binders are available for download 30 days from the day it was generated. Binders are view-only for an additional 30 days.
There are two formats in which you can download an SDS binder:
•A collection of individual SDSs gathered per location. This selection includes an index listing each SDS alphabetized by product name.
•A collection of a location’s entire collection in book-format. This selection includes a Table of Contents. You also have an option whether to include consecutive page numbers for the collection with this option.
•Both selections can be printed out or delivered to personnel electronically.
Step 1Navigate to CHEMICAL / SDS > RIGHT TO KNOW ACCESS > Download SDS Binder.
Step 2Click SEARCH SDS BINDERS.
Step 3Find the collection in the window, or perform a search. See Searching for an SDS Binder.
Step 4Click the binder’s hyperlinked LOCATION name.
The Download SDS Binders dialog displays, where you can choose between:
•An SDS Collection w/Index—Provides individual SDSs in PDF format and includes an index.
•Printable SDS Binder—Provides a PDF for your location’s entire collection in book-format and includes a Table of Contents.
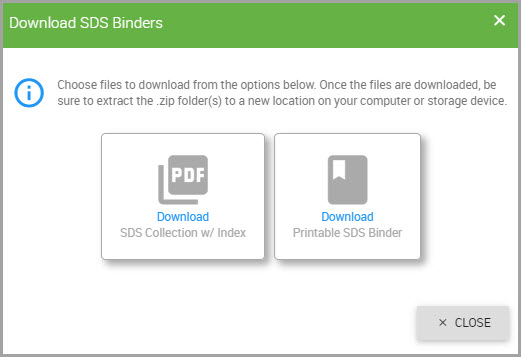
Step 5Click the Download hyperlink for either:
•SDS Collection w/Index
or
•Printable SDS Binder
Step 6Browse your device for the location for where you want to store the binder.
Step 7Choose a name for the binder.
Step 8Click Save.
The file displays in the lower portion of the window.
Step 9When the file is ready, double-click the file name to extract it the file to your system.
Step 10In the Compressed Folder Tools window, click Extract.
Step 11Click Extract all.
Step 12Browse your system for a location to save the extracted file(s).
Step 13Click Extract.
When the extraction process completes, the files display in a new window and are available for your use.
Providing Right to Know Access with the Kiosk Manager
When you synchronize (“sync”) your SDS library with the Kiosk manager to a storage device, you ensure that you and your staff can access any SDS in your collection if a lapse with Internet connectivity occurs.
Note An Internet connection is only required when downloading the application and syncing your collection with the Kiosk manager. You can search and view SDSs offline.
At least one administrator per location should download and regularly sync their SDS library collection to the Kiosk manager to ensure SDS accessibility for their staff.
Note We recommend that you sync the Kiosk manager with your library on a quarterly basis to ensure the Kiosk backup is up-to-date.
Topics include:
Downloading and Installing the Kiosk Application to your Desktop
Downloading and Installing the Kiosk Application to a Storage Device
Synchronizing the Kiosk Manager with your SDS Library Collection
Synchronizing your Library Collection Overnight with the Kiosk Manager
Synchronizing your Collection during Work Hours
Searching for SDSs with the Kiosk Manager
Viewing SDSs with the Kiosk Manager
Downloading and Installing the Kiosk Application to your Desktop
Before you begin, ensure that you have an Internet connection.
Note You may need to temporarily suspend anti-virus software installed on your device before you can install the Kiosk manager application.
Step 1Select CHEMICAL / SDS > RIGHT TO KNOW ACCESS > Download Kiosk App in the navigation pane.
Step 2In the Chemical / SDS Backups window, click +DOWNLOAD KIOSK APP. Alternatively, you can click the Download Now hyperlink instead.
Step 3In the Save As dialog box, browse for and click on the Desktop icon.
Caution Do not rename the file. Doing so can interfere with the installation process.
Step 4Click Save.
Step 5Click the Setup . . .exe file that just downloaded to your device to initiate the Kiosk installation process.
Step 6Click Yes when the SafeTec Kiosk Setup message displays.
Step 7In the Setup-SafeTek Kiosk dialog, click Browse... to locate your desktop.
Step 8Click the Desktop icon.
Step 9Click OK.
Step 10Click Next.
Step 11(Optional) Click the Create a desktop shortcut check box.
Note If you decide against creating a desktop shortcut to the Kiosk program, after you complete the installation process, you launch the program by clicking the SafeTec Kiosk folder on your desktop and then double-clicking the Kiosk.UI.exe file.
Step 12Click Next.
Step 13Click Install.
Step 14Click Finish. You have completed the installation process.
Note Perform the next step if you want to immediately launch the Kiosk Manager. Before you begin synchronizing, see Synchronizing the Kiosk Manager with your SDS Library Collection.
Step 15 (Optional) Launch the Kiosk program by:
•Double-clicking the SafeTec Kiosk icon on your desktop, or
•Clicking the SafeTec Kiosk Folder on your desktop, and then double-clicking the Kiosk.UI.exe file.
Next Steps:
Synchronizing the Kiosk Manager with your SDS Library Collection
Downloading and Installing the Kiosk Application to a Storage Device
Before you begin, ensure that you have an Internet connection.
Note You may need to temporarily suspend anti-virus software installed on your device before you can install the Kiosk manager application.
A Universal Serial Bus (USB) flash drive is used as the storage device in the following procedure.
Step 1Insert the USB flash drive into your device.
Step 2Select CHEMICAL / SDS > RIGHT TO KNOW ACCESS > Download Kiosk App in the navigation pane.
Step 3In the Chemical / SDS Backups window, click +DOWNLOAD KIOSK APP. Alternatively, you can click the Download Now hyperlink instead.
Step 4In the Save As dialog box, browse for and click on the USB drive.
Caution Do not rename the file. Doing so can interfere with the installation process.
Step 5Click Save.
Step 6Click the Setup...exe file that just downloaded to your device to initiate the Kiosk installation process.
Step 7Click Yes when the SafeTec Kiosk Setup message displays.
Step 8In the Setup-SafeTec Kiosk dialog, click Browse... to locate the USB drive, and then click on the drive’s icon.
Step 9Click OK.
Step 10Click Next.
Step 11(Optional) Click the Create a desktop shortcut check box.
Note If you decide against creating a desktop shortcut to the Kiosk program, after you complete the installation process, you launch the program by navigating to your USB drive, double-clicking the SafeTec Kiosk folder, and then double-clicking the Kiosk.UI.exe file.
Step 12Click Next.
Step 13Click Install.
Step 14Click Finish. You have finished the installation process.
Note Perform the next two steps if you want to immediately launch the Kiosk Manager. Before you begin synchronizing, see Synchronizing the Kiosk Manager with your SDS Library Collection.
Step 15(Optional) If you want to begin synchronizing now, launch the Kiosk program by:
•Double-clicking the SafeTec Kiosk icon on your desktop, or
•Navigating to your USB drive, double-clicking the SafeTec Kiosk Folder, and then double-clicking the Kiosk.UI.exe file.
Next Steps:
Synchronizing the Kiosk Manager with your SDS Library Collection
Synchronizing the Kiosk Manager with your SDS Library Collection
Perform the following steps for your initial and subsequent syncs between the Kiosk manager and your SDS library. Because your first synchronization may run up to 24 hours depending on the size of your collection, choose between the following processes:
Synchronizing your Library Collection Overnight with the Kiosk Manager—Perform this procedure for syncing larger collections with the Kiosk Manager for the first time.
Synchronizing your Collection during Work Hours—Perform this procedure for the initial syncing of smaller collections or when performing subsequent syncs. While the system syncs, you can minimize the window to perform other work, or log out of the system.Do not, however, shut down your system or put it into Sleep Mode.
Note When performing subsequent syncs with your library, the Kiosk Manager searches only for SDSs added to your collection since its last synchronization and therefore takes less processing time.
Before you begin synchronizing, ensure that:
1You are connected to the Internet.
2You have performed either:
—Downloading and Installing the Kiosk Application to your Desktop, or
—Downloading and Installing the Kiosk Application to a Storage Device
Synchronizing your Library Collection Overnight with the Kiosk Manager
Perform the following steps if you have a large SDS collection and you have never synchronized your collection with the Kiosk Manager.
Note An Internet connection is required for synchronization.
Step 1Access the Kiosk program by:
•Clicking the SafeTec Kiosk icon where you saved it on your device, or
•Using the USB drive you saved the application on, insert it into your device, double-click the SafeTec Kiosk folder, and then double-click the Kiosk.UI.exe file.
Step 2In the SDS BACKUPS KIOSK MANAGER window, click START LIBRARY SYNC.
Step 3Enter your administrator login credentials in the Download Library dialog box.
Step 4Click Login. The Download Library progress message displays as the Kiosk begins syncing with your SDS library.
As the sync progresses, you can minimize the screen to perform other tasks.
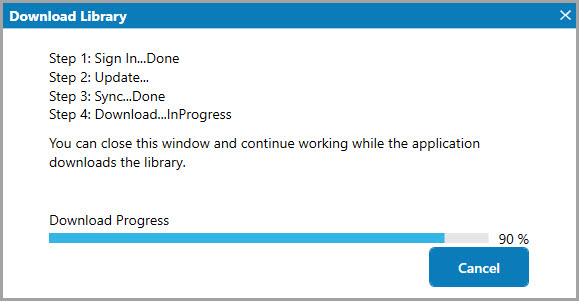
Step 5(Optional) If the synchronization is still running and you are at the end of your business day, put your device in Sleep mode to allow the sync to continue.
Step 6(Optional) If you left the sync running overnight (Step 5), log back into the system and also the Kiosk Manager (see Steps 1 through 4, above) and then click START LIBRARY SYNC to continue the process where it left off.
Step 7Click Complete when the sync finishes to dismiss the progress message. You may need to expand the window to see this button.
After the sync completes, you are ready to search for SDSs.
See Searching for SDSs with the Kiosk Manager.
Synchronizing your Collection during Work Hours
Perform the following steps if:
•You have previously synced your SDS library collection with the Kiosk Manager.
•You have a small SDS library collection and have never synced it with the Kiosk Manager.
Note An Internet connection is required for synchronization.
Step 1Launch the Kiosk program by:
•Clicking the SafeTec Kiosk icon where you saved it on your device, or
•Using the USB drive you saved the application on, insert it into your device, double-click the SafeTec Kiosk folder, and then double-click the Kiosk.UI.exe file.
Step 2In the SDS BACKUPS KIOSK MANAGER window, click START LIBRARY SYNC.
Step 3Enter your administrator login credentials in the Download Library dialog box.
Step 4Click Login. The Download Library progress message displays as the Kiosk begins syncing with your SDS library.
As the sync progresses, you can minimize the screen to perform other tasks.
Note Do not put your system to sleep or shut down your device during this synchronization process.
Step 5Click Complete when the sync finishes to dismiss the progress message. You may need to expand the window to see this button.
After the sync completes, you are ready to search for SDSs.
See Searching for SDSs with the Kiosk Manager.
Searching for SDSs with the Kiosk Manager
Before you begin and if you installed the Kiosk Manager on a storage device, have that device available, and be sure you have performed the following procedures:
1Downloading and Installing the Kiosk Application to a Storage Device.
2Synchronizing the Kiosk Manager with your SDS Library Collection.
Note An Internet connection is not required to search for SDSs using the Kiosk manager.
A USB flash drive is used as the storage device in the following procedure.
Step 1(Optional) Insert the USB drive into your device.
Step 2Launch the Kiosk program by:
•Clicking the SafeTec Kiosk icon where you saved it on your device, or
•Using the USB drive you saved the application on, insert it into your device, double-click the SafeTec Kiosk folder, and then double-click the Kiosk.UI.exe file.
Step 3In the SDS BACKUPS KIOSK MANAGER window, click SEARCH FOR MATERIALS to invoke the search window.
Choose one or more of the following search filters to locate the SDSs that you need. To view results, click the SEARCH button after making each selection.
Note Clicking the SEARCH button without making any filter selections returns your entire SDS collection.
•Search—Enter a product name or key word for the SDS.
•Click SELECT LOCATION to prompt the Location Selection dialog box where you can:
—Click a location’s caret, shown below, to reveal it’s sub-locations.
—Click the top-level location’s check box to select that location and its sub-locations.
—De-select locations as needed.
When you finish, click Done to dismiss the dialog box.
•Click Active to display additional SDS status of Archived, or Any, and then click the status that you want.
Step 5Click SEARCH to display results.
Note The ARCHIVED column denotes whether a material is active or archived, and is not intended for user input.
Step 6Repeat Steps 4 and 5, as desired.
To access a product’s SDS, see Viewing SDSs with the Kiosk Manager
Viewing SDSs with the Kiosk Manager
Step 1Perform Searching for SDSs with the Kiosk Manager.
Step 2When results display, click the SDS’s hyperlinked Product Name to open the SDS’s BASIC INFO page.
Note If you need to return to the previous page, click SEARCH shown above BASIC INFO.
Step 3Click the PDF icon at the top of the page to display the SDS.
Using RTK Site Access Links
This module provides a method for you to generate a link containing your site’s SDS collection which you can then distribute to personnel. You have the option to set distribution security measures such as link expiration dates and / or limit the total number of link views.
Topics include:
Creating a Right To Know Access Link
Editing a Right To Know & Understand Access Link
Distributing a Right To Know Access Link
Deleting a Right To Know Access Link
Using Search Functions in the Right To Know Window
Performing a Basic Search for a Material in the RTK Window
Performing an Advanced Search in the RTK Window
Filtering Results after a Right To Know Search
Viewing All Sites Associated with an RTK Link
Creating a Right To Know Access Link
Step 1Choose CHEMICAL / SDS in the navigation pane.
Step 2Click RIGHT TO KNOW ACCESS > RTK Site Access Link.
Step 3In the Right to Know & Understand window, click +CREATE LINK.
The Create Right To Know Link window opens with the Select Locations section displaying.
Step 4(Optional) Perform a Search for the site, facility, or sub-location for the collection you want to create the link for if you can’t immediately find it on the page.
Note Click Show Selected if you want only want your sites or workflow enabled sites to display in this section.
Step 5Select the site, facility, and/or sub-location check boxes for the SDS binders you want to include in the RTK link.
Step 6Click Edit Details to reveal this section’s contents.
Note Fields accompanied with an asterisk (*) requires input.
Step 7Respond to the following fields:
•(Required) Provide a Link Title*. When you complete this procedure, this name displays under the TITLE column in the Right To Know & Understand window.
•(Optional) Pick the link’s Expiration Date by clicking in this field. A calendar displays for you to find and select the date. Users are not be able to access the link after the date you select.
•(Optional) Provide a user-friendly link name in the Link Alias field. Your input displays beneath the Link Alias column in the Right To Know & Understand window when you complete this procedure.
If you choose not to provide a name, the site/facility/sub-location auto-populates the field.
Note You can choose up to 150 characters for your Link Alias, consisting of alpha/numeric and the underscore (_) symbol. Spaces between words are not allowed.
•(Optional) Enter the number of Max Views for the link.
•(Required) Select the Language* from the field’s drop-down menu.
Step 8Click Edit Feature Settings to reveal this section’s contents.
•Enter a feature’s key words in the Search Features field to refine the list shown.
•Select a Category from the drop-down field to display only that category’s features.
•Choose AVAILABLE FEATURES to include in the link by clicking the feature’s green plus sign. The feature name moves beneath the SELECTED FEATURES column.
•(Optional) To Add all SELECTED FEATURES by clicking the green plus sign at the top of this section.
•(Optional) To remove a feature from the SELECTED FEATURES column, click the feature’s red icon
•(Optional) To Remove all SELECTED FEATURES by clicking the red icon at the top of this section.
Step 9When you are done, click FINISH.
Note After creating a RTK access link, you can add them to a landing page which displays link groups based upon geographical region, business unit, or other categories. See Creating an RTK Landing Page.
Editing a Right To Know & Understand Access Link
You can edit aspects of an RTK access link to
•Update the link’s location associations (site, facility, and sub-locations)
•Provide a more user-friendly link alias name
•Change the link’s expiration date
•Update its feature settings
Step 1Choose CHEMICAL / SDS in the navigation pane.
Step 2Click RIGHT TO KNOW ACCESS > RTK Site Access Link.
Step 3In the Right to Know & Understand window, find the link you want to edit beneath the TITLE column and in its row, select the vertical ellipses > Edit Details.
Step 4See Creating a Right To Know Access Link, Steps 4 through 9.
Distributing a Right To Know Access Link
Step 1Choose CHEMICAL / SDS in the navigation pane.
Step 2Click RIGHT TO KNOW ACCESS > RTK Site Access Links.
Step 3(Optional) In the Right To Know & Understand window, select the RTK link’s Site Assignment from the drop-down menu to narrow the selections shown on-screen.
Step 4(Optional) In the Right To Know & Understand window, select the RTK link’s Site Assignment from the drop-down menu to narrow the selections shown on-screen.
Note Ensure the link is active by noting its EXPIRATION date.
Step 5In the link’s row, click the Get Access Link icon.
The Access Link Generated dialog box displays the RTK link.
Step 6Copy the link to distribute the RTK information.
Step 7Click CLOSE.
Deleting a Right To Know Access Link
Step 1Choose CHEMICAL / SDS in the navigation pane.
Step 2Click RIGHT TO KNOW ACCESS > RTK Site Access Links.
Step 3(Optional) In the Right To Know & Understand window, select the RTK link’s Site Assignment from the drop-down menu to narrow the selections shown on-screen.
Step 4In the link’s row, click the Delete icon.
A message displays confirming the link’s deletion.
Using Search Functions in the Right To Know Window
After accessing a Right To Know (RTK) link, the Chemical / SDS window opens to display the following search tools that you can use to locate materials based on a variety of criteria.
Performing a Basic Search for a Material in the RTK Window
Step 1Choose CHEMICAL / SDS in the navigation pane.
Step 2Click RIGHT TO KNOW ACCESS > RTK Site Access Links.
Step 3In the lower portion of the Right To Know & Understand window, find the Site name and in its row, click the Get Access Link icon.
Step 4After accessing the link and in the Chemical / SDS Search Window, select the Basic Search radio button.
Step 5Enter or select data from one or all the fields described below:
—Select a facility from the Location Assignment drop-down menu.
—Enter keywords or phrases in the Search field, separating each term or phrase with a comma.
You can also choose a Search Mode in conjunction with performing a basic search by:
—Choosing Match All Terms to return results that match all search terms you entered in the Search field, and in the order that you entered them.
—Choosing Match Any Term to return results that match any of the search terms you entered in the Search field, in any order.
Note Click the  icon to reveal additional search tips.
Step 6After you finish entering or selecting options, click SEARCH COLLECTION to display results.
Performing an Advanced Search in the RTK Window
You can refine search results by choosing to perform an advanced search.
Step 1See Performing a Basic Search for a Material in the RTK Window and perform Steps 1 through 3.
Step 2After accessing the link and in the Chemical / SDS Search Window, select the Advanced Search radio button.
Step 3Along with the fields described in Performing a Basic Search for a Material in the RTK Window, the following additional fields display. Enter data for one or more of the fields to further refine your search results:
—Material Number
—Product Number
—Status
—Document Format
—Barcode
Step 4Click SEARCH COLLECTION to display results.
Filtering Results after a Right To Know Search
After you have performed a chemical search, you can further refine results by the clicking the Search Filters icon, shown below.

Clicking this icon prompts the window to display additional ways to pare your results.
Viewing All Sites Associated with an RTK Link
The system truncates the display of RTK site names when the characters surpass the 200 character mark.
To see all sites associated for an RTK link, perform the following steps.
Step 1Choose CHEMICAL / SDS > RIGHT TO KNOW ACCESS > RTK Site Access Links in the navigation pane.
Step 2View more sites by performing one of the following:
•Click the caret (>), shown bordered in green in the following image, to reveal an additional 500 characters of sites.
•Click the ellipses (...), shown bordered in red in the following image, to reveal all sites.
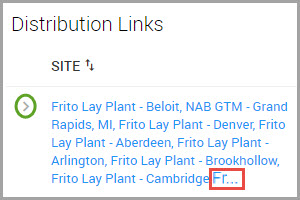
Using Right To Know Access Link Landing Pages
You can build a Right-to-Know (RTK) landing page to hold a selection or all of the RTK links that you have previously created. You can then distribute the landing page to users or add its link to your organization’s web page.
Note You must create RTK access links before building a landing page. See Creating a Right To Know Access Link.
Topics include:
Using the Tools in the RTK Landing Page Preview Section
Editing RTK Landing Page Details
Distributing the Right To Know Landing Page
Deleting an RTK Access Link Landing Page
Creating an RTK Landing Page
Step 1Choose CHEMICAL / SDS > RIGHT TO KNOW ACCESS > RTK Site Access Links in the navigation pane.
Step 2Click the RTK LANDING PAGES tab.

Step 3In the RTK Landing Page window, click +CREATE LANDING PAGE.
Step 4In the Create RTK Landing Page window and beneath the Edit RTK Link Groups section, enter a GROUP DESCRIPTION. The group will hold the access links that you add to it in Step 7.
Examples for RTK link groups include geographic regions or business groups within an organization.
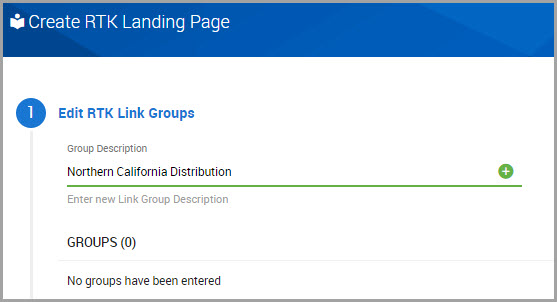
Step 5Click to add the group to the landing page.
The name now displays beneath the GROUPS section.
Step 6(Optional) Repeat Steps 4 and 5 to add additional group descriptions.
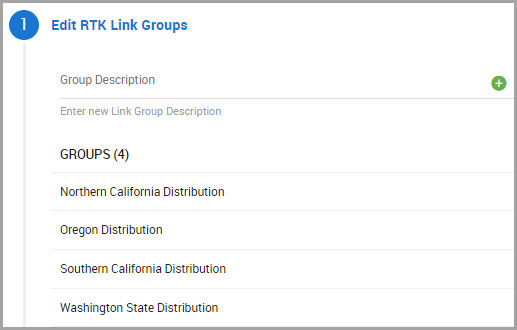
Note See Editing RTK Landing Page Details to learn how to modify information performed for this topic.
Step 7Click Edit RTK Group Assignments to select link titles and add them to the group(s) you created in the previous section. This is a two-step process:
(a)Click the check box of the access link TITLE you want to include in a group.
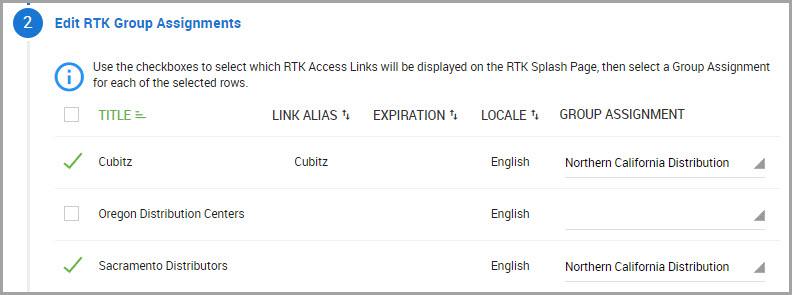
(b)In the access link’s row and beneath the GROUP ASSIGNMENT column, click the drop-down menu to select a group assignment for the access link.
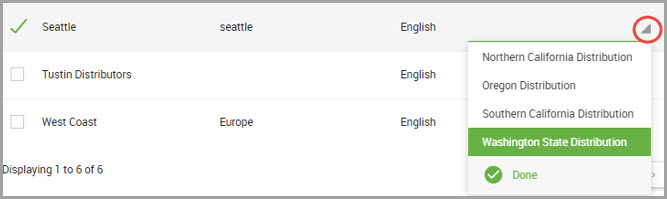
(c)Repeat Steps a and b as needed. When you finish, continue to Step 8.
Step 8Click Edit Landing Page Details to continue.
Note Fields with an asterisk (*) requires input.
Step 9Provide a Title* for the landing page. This displays in the TITLE column of the RTK Landing Pages window.
Step 10 Provide the URL Link Alias*. This displays in the ALIAS column of the RTK Landing Pages window.
Note Do not use a space in your Link Alias name. If you want to include spacing between words, use the underscore (“_”) key.
Step 11 Click Preview to see how the finished page appears. A portion of this page is shown in the image below.
Note See Using the Tools in the RTK Landing Page Preview Section for details about using the tools (Search, Grid View, List View, and the RTK Group Assignment drop-down menu) shown in this section of the Create RTK Landing Page window.
The page refreshes and returns to the RTK Landing Pages window.
Using the Tools in the RTK Landing Page Preview Section
There are several features in the Preview section that you can use to modify the display
You can:
•Enter facility or group names in the Search field to display only those that you are interested in seeing.
•Change how the groups display by clicking the List View icon, circled in red in the previous image.
An example of the page displaying in List View is shown below.
Grid View, circled in green, is the default setting.
•Click RTK Group Assignment to select the group you want to display. All Groups is the default setting.
Editing RTK Landing Page Details
Step 1Choose CHEMICAL / SDS > RIGHT TO KNOW ACCESS > RTK Site Access Links in the navigation pane.
Step 2Click the RTK LANDING PAGES tab.
Step 3Find the TITLE of the landing page you want to edit and in its row, click its Edit icon.
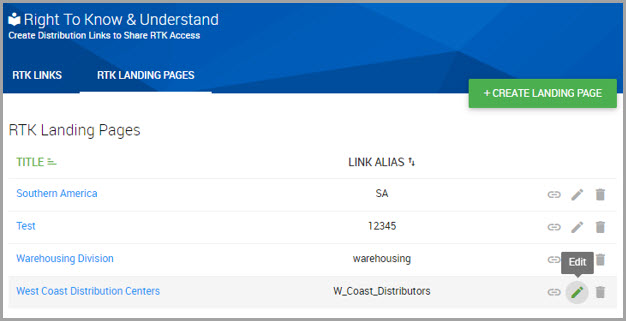
Step 4In the Create RTK Landing Page window, click on the section headers to find the content that you want to edit. Each section listed below describes how to make modifications:
•Edit RTK Link Groups:
To edit the group name:
A) Click the Edit icon shown in the group name’s row.

B) In the Edit Group Description dialog box, delete the current Group Description and enter a new name.
C) Click UPDATE.
Note Delete a group by clicking its Trash icon.
•Edit RTK Group Assignments:
—Remove a link TITLE by de-selecting its check box.
—Re-assign a link TITLE by choosing a different GROUP ASSIGNMENT from its drop-down menu.
—Include an additional link to the landing page by clicking its check box and choosing its GROUP ASSIGNMENT.
•Edit Landing Page Details:
—Change the Title* and/or the Link Alias* by deleting the current information and re-entering new content.
Note The Preview section’s content is modified only by performing the edits mentioned in this topic. You can change how this section displays for you by using the tools shown in the Preview section. See Using the Tools in the RTK Landing Page Preview Section.
Distributing the Right To Know Landing Page
Step 1Choose CHEMICAL / SDS > RIGHT TO KNOW ACCESS > RTK Site Access Links in the navigation pane.
Step 2Click the RTK LANDING PAGES tab.
Step 3Find the landing page that you want to distribute, and click on its hyperlinked TITLE.
Step 4(Optional) In the Access Link dialog box, ensure that you are selecting the correct landing page by clicking the Open Link icon, shown circled in red in the following image.
Step 5Copy the landing page link by clicking the Copy Link to Clipboard, shown circled in blue in the following image.
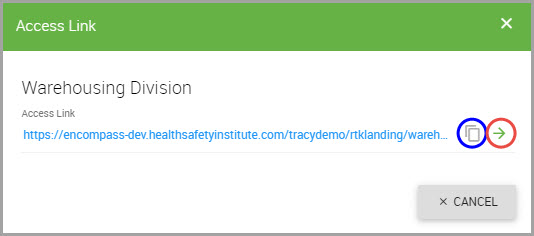
Step 6Paste the link into an email message and deliver it to users.
Step 7(Optional) Add the link to your organization’s website.
Deleting an RTK Access Link Landing Page
Step 1Choose CHEMICAL / SDS > RIGHT TO KNOW ACCESS > RTK Site Access Links in the navigation pane.
Step 2Click the RTK LANDING PAGES tab.
Step 3Find the TITLE of the landing page you want to remove and in its row, click the Delete icon.
Appendix A—Inventory: Source Quantity Conversions
The following describes conversion methods for the following material physical states to be used for creating or modifying an inventory record for a material:
—Solid
—Liquid
—Gas
—Mixed States
|
Source |
Conversion |
|---|---|
|
State Solid |
System calculations use a conversion factor (scale) to convert the material weight to pounds. Formula: q x CF = w (LBs) Where: • q = Inventory Bulk Quantity • CF = Conversion Factor • w = weight in pounds e.g. 100 Kg X 2.20462262 = 220.462262 Lbs |
|
State Liquid |
System calculations use Specific Gravity times a scale factor (the weight of water @ 8.34 Lbs/Gal) to convert the material volume to Pounds when volumetric units are used on the inventory record. Formula: q(CF) x SG = w (LBs) Where: • q = Inventory Bulk Quantity • CF = Conversion Factor • SG = Specific Gravity • w = weight in pounds e.g. 100 gallons X C.F. 8.34 X S.G. 1.0 = 834 LBs |
|
State Gas |
The system uses a Gas Calculator to convert gas-state materials from Cubic Feet to Pounds. The GasCalculator uses the Ideal Gas Law for calculations: Formula: PV = nRT Where: • P = pressure in psig + 14.7 = psia • V = volume in ft3 • T = temperature convert to Rankine —Case Fahrenheit result = CDec(value + 459.67) —Case Celsius result = CDec((value + 273.15) * (9/5)) —Case Kelvin result = CDec(value * 9/5)) • R = gas constant = 10.731 [(ft3 psi)/(R lbmol)] • MW = Molecular Weight of Gas (or weighted sum of all ingredient constituent molecular weights) Note Molecular Weight can be referenced as either g/mole or kg/mole, since MW is a ratio, which does not require any conversion and can be used in the equation as either. Detailed Formula for PV = nRT: {((psig+14.7)*(Qty ft3)) / (T*10.731))*(MW) |
|
Mixed States |
The system allows for multiple combinations of all three Chemical States. Users must select a Physical State to perform conversions. |