Configuring & Managing System Settings
Main topics for this section includes:
Searching for Features in the Settings Module
Managing Chemical / SDS Settings
Configuring Material Component Settings
Configuring Inventory Settings
Configuring your Chemical Data Collections for Analysis
Setting SDS Refresh Multi-Composition Options
Creating and Managing Administrator Roles
Searching for Features in the Settings Module
Step 1Choose SETTINGS in the navigation pane.
Step 2Enter a feature name in the Search Settings field.
As you type, the system displays results according to your input.
Creating & Managing Sites
Topics in this section include:
Understanding the Site Management Window
Exporting your Sites List to a Spreadsheet
Enabling Chemical Management for a Site
Understanding the Site Management Window
This section identifies the tools shown in the Site Management window.
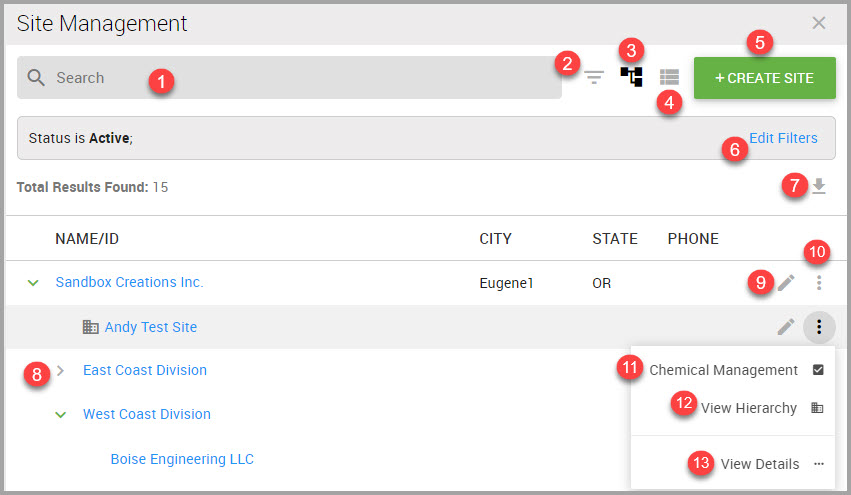
|
Item Number |
Description |
|---|---|
|
1 |
Enter Search parameters here. Results auto-display as you type. |
|
2 |
Click to display the Advanced Search dialog box, described in Step 4 in Searching for a Site. |
|
3 |
Click to display your sites in Hierarchy View (the default setting). |
|
4 |
Click to display your sites in List View. |
|
5 |
Click to Create a New Site. |
|
6 |
Displays any filters applied to your search. |
|
7 |
Click to Edit Filters applied using the Advanced Search tool. |
|
8 |
Click to Export search results in an Excel spreadsheet. Without applying filters, the resulting export results in your entire site list. |
|
9 |
Click the caret (>) to display any subsites. |
|
10 |
Click to Edit site Details. |
|
11 |
Click to View More Menus. |
|
12 |
Click to load the Chemical Management page. Displays Chemical Management if the selected site is enabled; otherwise, displays as Enable Chemical Management. |
|
13 |
Click to View (site) Hierarchy. |
|
14 |
Click to View (additional site) Details. |
Creating a Site
Step 1Choose SETTINGS in the navigation pane.
Step 2Click Site Management.
Step 3In the Site Management window, click +CREATE SITE.
Step 4In the Create Site window, provide information for the fields.
Note You must provide input for all fields accompanied by an asterisk (*).
Additional information for field input includes:
•Site Assignment* defaults to the top-level of your site hierarchy. To select a different site, click this field’s triangular drop-down menu.
If you need to perform a site search:
(a) Click the Site Assignment* field.
(b) Enter full or partial site names next to the magnifying glass.
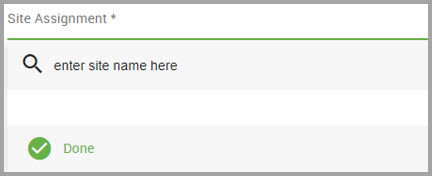
Results auto-fill as you type.
(c) Select the site by clicking on the site name.
(d) Click Done to dismiss the drop-down menu, if necessary.
•Provide an alpha-numeric identifier for Site ID.
•Address Line 2—For use if you need to include a building, suite, department name or any additional addressing identifiers.
•Country—Select a different country by clicking the triangular drop-down menu.
Step 5When you finish, click SAVE SITE.
A message displays and asks if you want to create another site.
Step 6Decide to either:
(a) Decline by clicking NO, THANKS.
The page refreshes and displays the new site’s Site Detail window.
OR
(b) Click YES, CREATE NEW SITE to add another site.
The page refreshes and returns to the Create Site window.
Editing Site Details
Step 1Choose SETTINGS in the navigation pane.
Step 2Click Site Management.
Step 3In the Site Management window, search for the site or locate it beneath the NAME column. See Searching for a Site for additional information.
Step 4In the site’s row, click its View/Edit Site Details icon.
Step 5In the Site Details window, modify fields as needed. See Understanding the Site Management Window, step 4 for field information.
Step 6When you finish, click SAVE SITE.
Searching for a Site
You can perform a basic search for sites by searching by name or site assignment, or conduct a search based on specific criteria such as site status or whether the site is enabled for chemical management. See Understanding the Site Management Window to identify the icons shown in this window.
Step 1Choose SETTINGS in the navigation pane.
Step 2Click Site Management.
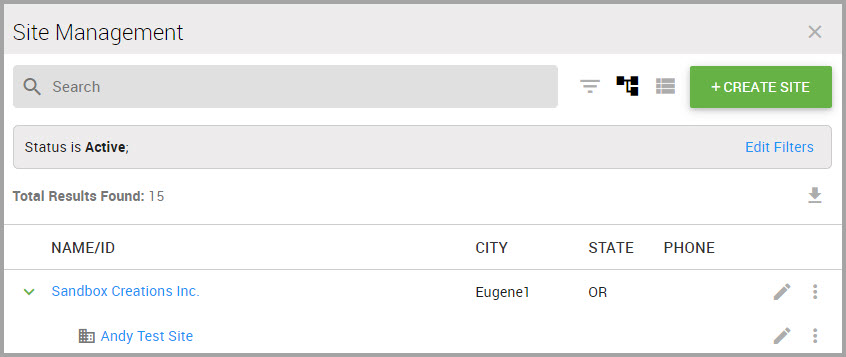
Step 3Enter key terms in the Search field. Results display as you type; an example is shown below.
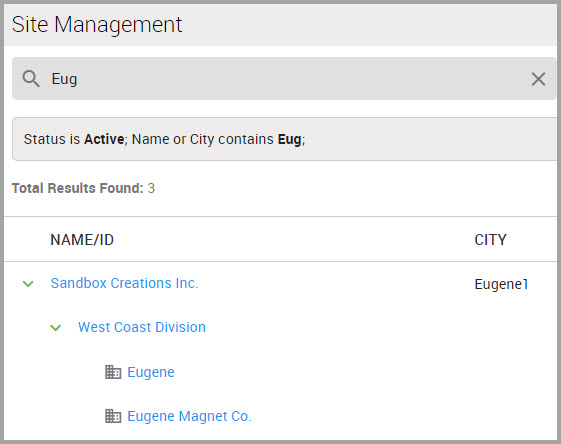
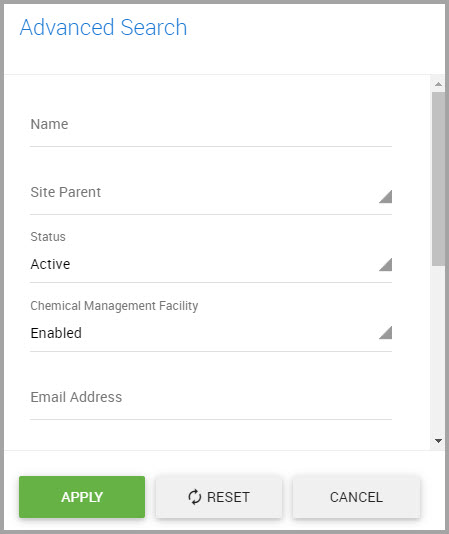
Step 4(Optional) For additional search criteria, click the Advanced Search icon (see Understanding the Site Management Window) to display the Advanced Search dialog, shown in the following image.
(a)Use the scroll bar on the side of the dialog to display additional fields in the dialog box.
(b)Make your selections.
(c)Click APPLY when you finish.
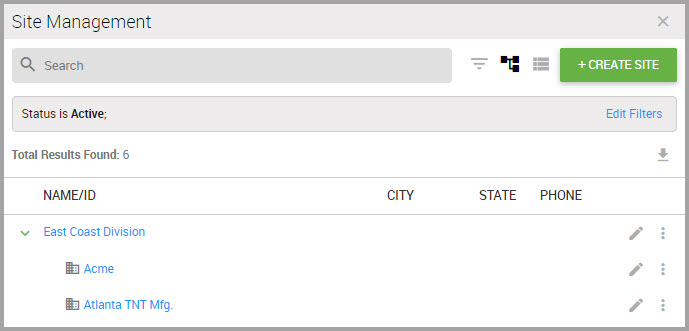
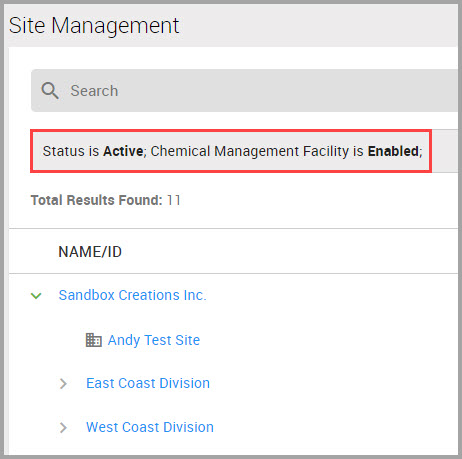
In the example above, we are searching for Active sites that are enabled for Chemical Management. The following image displays these filters (bordered in red), along with sites meeting the specified criteria.
Exporting your Sites List to a Spreadsheet
You can export your entire site list, or specify a selection of sites to export, by performing the following steps.
Step 1Choose SETTINGS in the navigation pane.
Step 2Click Site Management.
Step 3In the Site Management window, decide to:
•Perform a site search to narrow the results shown in the spreadsheet (Continue to Step a).
or
•Export your entire site list (Continue to Step 4).
(a)(Optional) Conduct a site search to narrow results shown in the spreadsheet by performing one of the following actions:
•Entering the site Name
•Entering the Email Address associated with the site
•Selecting the Site Assignment*
(b)Click SEARCH SITES (Continue to Step 4).
Step 4Click the Export to Excel icon, shown bordered in red in the following image.
Step 5Browse for a location on your device to save the spreadsheet to using the Save As dialog box.
Step 6(Optional) Provide the spreadsheet a new File name.
Step 7Click Save. The spreadsheet downloads to your device.
Step 8(Optional) Click the file name to view the results.
Viewing Site Hierarchy
Step 1Choose SETTINGS in the navigation pane.
Step 2Click Site Management.
Step 3In the Site Management window, click VIEW HIERARCHY.
The window refreshes to display your site’s hierarchy.
An alternate method for viewing hierarchy includes:
(a) Searching for the site. See Searching for a Site.
(b) After locating the site and from that site’s row, click the ellipses, and then select View Hierarchy.
Viewing a Site’s Members
Step 1Choose USERS> MEMBERS > List from the navigation pane.
Step 2Click in the Site Assignment field and either:
—Enter full or partial site names next to the magnifying glass icon. Results auto-fill as you type.
OR
—Scroll down the field’s pane to locate the site.
Step 3Click SEARCH MEMBERS.
The site’s members auto-display in the lower portion of the window.
Enabling Chemical Management for a Site
Your sites chemical management must be enabled so you can track chemicals stored at your organization’s locations.
Note
-Chemical management cannot be enabled globally for an organization; you must individually choose specific locations within a facility.
-If a site is enabled for chemical management, their sub-sites are automatically enabled.
Step 1Choose SETTINGS in the navigation pane.
Step 2Click Site Management.
Step 3In the Site Management window, search for the site or locate it beneath the NAME column. See Searching for a Site.
Note Locations already enabled for chemical management display a green check mark beneath the CHEMICALS column in the Site Management window.
Step 4In the site’s row, click the vertical ellipses and select ENABLE CHEMICAL MANAGEMENT.
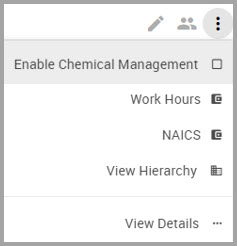
Note If a site’s chemical management has already been enabled, the ellipses menu displays Chemical Management instead of Enable Chemical Management.
Step 5In the Site Details window, click the Enable Chemical Management toggle.
Click SAVE to complete the process.
Managing Chemical / SDS Settings
You can control Chemical module system behaviors by working with the features shown in this module.
Access this module by:
Step 1Choosing SETTINGS in the navigation pane.
Step 2Find Chemical / SDS Settings.
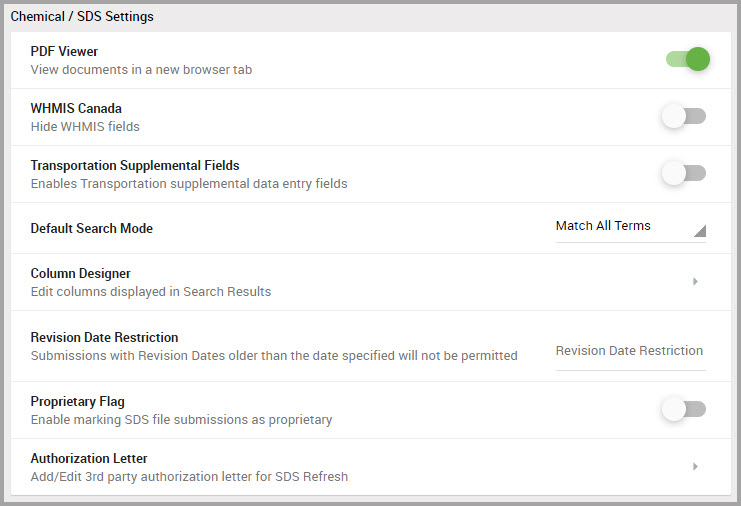
Viewing PDFs in a New Browser Window
Click the PDF Viewer toggle to view documents in a new browser window.
Showing or Hiding WHMIS Canada Details
Click the WHMIS Canada toggle to hide WHMIS details that display in the Hazard section in the Material Detail window.
Enabling Transportation Supplemental Fields
Click the Transportation Supplemental Fields toggle to provide additional IATA transportation data fields.
Customizing your Default Search Mode
Customize your chemicals Default Search Mode preferences by making a selection of either:
•Match Any Term to return results that match any of the search terms you entered in the Search field, in any order. This option must be selected if you enable the Including Wildcard with Search Terms feature.
•Match All Terms to return results that match all search terms you entered in the Search field, and in the order that you entered them.
Including Wildcard with Search Terms
This setting automatically appends wildcards to maximize Chemical/SDS search results. For example, when this feature is enabled and if you enter the search term “hydro,” search results include:
•hydro
•hydrogen
•hydro-mono-sodium
Note You must also select Match Any Term for this feature to perform.
Customizing Search Results Columns
You can control which columns display, and their order, in material search results windows by performing the following steps.
Note Manufacturer, Product Name, and Revision Date are required columns and cannot be removed from material search results.
Step 1Choose SETTINGS in the navigation pane.
Step 2Click Column Designer in the Chemical / SDS Settings section of the window.
Step 3Click the Column Designer’s Edit Customize Search icon.
Step 4(Optional) In the Edit Search Results Columns window, use the following two elements to narrow column choices to select from:
•Enter Search Column names if you are interested in a particular category of columns to display in material search results. Results auto-display as you type.
The example below shows the results from entering product in the Search Columns field.
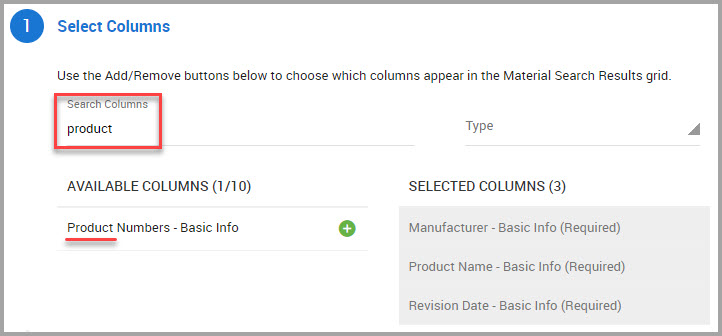
•Narrow choices by choosing either Basic Info or Material Codes from the Type drop-down menu.
Note We suggest that you choose no more than three columns, for a total of seven columns, for optimum display purposes, although results may vary depending on your screen size. Columns auto-collapse from left-to-right to accommodate the screen size.
Step 5After you find the column name beneath the AVAILABLE COLUMNS section, click its green button to select it.
The column name moves beneath the SELECTED COLUMNS section.
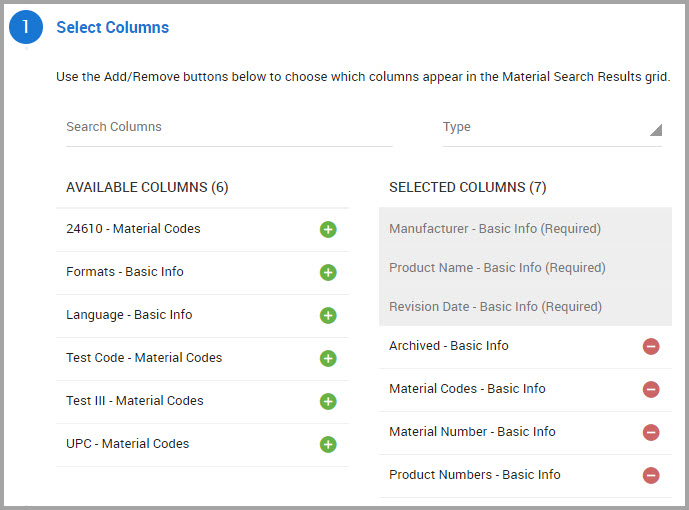
Step 6(Optional) Click the red buttons for any columns that you do not want included in chemical search results windows.
Note Manufacturer, Product Name, and Revision Date columns are required material search results fields and cannot be removed.
Step 7When you finish selecting columns, scroll down to the bottom of the page, and click CONTINUE.
The Define Column Order section expands to display the columns you selected in the previous steps. The top-down column sequence shown here displays left-to-right in your search results windows.
Step 8(Optional) If you want to re-arrange column positions, choose one of two ways to move a column:
•Find the column name that you want to move and in its row, click the up or down arrows until the column displays in the order position that you want.
Or
•Click on the column name that you want to move, and then drag-and-drop it to the order position you prefer.
Step 9Scroll down the page and click CONTINUE.
Step 10(Optional) In the Preview window, select the appropriate Preview Screen Size radio button for the device mode that you want to preview the new column configuration in.
Step 11 (Optional) If you want to make revisions after previewing the column positions, click BACK to return to previous sections, and then proceed to Step 10 to preview the configuration again. Otherwise, continue to Step 12.
Note You may need to refresh the system to view the new column configuration.
Imposing Revision Date Restrictions
Entering a Revision Date Restriction prevents users from submitting documents older than the date you specify here.
To set a revision date restriction:
Step 1Choose SETTINGS from the navigation pane.
Step 2Find Chemical /SDS Settings, and click in the Revision Date Restriction field.
Step 3Click the your revision date’s Year, Month, and Day in the calendar.
Step 4Click Close.
Marking SDS Submissions with a Proprietary Flag
Clicking the Proprietary Flag toggle enables you to mark new documents that you are submitting as proprietary, making it available only within your organization’s collection, and preventing it from appearing in the SDS Library.
Creating an SDS Authorization Letter
Create or upload a letter authorizing 3rd parties to request and acquire Safety Data Sheets on your behalf.
You can produce the letter one of two ways:
•Creating an SDS Refresh Authorization Letter with the System’s Template
or
•Uploading an SDS Authorization Letter from your Device
Topics in this section include:
Creating an SDS Refresh Authorization Letter with the System’s Template
Uploading an SDS Authorization Letter from your Device
Editing the SDS Refresh Authorization Letter
Viewing your Company’s SDS Refresh Authorization Letter
Creating an SDS Refresh Authorization Letter with the System’s Template
You can create an SDS refresh authorization letter quickly by using the system’s template which automatically generates your letter’s content.
Step 1Choose SETTINGS in the navigation pane.
Step 2Find the CHEMICAL /SDS Settings section of the window, and click Authorization Letter.
Step 3Click Add New Authorization Letter.
Step 4Click the Create New Letter radio button.
Step 5Enter information for the fields shown on the page. All fields are required except Address Line 2.
Step 6Provide your signature one of two ways:
•If you have a touch screen device, place your finger on your computer screen to write your name within the Signature box.
or
•If you don’t have a touch screen device, using your mouse, place the cursor within the Signature box to write your name.
Note Click CLEAR SIGNATURE to re-write your name.
Step 7When you finish, click SAVE.
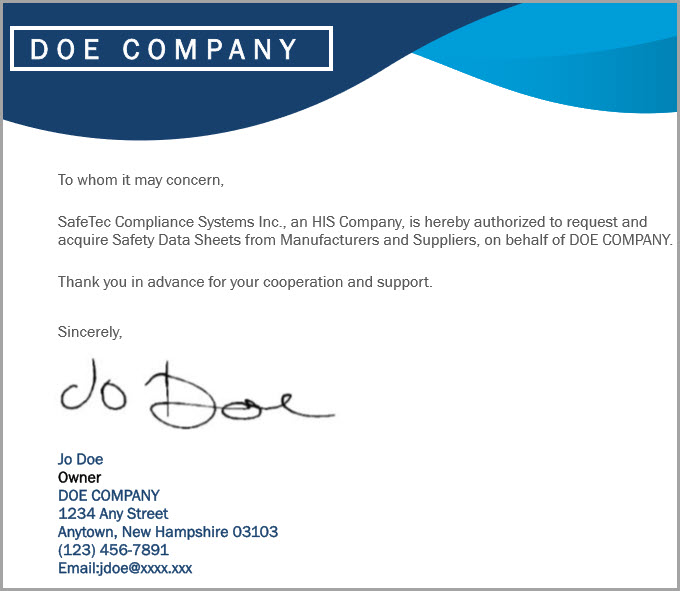
Uploading an SDS Authorization Letter from your Device
Before you begin, ensure that your authorization letter:
•Is written on your company’s letterhead.
•Contains text that reflects the messaging shown in the following image, and provides complete contact information and a signature from an authorized party.
•Is saved as a Portable Document Format (pdf).
Step 1Perform Steps 1 through 2 in Creating an SDS Refresh Authorization Letter with the System’s Template.
Step 2In the Add Authorization Letter page, click the Upload New Letter from Desktop radio button.
Step 3Either:
•Drag the letter from your desktop to inside the text box,
or
(a)Click the Select a File hyperlink.
(b)Browse your system for the letter, clicking Open once you find it.
The letter’s FILE NAME displays on the page.
Note If you want to remove the letter, click the trash icon.
(c)Continue to Step 4.
Step 4Click UPLOAD.
Step 5(Optional) View the letter by returning to the Application Preferences page.
Step 6Click the View Authorization Letter icon.
Editing the SDS Refresh Authorization Letter
If you need to revise the letter, you will need to resubmit another template (Creating an SDS Refresh Authorization Letter with the System’s Template) or upload a new letter (Uploading an SDS Authorization Letter from your Device).
Viewing your Company’s SDS Refresh Authorization Letter
You can view your company’s SDS refresh authorization letter by performing the following steps.
Step 1Choose SETTINGS in the navigation pane.
Step 2Find the Chemical/ SDS Settings section of the window, and click Authorization Letter.
Step 3Click the View Authorization Letter.
Configuring Material Component Settings
This module contains the following chemical management categories that you can configure and manage:
•Working with Attachment Categories
•Working with Classification Types
•Creating & Modifying Custom Fields
•Enabling Material Hazard Classifications

Working with Attachment Categories
Use the procedures in this section to add and modify supplemental documentation that pertains to a material.
Creating an Attachment Category
Step 1Choose SETTINGS in the navigation pane.
Step 2Find the Material Components section, and click Attachment Categories.
Step 3Click ADD ATTACHMENT CATEGORY.
Step 4Provide a Category* name in the dialog box.
Step 5Click SAVE.
Renaming an Attachment Category
Step 1Choose SETTINGS in the navigation pane.
Step 2Find the Material Components section, and click Attachment Categories.
Step 3Find the category DESCRIPTION shown in the Manage Material Component Features window.
Step 4In the category’s row, click the Rename Attachment Category icon.
Step 5Enter a new category name in the dialog box.
Step 6Click CONFIRM.
Working with Code Types
Code types are used to identify materials. Code types include UPC, stock numbers, Mil-Spec numbers, and others that are used at your location. Once you add the codes, they are automatically activated
Creating a Code Type
Step 1Choose SETTINGS in the navigation pane.
Step 2Find the Material Components section, and click Code Types.
Step 3Click Add Code Type.
Step 4Provide a code Type* name in the Add New Material Code Type dialog box.
Step 5Click SAVE.
Renaming a Code Type
Step 1Choose SETTINGS in the navigation pane.
Step 2Find the Material Components section, and click Code Types.
Step 3Find the code DESCRIPTION that you want to rename and in its row, click the Rename Code Type icon.
Step 4Enter a new code name in the Rename Code Type dialog box.
Step 5Click CONFIRM.
Archiving a Code Type
Step 1Choose SETTINGS in the navigation pane.
Step 2Find the Material Components section, and click Code Types.
Step 3Find the code DESCRIPTION that you want to archive and in its row, click the Archive Code Type icon.
Step 4CONFIRM the action.
Activating an Archived Code Type
Step 1Choose SETTINGS in the navigation pane.
Step 2Find the Material Components section, and click Code Types.
Step 3Find the code DESCRIPTION you want to re-activate and in its row, click the Activate Code Type icon.
Step 4CONFIRM the action.
Working with Classification Types
Material classification types are used for grouping materials based upon their usage similarities. Begin by creating the top-level (or “parent”) classification type (see Creating an Attachment Category) and then add sub-classification types (or “children”). For example, you can create a top-level group type entitled Housekeeping, nested with sub-level types such as laundry, kitchen, and so on. To create sub classification types, see Adding a Sub-Classification Type in this section.
Creating a Classification Type
Begin creating your top-level material classification type with this procedure, and then see Adding a Sub-Classification Type to create its nested sub-classification types.
Step 1Choose SETTINGS from the navigation pane,
Step 2Find the Material Components section, and click Classification Types.
Step 3Click Add Classification Type.
Step 4Enter a Name* in the Add New Classification Type dialog box.
Step 5Click SAVE.
Adding a Sub-Classification Type
Use these procedures to create the material classification types that you want nested in a top-level material classification type.
Step 1Choose SETTINGS from the navigation pane.
Step 2Find the Material Components section, and click Classification Types.
Step 3Find the row of the type you want to add a sub-classification type to, and in that row click the Add Sub-Classification icon.
Step 4Enter a Name* for the sub-classification type.
Step 5Click SAVE.
Renaming a Classification Type
Step 1Choose SETTINGS from the navigation pane.
Step 2Find the Material Components section, and click Classification Types.
Step 3Find the row of the classification you want to rename, and click its Rename Classification icon.
Step 4Rename the classification.
Step 5CONFIRM the action.
Deleting a Classification Type
Step 1Choose SETTINGS in the navigation pane.
Step 2Find the Material Components section, and click Classification Types.
Step 3Find the row of the type you want to remove, and click the Delete Classification icon.
Step 4CONFIRM the action.
Creating & Modifying Custom Fields
Create unique fields to display additional information for a material.
Creating a Custom Field
Step 1Choose SETTINGS in the navigation pane.
Step 2Find the Material Components section, and click Custom Fields.
Step 3Click Add Custom Field.
Step 4In the Add Material Custom Field dialog box:
Note Fields accompanied by an asterisk (*) requires input.
(a)Select either Decimal or Text for the Type*.
(b)Provide a Title* for the custom field.
(c)(Optional) Create a ToolTip for the field. Users see this text when they hover their cursor over the custom field.
Step 5Click SAVE.
The custom field activates immediately.
Modifying a Custom Field
Step 1Choose SETTINGS in the navigation pane.
Step 2Find the Material Components section, and click Custom Fields.
Step 3Find the field TITLE you want to modify and in its row, click the Update Custom Field icon.
Note Fields accompanied by an asterisk (*) requires input.
Step 4In the Update Custom Field dialog box, choose to modify the Type*, Title*, and/or ToolTip.
Step 5Click SAVE.
Archiving a Custom Field
Step 1Choose SETTINGS in the navigation pane.
Step 2Find the Material Components section, and click Custom Fields.
Step 3Find the custom field TITLE you want to archive and in its row, click its Archive Custom Field icon.

Step 4CONFIRM the action.
Activating an Archived Custom Field
Step 1Choose SETTINGS in the navigation pane,
Step 2Find the Material Components section of the window, and click C Fields.
Step 3Find the custom field TITLE you want to reactivate and in its row, click its Activate Custom Field icon.

Step 4CONFIRM the action.
Enabling Material Hazard Classifications
Material Hazard Classes can identify materials that are hazardous under NYC Hazard, 209-U Hazard, or Fire Code regulations. These classes can also satisfy additional reporting requirements in some U.S. jurisdictions.
After performing the following procedure, you can apply hazard classifications to a material.
Step 1Choose SETTINGS in the navigation pane.
Step 2Find Material Components > Material Hazard Classes.
Step 3Click the toggle to the green setting to enable adding hazard classes to a material.
You can now apply hazard classifications to a material via CHEMICAL / SDS > Chemical / SDS Search > (Select a Material’s hyperlink) > Material Details > IDENTIFICATION > Scroll to Hazard Classes > +ADD HAZARD CLASS.
See Applying Hazard Classifications to a Material for step-by-step procedures.
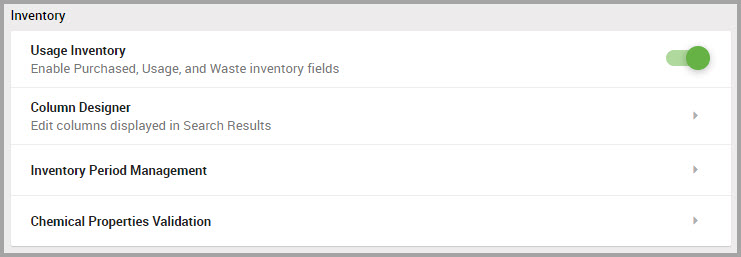
Configuring Inventory Settings
Before users can add inventory data for a facility, that facility must first be configured for inventory. After you configure the facility, you can begin adding inventory data, which is performed in the CHEMICAL / SDS> SEARCH > Chemical / SDS modules. See Configuring Inventory Settings for a Facility for more information.
Determining if a Facility is Configured for Inventory
Before you can add inventory data for a facility, its inventory reporting year and reporting cycle must be configured first. Use these steps to determine if a facility’s inventory configuration has been established.
Step 1Choose SETTINGS in the navigation pane.
Step 2Find the Inventory section, and click Inventory Period Management.
Step 3In the lower portion of the Inventory Configuration window, find the facility by either conducting a search in the Facility Name field, or scroll down the window (and through additional pages, if necessary) to locate the facility.
Step 4Review the following:
•If the facility is inventory configured, its CYCLE and period START/PERIOD END dates display.
•If the facility is not inventory configured, a link to configure its inventory displays. Continue to Step 5.
Step 5(Optional) Click the inventory configuration link to begin the facility’s configuration process. See Configuring Inventory Settings for a Facility, and begin with Step 3.
Managing the Display of Inventory Usage Inventory Fields
Inventory usage fields are enabled in the system by default. Perform the following steps to prompt the system to hide or show the following fields:
•Purchased Quantity
•Usage
•Waste Input
Step 1Choose SETTINGS in the navigation pane.
Step 2Find the Inventory section of the window.
Step 3Locate the Usage Inventory toggle.
Enabled (green) is the default setting.
Step 4(Optional) To hide inventory usage fields, click the toggle.
Customizing Inventory Search Results Column Display
You can control which columns display, and their order within the grid, in inventory search results windows by performing the following steps.
Step 1Choose SETTINGS in the navigation pane.
Step 2Find the Inventory section of the window, and click Column Designer.
Step 3(Optional) In the Edit Inventory Search Results Columns window, use the following two UI elements to narrow column choices for you to select from:
•Enter column names in the Search Column field if you are interested in a particular category of columns to display in inventory search results. Results auto-display in the AVAILABLE COLUMNS section as you type.
The example below shows the results after entering Site in the Search Columns field.
•Narrow column Types by choosing either Basic Info, Input Field, or Inventory Data from the drop-down menu.
Note We suggest that you choose no more than three columns, for a total of seven columns, for optimum display purposes, although results may vary depending on your screen size. Columns auto-collapse from left-to-right to accommodate your screen size.
Step 4Select the AVAILABLE COLUMNS that you are interested in by clicking their green buttons.
The column name moves to the SELECTED COLUMNS section.
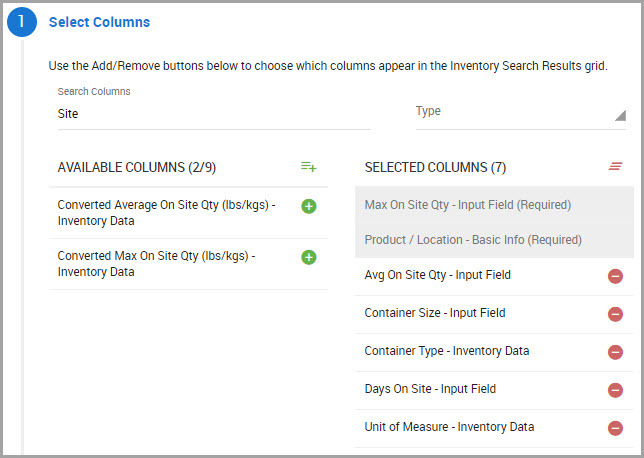
Step 5(Optional) Click the red buttons for any SELECTED COLUMNS that you do not want included in inventory search results windows.
Note Max On Site Qty-Input Field and Product / Location-Basic Info columns are required inventory search results fields and cannot be removed.
Step 6When you finish selecting columns, scroll down and click Define Column Order.
The Define Column Order section expands to display the columns you selected in the previous steps. The top-down column sequence shown here displays left-to-right in your inventory search results window.
Step 7(Optional) If you want to re-arrange column positions, choose one of two ways to move a column:
•Find the column name that you want to move and in its row, click the up or down arrows until the column displays in the order position that you want.
Or
•Click on the column name that you want to move, and then drag-and-drop it to the order position you prefer.
Step 8Scroll down the window and click Preview.
Step 9(Optional) In the Preview section, select the appropriate Preview Screen Size radio button for the device mode that you want to review the new column configuration in.
Step 10 (Optional) If you want to make revisions after previewing the column positions, click BACK to return to previous sections, and then proceed to Step 9 to preview the configuration again. Otherwise, continue to Step 11.
Note You may need to refresh the system to view the new column configuration.
Configuring Inventory Settings for a Facility
Step 1Choose SETTINGS in the navigation pane.
Step 2Find the Inventory section, and click Inventory Period Management.
Step 3Click Add Configuration.
Note Fields accompanied by an asterisk (*) requires input.
Step 4In the Add Inventory Configuration dialog box, choose:
(a)The Facility* to configure for inventory.
(b)The Reporting Year* to apply this configuration to. The reporting year can only be set for the current, previous, or subsequent year and begins 01/01 and ends on 12/31 of each year.
(c)The Inventory Cycle* (the frequency of inventory data capture) for this configuration. The inventory cycle always start on the 1st and end on the calculated end date depending on the cycle chosen.
Note The Inventory Cycle cannot be changed except during a reporting year rollover.
Step 5Click SUBMIT.
Next Steps
•Enable additional usage inventory fields such as Purchased Quantity, Usage, and Waste. We recommend that you enable these fields following the configuration of your facility for inventory. See Starting a New Inventory Cycle For a Facility for more information.
Starting a New Inventory Cycle For a Facility
Step 1Choose SETTINGS in the navigation pane.
Step 2Find the Inventory section, and click Inventory Period Management.
Step 3Click the facility’s check box.
Step 4Click START NEXT PERIOD.
Step 5Choose one of the following Rollover Options*:
•Rollover Inventory Without Quantities: Retains the records but without quantity information.
•Rollover Inventory with Quantities: Retains records and quantity details.
•Start Next Period without Rollover: Retains no records.
Step 6Click SUBMIT.
Rolling a Facility’s Inventory Records to a Previous Period
Note This procedure deletes all inventory records captured in the current period and reinstates the previous period for the selected facility.
Step 1Choose SETTINGS in the navigation pane.
Step 2Find the Inventory section, and click Inventory Period Management.
Step 3Click the FACILITY’s check box.
Step 4Click ROLLBACK TO PREVIOUS PERIOD.
Step 5Click CONFIRM.
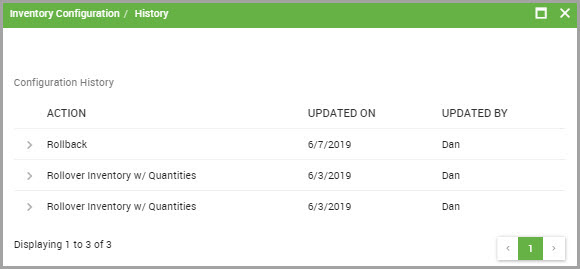
Viewing Inventory Configuration History for a Facility
You can review a facility’s inventory configuration history for:
•Rolling inventory forward
•Rolling inventory backward
Step 1Select SETTINGS in the navigation pane.
Step 2Find the Inventory section, and click Inventory Period Management.
Step 3In the lower portion of the Inventory Configuration window, find the facility whose inventory configuration you want to review and in its row, click the View History icon.
Step 4In the Inventory Configuration History page, any configuration events are listed beneath the ACTION column. Event dates and who performed the updates also display in this page.
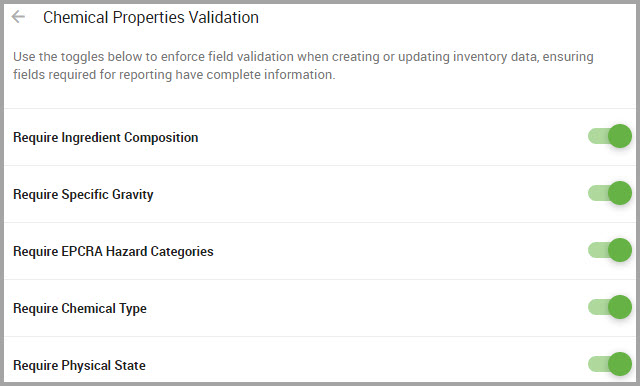
Enforcing Chemical Properties Validation
Enforce field validation when creating or updating inventory data to ensure required fields used in reports captures complete data.
Step 1Choose SETTINGS in the navigation pane.
Step 2Find the Inventory section, and click Chemical Properties Validation.
Toggles are automatically enabled by the system.
Configuring your Chemical Data Collections for Analysis
You can configure Decision Matrix Review Options and Data Quality Analytics Options to prompt reviews based on criteria you select.
Configuring Decision Matrix Review Options
Step 1Choose SETTINGS from the navigation pane.
Step 2Find the Collection Management section, and click Decision Matrix Options.
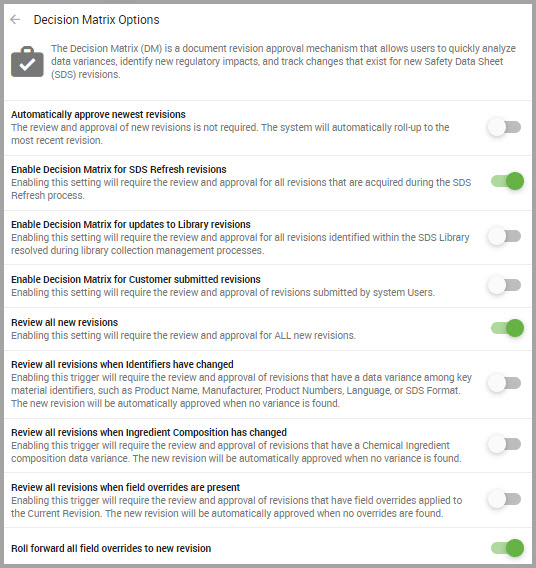
•Automatically approve newest revisions—When enabled, this feature allows the system to automatically approve and roll-out all revised SDSs submitted to the system.
•Enable Decision Matrix for SDS Refresh revisions—Click this toggle to require the review and approval for all SDS revisions acquired during an SDS refresh process.
•Enable Decision Matrix for updates to Library revisions—Click this toggle to require the review and approval for all revisions identified within the Library and resolved during Collection Management processing.
•Enable Decision Matrix for Customer submitted revisions—Click this toggle to require the review and approval for revisions submitted by system administrators.
•Review all new revisions—Enabling this toggle requires the review for all new SDS revisions submitted to the system.
Note Selecting one or more of the following triggers can minimize the amount of reviews required for revised SDSs submitted to the system.
•Review all revisions when identifiers have changed—Click this toggle to review all SDS revisions where key identifiers are modified. If none of the following identifiers changed between the current and new revision, the system auto-approves the revision candidate.
These identifiers include:
—Product Name
—Manufacturer
—Product Number
—Language
—SDS Format
•Review all revisions when ingredient Composition has changed—Click this toggle to require the review of SDS revisions where a chemical ingredient has changed between the current SDS and the new revision. If no chemical ingredient changed, the system auto-approves the revision.
•Review all revisions when field overrides are present—Click this toggle to require the review of SDS revisions where field overrides are present in the new revision. This toggle allows reviewers to copy the overrides to the new revision or accept the data within the new revision.
•Roll Forward all field overrides to new revision—Click this toggle to copy all field overrides into the new SDS revision. Unless this box is checked, no overrides roll forward to the new revisions.
Verifying Decision Matrix Reviewers
Note Decision Matrix Reviewer roles are created and assigned in the Administrative Roles section of the SETTINGS module.
See who is assigned a Decision Matrix review role by performing the following steps.
Step 1Choose SETTINGS in the navigation pane.
Step 2Find the Collection Management section, and click Decision Matrix Reviewers.
The dialog box opens and displays your sites and their facilities.
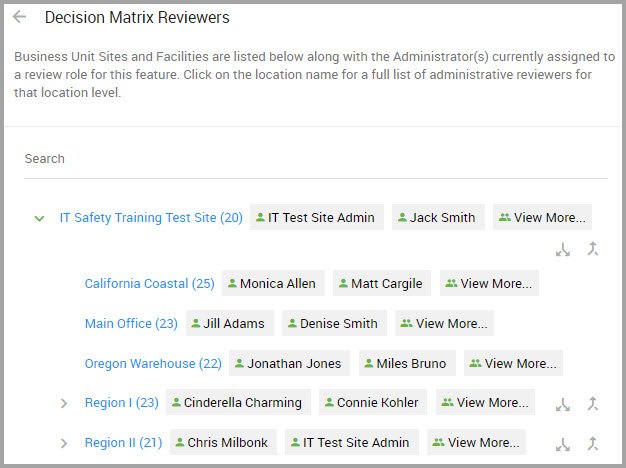
Step 3(Optional) Perform a Search to locate a site quickly by entering it’s name. Results auto-display as you type.
Other elements include:
•If more than two reviewers are assigned, a View More button is provided to see the complete list of Decision Matrix reviewer for that site.
•If a site’s facilities aren’t displaying, click the Expand icon in the site’s row to reveal any additional facilities.
•To display only the Site name and hide any of its facilities, click the Collapse icon in the site’s row.

Configuring Data Quality Analytics Options
Step 1Choose SETTINGS in the navigation pane.
Step 2Find the Collection Management section, and click Data Quality Analytics Options.
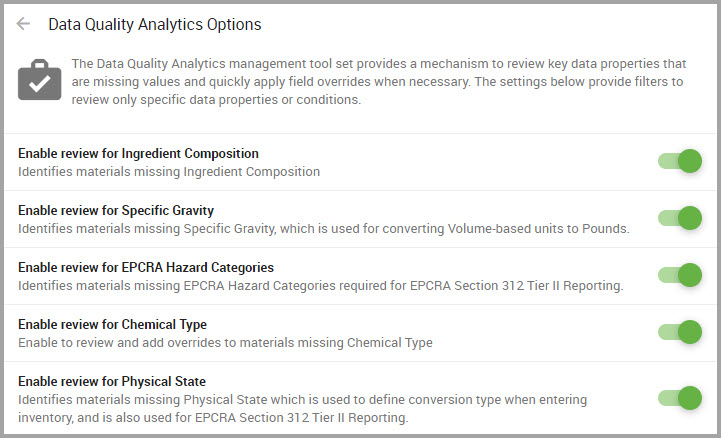
The following list describes the Data Quality Analytics Options:
•Enable review for Ingredient Composition—Choose this toggle to identify SDSs missing Ingredient Composition information.
•Enable review for Specific Gravity—Choose this toggle to identify SDSs missing Specific Gravity information.
Note The Specific Gravity field is required in an inventory record if Liquid Volume to Pounds is selected as a Conversion Type.
•Enable review for EPCRA Hazard Categories—Choose this toggle to identify SDSs missing EPCRA Hazard Categories information. This information is required for EPCRA Section 312 Tier II reporting.
•Enable review for Chemical Type—Choose this toggle to identify SDSs missing Chemical Type information.
•Enable review for Physical State—Choose this toggle to identify SDS missing Physical State, which is used to define conversion type when entering inventory. This information is also used for EPCRA Section 312 Tier II reporting.
Verifying Your Data Quality Analytics Reviewers
Note Data Quality Reviewers roles are created and assigned in the Administrative Roles section of the SETTINGS module.
See who is assigned a Data Quality Analytics review role by performing the following steps.
Step 1Choose SETTINGS in the navigation pane.
Step 2Find the Collection Management section, and click Data Quality Analytics Reviewers.
The dialog box opens and displays your sites. their facilities and their assigned reviewers.

Step 3(Optional) Perform a Search to locate a site quicker by entering it’s name. Results auto-display as you type.
Other elements include:
•If more than two reviewers are assigned, a View More button is provided to see the complete list of Decision Matrix reviewer for that site.
•If a site’s facilities aren’t displaying, click the Expand icon in the site’s row to reveal any additional facilities.
•To display only the Site name and hide any of its facilities, click the Collapse icon in the site’s row.

Setting SDS Refresh Multi-Composition Options
SDS Refresh is a service HSI provides on behalf of our customers to source new SDS revisions. Some revisions may include separate SDSs reflecting chemical variations of the material.
Use this tool to change the default setting from Manual, where you must review and choose which SDS components that you want to Auto, in which the system automatically includes all SDS variations to your library.
Step 1Choose SETTINGS from the navigation pane.
Step 2Find Collection Management.
Step 3Click on Chemical SDS/Merge Options.
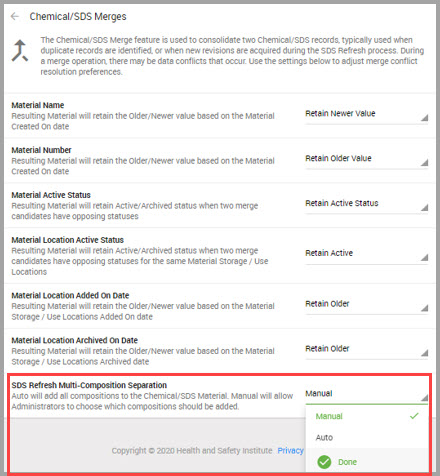
Step 4In the SDS Refresh Multi-Composition Separation field, select:
•Auto for the system to accept all documented variations of a product’s SDS, or
•Maintain the Manual setting, in which you must manually choose the SDS variations the refresh discovers within 90 days.
See SDS Refresh Analytics Overview for additional information about the SDS Refresh service we provide.
Searching For and Viewing Regulations
This feature enables you to:
•Search for chemical regulations available to your organization
•View the substances that comprise a regulation and which require reporting
Using the Manage Regulations Window
Step 1Choose SETTINGS from the navigation pane.
Step 2Find the Regulations section, and click Regulation Management.
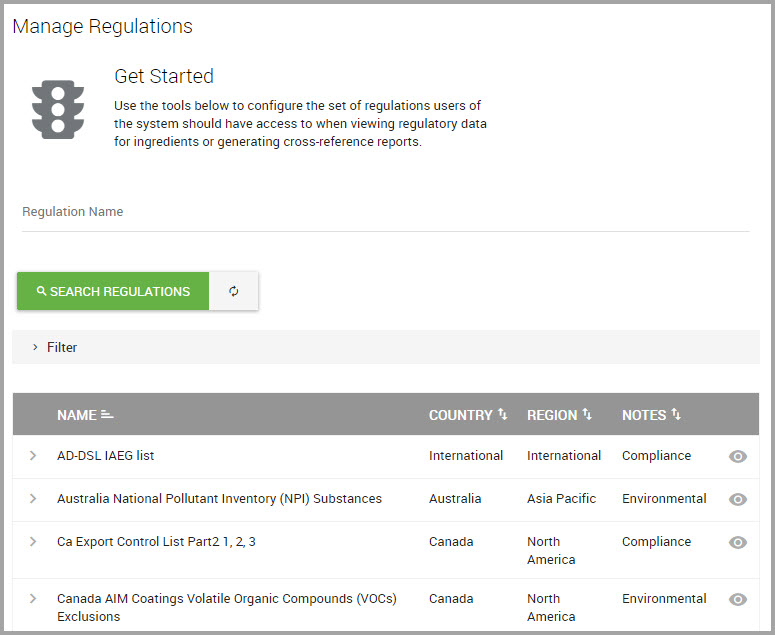
You can perform the following actions in this window:
Search for a particular Regulation Name.
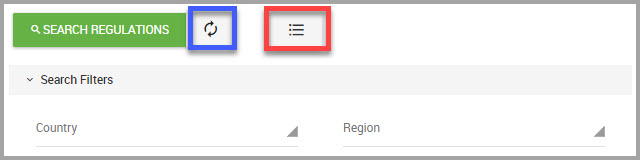
•Filter regulations by Country or Region to reduce the number of regulations that display in the window. Access these filters by clicking the Search Filters icon, shown bordered in red in the following image, and then making selections from the drop-down menus.
•Clear Search Filters or search results by clicking the Reset Search button, shown bordered in blue in the following image.
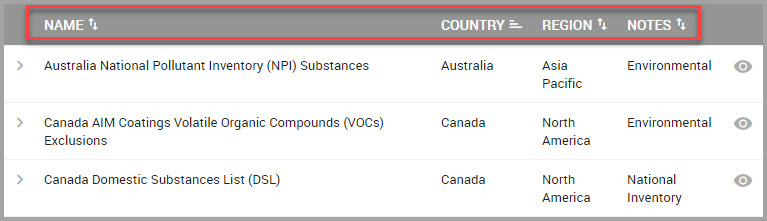
•Sort information shown beneath each column by clicking directly on the column titles to group like items together in the window.
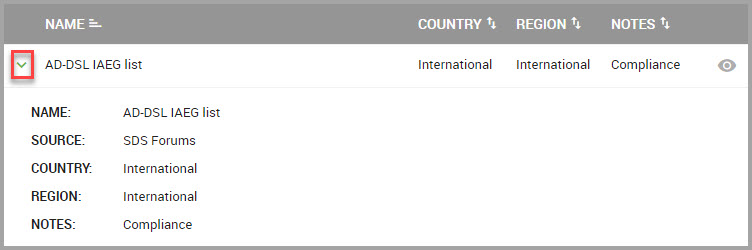
•Learn additional regulation details by clicking the caret adjacent to each regulation NAME.
Performing a Search in the Manage Regulations Window
Step 1Perform the first three steps in Using the Manage Regulations Window.
Step 2Begin your search by entering full or partial names in the Regulation Name field. If you want to filter results further, continue to Step 3. If not, continue to Step 4.
Step 3(Optional) Choose to Filter regulations by:
(a)Clicking the Search Filters icon.
(b)Making selections from the Country or Region drop-down menus. Results display as you make your selections.
Note If you need to clear your filter selections and/or search results, click the Reset Search button.
Step 4Click SEARCH REGULATIONS.
Viewing a Regulation's Substance List
After navigating to the Manage Regulations window, you can view a regulation’s list of substances by performing the following steps.
Step 1Perform Steps 1 through 2 in Performing a Search in the Manage Regulations Window.
Step 2After finding the regulation, in its row click the  icon to display its list of substances.
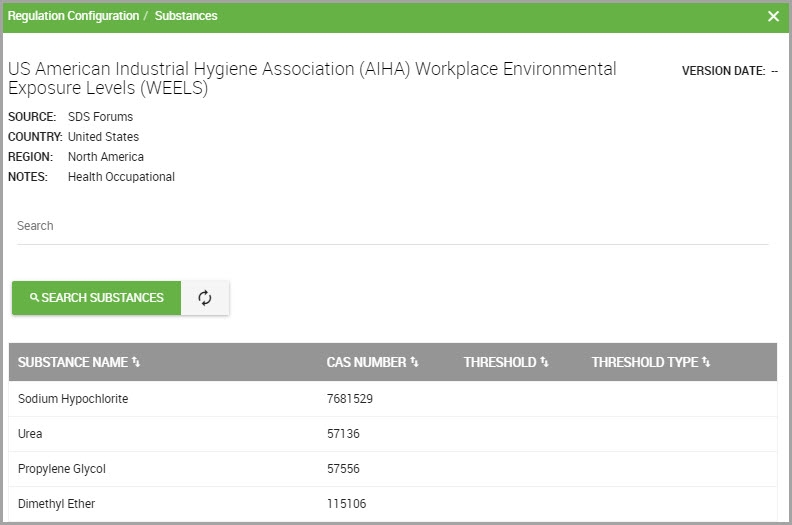
This window’s column information includes:
•SUBSTANCE NAME displays each substance that is included in the regulation.
•CAS NUMBER displays the Chemical Abstracts Service (CAS) identifier assigned to that substance.
•THRESHOLD values displays the minimum total quantity that determines if this material is reportable for the regulation.
•THRESHOLD TYPE displays acronyms related to the regulation. Common acronyms include:
|
Threshold Acronym |
Threshold Name |
|
RQ |
Reportable Quantity |
|
TPQ |
Threshold Planning Quantity |
|
RT |
Reporting Threshold |
Step 3(Optional) In the Regulation Configuration page, you can SEARCH SUBSTANCES by entering full or partial identifiers for any of the following categories:
—Substance Name
—CAS number
—Threshold
—Threshold Type
Note Click the Reset Search button if you need to perform a different search and to clear results.
Click SEARCH SUBSTANCES.
Creating and Managing Administrator Roles
Topics include:
Using the Administrator Role Permission Feature
Using the Administrator Roles Window
Creating and Managing Administrator Roles
Searching for an Administrator Role
Adding Features to an Administrator Role
Deleting Features From an Administrator Role
Reviewing Configuration History for an Administrative Role
Editing an Administrator Role’s Name or Status
Deactivating an Administrator Role
Activating an Administrator Role
About Administrator Roles
Designate and manage your administrator's access to particular system modules by assigning your admin to specific administrator roles. You can limit or provide as much module access to an administrator as you wish. Roles with varying degrees of security settings, also known as permissions, are provided for the Administrator and Sites roles. See Using the Administrator Role Permission Feature for additional information about these enhanced settings.
Caution Ensure that at least one admin is positioned at the top of your hierarchy and is not assigned an admin role to assure their access to all system modules.
After creating the role, your next step is to add modules to that role and then complete the process by assigning the role to an administrator.
Note To assign administrator role, see either Creating an Administrator or Editing Administrator Details and look for the Admin Role field description.
When an administrator is assigned a role, they only have access to the module or modules which comprise that role. If an administrator is not assigned a role, they have access to any modules within the system.
Using the Administrator Role Permission Feature
We provide additional permission categories that you can grant administrators when you assign them administrator roles.
Access this feature by:
Step 1Select SETTINGS in the navigation pane.
Step 2At the top of the Settings window, perform a Search for Administrator Roles.
Step 3Click Role Management.
Step 4In the Administrator Roles window and in the row for a role name, click the Feature List icon.
Step 5Click +ADD FEATURES.
The Add Features page opens, where you can see that the Administrators and Sites-related administrator roles offer drop-down menus where you can select the appropriate permission access for an administrator.
Administrator Management Permission Options:
Provides administrators access to view/edit system administrator user accounts, and includes the following permission features:
•Read—Administrators can view details for administrators under their site assignment but cannot edit any details, with the exception of their own profile contact details. These details include their login name, user name, password, phone number, and addressing fields.
•Update—Administrators can view and edit details for administrators under their site assignment. These details include login name, user name, password reset, phone number, and addressing fields.
•Write—Administrators can view and edit all details for administrators under their site assignment. These details includes creating new administrators, resetting passwords, configuring site assignments, workflow roles, and active statuses.
Site Management Permission Options:
Provides administrators access to view/edit site and location hierarchy, and includes the following permission features:
•Read —Administrators can view site details, but cannot edit any site sections.
•Update—Administrators can view details, edit site contact information, and add or archive chemical management sub-locations.
•Write—Administrators have full access for viewing and editing all site details, add new sites, and enabling/disabling Chemical Management facilities.
Using the Administrator Roles Window
Step 1Choose SETTINGS from the navigation pane.
Step 2Find the Administrator Roles section, and click Role Management.
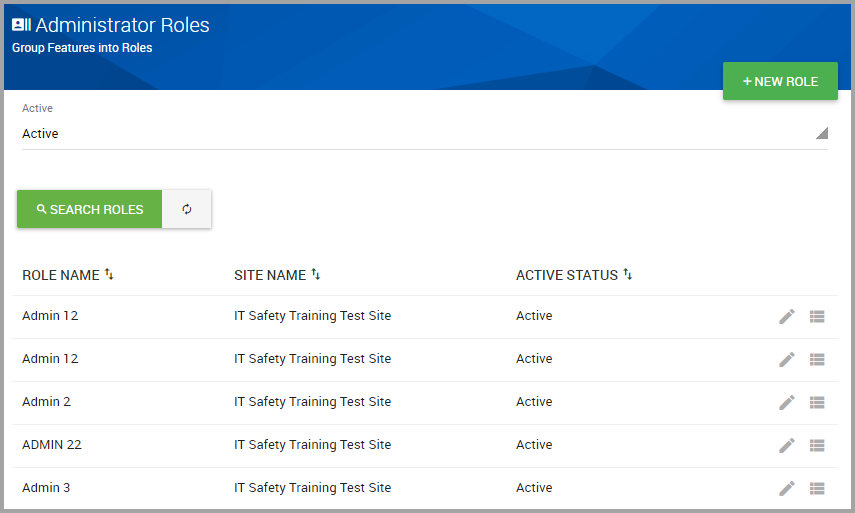
The window displays currently defined roles, and includes the following icons:
|
|
Click to invoke the Edit Role dialog box where you can revise the role name or its status. |
|
|
Click to invoke the Feature List window where you can include or remove role modules. |


Creating an Administrator Role
Step 1Choose SETTINGS in the navigation pane.
Step 2Find the Administrator Roles section of the window, and click Role Management.
Step 3Click +NEW ROLE.
You must provide input for all fields accompanied with an asterisk (*) in the Add New Role dialog box.
Step 4Enter a Role Name*. This name must be unique to the system.
Step 5Select the role’s Status.
Step 6Click SAVE ROLE.
Searching for an Administrator Role
Step 1Choose SETTINGS in the navigation pane.
Step 2Find the Administrator Roles section of the window, and click Role Management.
Step 3(Optional) In the Administrator Roles window, select Status and select an option from its drop-down menu.
Step 4Click SEARCH ROLES.
Adding Features to an Administrator Role
If you want to set additional security access options for an administrator, review Using the Administrator Role Permission Feature before continuing.
Step 1Choose SETTINGS in the navigation pane.
Step 2Find the Administrator Roles section, and click Role Management.
Step 3Find the Role Name that you want to add modules to. See Searching for an Administrator Role.
Step 4In the role’s row, click the Feature List icon.
Step 5In the Manage Role Features window, Click +ADD FEATURES.
Step 6In the Add Features page, select the toggle for each module you want to include with this Admin Role.
Step 7(Optional) To set permission access for Administrator and/or Site modules:
(a)Click either (or both) the Administrator and Sites toggle(s).
(b)Find the ACCESS LEVEL column, and select the appropriate permission option from the drop-down menu.
(c)Continue to Step 8.
Step 8When you are done, click SAVE FEATURES.
Step 9Click CLOSE.
Deleting Features From an Administrator Role
Step 1Choose SETTINGS in the navigation pane.
Step 2Find the Administrator Roles section, and click Role Management.
Step 3Find the Role Name that you want to add modules to, and in its row click the Add / Remove Features icon.
Step 4In the Add / Remove Features window, find the module you want to remove from the role and click the trash icon.
Reviewing Configuration History for an Administrative Role
You can review created by or update history for an administrative role by performing the following steps.
Step 1Choose SETTINGS in the navigation pane.
Step 2Find the Administrative Roles section, and click Role Management.
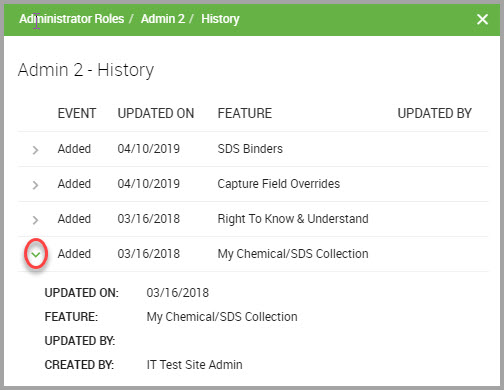
Step 3Find the role in the lower portion of the window, and in that role’s row, click its View History icon.
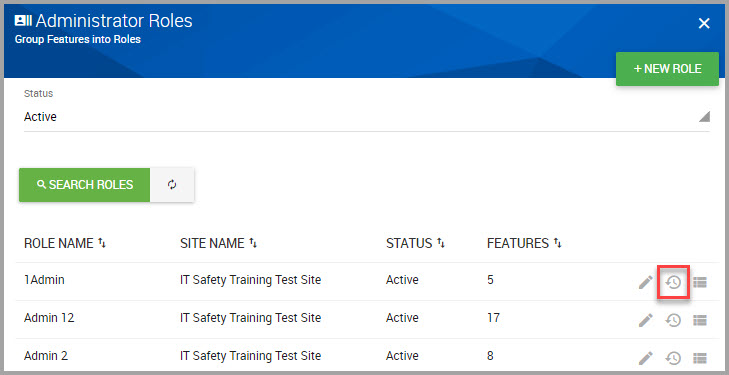
The role’s history page displays, where you can view a role’s EVENT history, and when the action took place.
•To view additional details, click an event’s caret.
Editing an Administrator Role’s Name or Status
Step 1Choose SETTINGS in the navigation pane.
Step 2Find the Administrator Roles section, and click Role Management.
Step 3In the Administrator Roles page, locate the ROLE NAME and in its row click the Edit icon.
Step 4Revise the Role Name* or Status*.
Step 5Click SAVE ROLE when you are finished.
Note To change the status of an administrator role, see either Deactivating an Administrator Role or Activating an Administrator Role.
Deactivating an Administrator Role
Step 1Choose SETTINGS in the navigation pane.
Step 2Find the Administrator Roles section, and click Role Management.
Step 3Find the Role Name that you want to deactivate. See Searching for an Administrator Role.
Step 4In the role’s row, click its Edit icon.
Step 5In the Edit Role dialog, select Status* > Inactive.
Step 6Click SAVE ROLE.
Activating an Administrator Role
Step 1Choose SETTINGS in the navigation pane.
Step 2Find the Administrator Roles section, and click Role Management.
Step 3Find the Role Name that you want to deactivate. See Searching for an Administrator Role.
Step 4In the role’s row, click its Edit icon.
Step 5In the Edit Role dialog, select Status* > Active.
Customizing your System
Topics in this section include:
Customizing your Dashboard with a Logo
Choosing Your Preferred Temperature Unit of Measurement
Choosing Your Preferred Weight Unit of Measurement
Viewing your Sites Assigned Languages
Customizing your Dashboard with a Logo
Topics include:
Uploading your Company Logo
Note Place your logo’s image file in a convenient place on your device for seamless uploading.
You can use the following image file formats for your logo:
•.gif
•.jpeg
•.jpg
•.png
•.svg
Step 1Choose SETTINGS from the navigation pane.
Step 2Find the Customization section, and click Company Logo.
Step 3In the Company Logo window, decide to either
•drag the image file inside the text box, or
(a)Click Select a File.
(b)Browse your system for the image.
(c)Click on the File Name.
(d)Click Open.
The image displays within the text box.
Step 4Click UPLOAD.
Deleting your Company Logo
Step 1Choose SETTINGS in the navigation pane
Step 2Find the Customization section, and click Company Logo.
Step 3In the Company Logo widow, click Delete Logo.
Step 4CONFIRM the action.
Choosing Your Preferred Temperature Unit of Measurement
This procedure sets the temperature Unit of Measurement globally throughout the system. Your individual preferences, managed via the Dashboard > Profile menu, overrides this global setting. See Using the Profile Menu, and look for the Preferences section.
Step 1Choose SETTINGS from the navigation pane.
Step 2Find the Customization section.
Step 3Select your preferred unit of measurement in the Temperature Unit of Measurement drop-down menu.
Choosing Your Preferred Weight Unit of Measurement
This procedure sets the weight Unit of Measurement globally throughout the system. Your individual preferences, managed via the Dashboard > Profile menu, overrides this global setting. See Using the Profile Menu, and look for the Preferences section.
Step 1Choose SETTINGS from the navigation pane.
Step 2Find the Customization section.
Step 3Select your preferred weight unit of measurement in the Weight Unit of Measurement drop-down menu.
Language Preferences Overview
You can set language preferences to translate the user interface (UI) to the languages you choose using the processes described below.
Language preferences are set at the following levels:
•Global level—Define the entire organization’s language settings using this method. Language set at the global level cascade to all sub-locations and facilities. See Defining Language Preferences at the Global Level.
•Site level—Refine languages available for sites further using this method. See Defining a Site’s Language Preferences.
Note Languages chosen at the site level are also inherited by that site’s members, RTK access links, and administrator details.
•User level—Set your language preference using this method. See Defining Language Preference at the User Level.
Note Languages set at the global level do not override language preferences set at the user level.
Topics include:
Defining Language Preferences at the Global Level
Defining a Site’s Language Preferences
Defining Language Preference at the User Level
Defining User’s Language Preference on the Login Page
Defining User’s Language from the Preferences Menu
Defining Language Preferences at the Global Level
Set language preferences at the global level to cascade throughout your organization. To further refine languages for individual sites or sub-sites, see Defining a Site’s Language Preferences.
To configure languages available throughout your organization, perform the following steps:
Step 1Choose SETTINGS in the navigation pane.
Step 2Find the Customization section of the window, and click Languages.
In the Languages section of the window, two columns display:
•The left column displays languages that are not selected for your organization.
•The right column displays your organization’s selected languages.
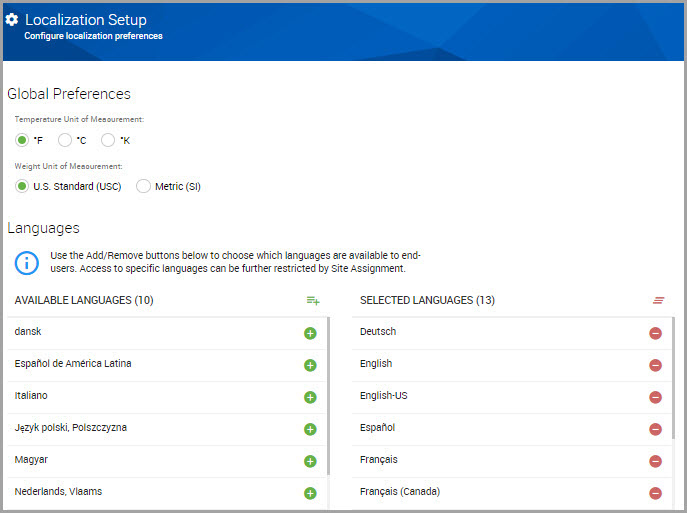
Step 3(Optional) To select a language, click its green button to move the language to the SELECTED LANGUAGES column.
Step 4(Optional) To remove a language, click its red button to move the language to the AVAILABLE LANGUAGES column.
Selections auto-save.
To configure language preferences for a site, see, Defining a Site’s Language Preferences.
Defining a Site’s Language Preferences
Step 1Select SETTINGS from the navigation pane.
Step 2Find the Sites section of the window, and click Site Management.
Step 3Perform a site search or find the site name in the lower-portion of the window. See Searching for a Site.
Step 4Click on the hyperlinked site name.
Step 5Beneath the Basic Information section, select a Language from the drop-down menu.
Step 6CONFIRM the language after reading the pop-up message. This message does not display if you select additional languages for this site.
Step 7(Optional) Select additional languages, as desired.
Step 8When you finish, scroll down the window and click SAVE SITE.
Defining Language Preference at the User Level
You can configure your language preference via two paths:
•From the login page. See Defining User’s Language Preference on the Login Page.
•From the Dashboard. See Defining User’s Language from the Preferences Menu.
Defining User’s Language Preference on the Login Page
Step 1On your login page, click the Set Language link.
Step 2In the Choose Language dialog box, select a Language* from the drop-down menu.
Step 3(Optional) Click Remember my settings to save this language for your subsequent logins.
Step 4Click CHOOSE LANGUAGE to switch the UI’s text to your selected language.
The system refreshes and displays your chosen language in the login page.
Defining User’s Language from the Preferences Menu
Step 1From your Dashboard, click the user icon, shown circled in red in the image below.
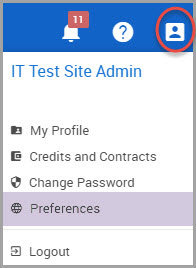
Step 2Select Preferences.
Step 3Select a Language* from its drop-down menu.
Step 4Click SAVE to immediately translate the UI to your chosen language.
Viewing your Sites Assigned Languages
Step 1Choose SETTINGS in the navigation pane.
Step 2Find the Customization section, and select Site Localization Summary.
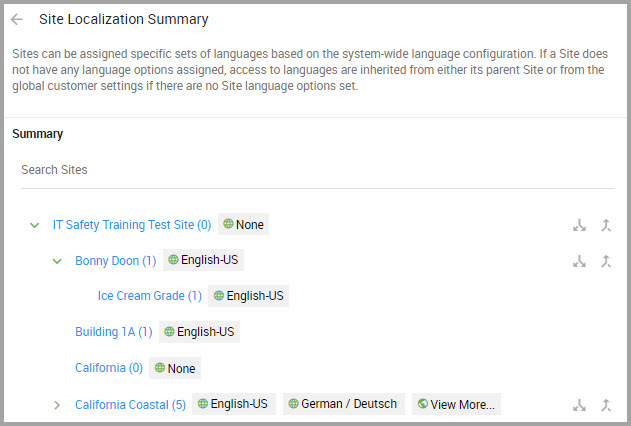
•Click the caret next to site names to display additional facilities within that site.
•Click the Expand and Collapse icons to display or hide a site’s sub-sites and facilities.
•If a site has more than two language preferences, a See More button displays. Click this button to view your site’s entire language preferences.